
User's Manual


Radio Installation
Thank you for your purchase of this Custom Autosound product!
Owner- Installer: Please review installation instructions and owners manual.
Keep in mind that your radio and/or speakers are custom equipment designed specifi-
cally for your year vehicle. It should be handled carefully and installed preferably by an
auto radio specialist. We suggest that you 'BENCH TEST" the unit before
installation, as
we do, prior to shipment.This is to insure that the equipment functions properly before
the time is spent for installation. This way, if a careless installation occurs and the unit
gets "fried" or some other possible damage, the installer is responsible. Shipping dam-
age does occasionally occur. If you should suspect shipping damage, please contact
the delivery company at once.
Please
read the owners manual thoroughly before using your radio.
It is recommended that you disconnect the negative lead from the battery before
installing any electronic equipment in your vehicle. Reconnect when wiring is complete.
First, you will need to remove the original knobs and shaft nuts from your original radio
if present. Unplug the main wire harness and speaker leads from the back of the origi-
n
al radio. Disconnect antenna lead and remove mounting strap from the back of the
radio. The radio is now ready to be removed from the dash. Check the original radio for
signs of water or oil damage from leaks. If leaks are present, do not install the new
radio. Water, oil or any other liquid damage is not covered under the new radio warran-
ty.
REAR MOUNTING STRAP OMISSION VOIDS WARRANTY!
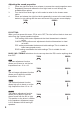
Attach the rea
r mounting strap to rear of radio. Install the radio from behind the dash.
Now attach the mounting strap to the dash or firewall using an existing bolt or screw.
Now attach shaft nuts to secure the radio in the dash (DO NOT OVER TORQUE THE
SHAFT NUTS - SLIGHTLY MORE THAN HAND TIGHT IS SUFFICIENT). Once the
radio is centered and secured, you can install the knobs.
Please refer to wiring instructions on
page 4&5.
Plug in antenna lead On speaker hook up make sure the positive lead goes to the posi-
tive terminal and the negative lead to the negative terminal of the speakers. A minimum
of two speakers is required for this stereo radio. DO NOT CONNECT ANY TWO
SPEAKER LEADS TO EACH OTHER OR TO VEHICLE GROUND. Radio damage will
occur. If less than four speakers are used, tape off remaining speaker leads to
prevent
a short.
Connect the red power wire to a switched 12volt source. Connect the yellow memory
wire to a constant 12volt source. Wire the black ground wire to a clean, solid chassis
point or original ground wire from the factory radio.
Good Listening! Audio quality is only as good as speaker quality!
3