
Installation Guide

Fusion Pro
®
Single Component
®
Grout
Installation Guide
1
Moisten Tile
Moisten tile with a LIGHTLY DAMP
microfiber towel. Do not allow water to
puddle on tile surface or joints.
Apply Grout Release or Pre-Seal Tile
CUSTOM recommends using Grout Release or pre-sealing the tile. This will significantly ease clean-up and help eliminate grout haze.
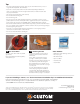
2
Spread and Strike Grout
WORK AREA = 1-4 minutes
*
Within the work area, fill and pack joints
at a 45º angle moving diagonally across
tile, then strike clean at a 90º angle to
remove excess grout.
*Working time is based on experience,
tile, and grout joint type.
3
Immediately
Dampen Surface
IMMEDIATELY moisten applied grout with
a lightly damp grout sponge. Do not
allow water to puddle on tile surface or
joints. If grout dries on surface, lightly
moisten, wait 2-4 minutes and gently
clean surface using sponge or white
nylon scrubber.
4
Loosen Grout Adhered to Tile
To smooth and even out joints and
remove grout residue, use a lightly
damp grout sponge flat against the
tile. Moving in a circular motion, loosen
grout that is still adhered to tile surface.
Use wet residue on sponge to loosen
grout on tile. Do not over scrub but keep
the grout joints full.
5
Shape Joints and Wipe Grout
Using a clean lightly damp sponge,
flat against the tile, wipe diagonally,
gathering up the residue and leaving
smooth consistent grout joints. Flip
sponge and repeat. Rinse, wring and
repeat. Change water frequently.
6
Final Clean Up
DO NOT let remaining film dry on tile
surface. Using two hands, IMMEDIATELY
drag a flat moderately damp microfiber
towel diagonally across the surface
to clean remaining residue. Always
use clean water. Flip towel and repeat
across work area. Rinse towel frequently.
WEAR IMPERVIOUS GLOVES, SUCH AS NITRILE, AND EYE PROTECTION.