
Installation Guide


SHOWER WALLS LAYOUT & APPLICATION
www.thesimplemat.com
Shower Walls
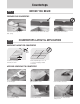
BEFORE YOU BEGIN
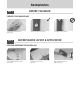
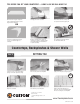
A single sheet of SimpleMat must run Lay SimpleMat horizontally on shower Overlap SimpleMat edges 1/8” to 1/4”
across a corner with at least 1" (25 mm) walls starting from the bottom of your (3 - 6 mm). Overlapping is shaded
of excess material on each wall. shower wall up. in illustration.
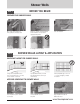
APPLYING SIMPLEMAT TO SHOWER WALLS
Place SimpleMat in position and mark Cut SimpleMat with scissors or Apply SimpleMat then flatten air
cuts if needed. utility knife. bubbles and creases.
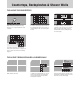
SIMPLEMAT LAYOUT FOR SHOWER WALLS
CUT AS
NEEDED
Step 2
PREPARE YOUR SHOWER WALLS
Nail or staple 16 lb roofing felt or Install 1/2” (13 mm) cement backerboard Clean dust and debris.
4 mil polyethylene sheeting to studs. for wall installation. Cut open areas to
support plumbing fixtures.
Step 1
Ensure a flat counter or wall surface. Do not apply to uneven surfaces.
3