
Installation Instructions
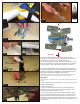
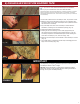
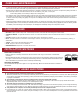

1. Apply a liberal amount of miter bond glue to the edge of each piece.
2. Install supplied biscuits.
3. Slide pieces together.
4. Snug (not tighten) miter bolts with wrench. The mitered pieces
should not move easily, yet able to be moved for alignment with a
sharp blow. Wipe excess glue (Fig. 10 & 11).
5. Locate the high side of each miter from the laminate side. Pound
down the high side with hammer and wood (Fig. 12). After adjusting,
tighten the closest miter bolt. Repeat process for the length of the
seam. Before moving countertop, the adhesive in the joint must dry for
a minimum of 60 minutes. After the joint is dry further adjustments will
not be possible.
(NOTE: Miter bolts, 7/16" open faced wrench, miter biscuits {included with tops}, and glue
required)
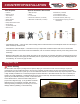
MITER BOLTS
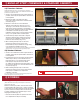
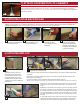
5. Flip the countertop right side up & visually inspect the seam.
Massage the two back-splashes into nal alignment by exing them
slightly back & forth until the seam is fully ush (Fig. 9f).
6. Snug all of the fasteners, but be careful not to over-tighten as over-
tightening the fasteners can result in joint separation on the laminate
(face) side. Next, set the height with the adjusting screw (Fig. 9e).
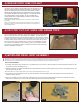
The glue should squeeze out of the miter joint (Fig. 9g). Snug all of
the fasteners, but be careful not to over-tighten as over-tightening the
fasteners can result in joint separation on the laminated (face) side.
Next, set the height with the adjusting screw (Fig. 9g).
(NOTE: Weights may also be necessary to force the miter tight at the surface Fig. 9e
Notice the glue squeezing out on the seam. Allow glue to dry for 60 minutes.)
4
Fig. 9f
Fig. 9g
Fig. 10
Fig. 11
Fig. 12
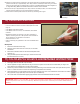
Triangle Pattern
1/8"
Miter Edge
1/4"
1/2"
1/4"
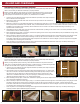
Fig. 9e
Fig. 9c
Fig. 9d