
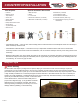
Installation Instructions


Before Starting
Tools Required Optional Installation Kit Includes
Helpful Tips
• Color-Matched Caulk — Used as color match nishing caulk to seal area where loose backsplash meets the countertop or
where countertop meets the wall.
• Color-Matched Laminate Repair — Decorative cover-up to help blend and hide the miter seam area on the laminate
countertop and also can be used to hide minor blemishes, such as scratches and chips that may occur during the life of the
countertop.
• Waterproof Wood Glue only used to attach the miters of the countertop. It's extremely important if purchasing glue off store
shelf that it's waterproof wood glue (Sku 485-4284) and not regular wood glue (any other glue used in attaching miters will
void warranty). Do not use any type of caulk.
We have taken extra steps to package the end splash, helping to ensure that it arrives free from damage. Inspect the
countertop as soon as possible and prior to any tear out of existing countertop at the job site. This inspection should take
place within twenty-four hours of pick up. Do not store materials outside or in locations where they may be exposed to water
or high humidity. Installation of a countertop thought to be either defective or have dimensional error does not extend your
warranty to include installation or reimbursement and may void your warranty. The limited warranty covers replacement or
repair only. See laminate warranty on back of instruction sheet.
• Hammer
• Marking utensil
• Tape measure
• Screw Gun
• Safety Glasses
• Belt Sander
• Phillips-Head Screw Driver
• Square Drive
• Jig Saw Utility Knife
• Wrench 7/16"
1. Build-up Strips
2. Shims
3. 1-1/4" Screws
4. Dual Action Fasteners (if needed)
5. Miter Bolts and Biscuits (if needed)
6. Miter Bond (if needed)
7. Color-Matched Caulk
8. Color-Matched Seam Fill
9. 5mm Allen Wrench (DAF only)
10. Moisture Barrier Tape (If you have a
dishwasher)
1) 2) 3) 4) 5) 6) 7) 8) 9) 10)
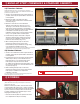
Check all dimensions, and test-t miter & eld joints for
proper t and alignment (Fig. 1). Any problems should be
addressed now to avoid larger ones later. Take care in
removing existing countertops (if necessary) so as not to
damage cabinets, plumbing, or electrical wiring.
R
COUNTERTOP INSTALLATION
12/18/18
1