
Installation Instructions


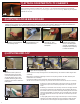


(NOTE: Belt sander and marking utensil required for both action
fasteners and miter bolts)
With the countertop in position, trace contour of wall
onto backsplash with marker (Fig. 7). Move countertop
to work area and use belt sander to remove the material
up to the marked line. Always make sure the sander
is cutting (rotating) into the laminate edge to avoid
chipping the laminate (Fig. 7a).
• Place the countertop back into position and check
for t. Repeat above steps if necessary.
Scribing Countertops to Contour of Wall
1. Check to see if cabinets are level. Adjust cabinets if
possible, shims may be required later if cabinets can
not be adjusted.
2. Pre-drill holes in the front and back of build-up strips.
Attach strips to the top of the cabinets face and
back frame using 1-1/4" drywall screws. Place
build-up strips every two feet of the cabinet
run. Make sure to place the rst and last strip 2" from
the end of the cabinet run to offset the build-down for
any end caps (Fig. 6).
3. When installing build-up strips on sink base,
measure the opening for the sink to verify that the
build-up strip is installed not to impede the
installation of the sink.
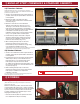
1B) Standard Cabinets
1A) Frameless Cabinets
1. Check to see if cabinets are level. Adjust cabinets if
possible, shims may be required later if cabinets can
not be adjusted.
2. Measure the width of the build down stick
next to the endcap located on the underside of the
countertop (Fig. 2).
3. Measure in from the end of the cabinet the
distance of the build down stick plus 1/4" and
mark (Fig. 3). Pre-drill the front and back of the
build-up strip where it will fasten to the cabinets.
Then pre-drill an additional 3 holes of equal distance
in the middle of the build-up strip for screw
installation into the bottom of the countertop. Install
using 1-1/4" drywall screws at marked spots.
4. Install a build-up strip on either side of the joint
where two cabinets meet, making sure to leave
enough room for installation of screws from the
bottom into the countertop (Fig. 4 & 5).
5. When installing build-up strips on sink base,
measure the opening for the sink to verify
that the build up strip is installed far enough away
not to impede the installation of the sink.
Follow 1A for Frameless Cabinets / Overhangs, 1B for Standard Cabinets / Overhangs
Additional build-up strips and 1-1/4" screws may be required for
installation on a frameless cabinet system. Additional materials can be
purchased at any Menards
®
store.
Additional build-up strips may be required for installation on a frameless
cabinet system. 1x4's can be used as longer build-up strips.
2) SCRIBING
1) BUILD-UP STRIP / FRAMELESS & STANDARD CABINETS
Fig. 6
Fig. 7aFig. 7
Any cabinet depth over 24" will need a custom build-up strips to be
made. Add support for any overhang over 10".
Fig. 4 Fig. 5
Fig. 2
All overhangs require build-up strips the full depth of the countertop for support.
All overhangs require build-up strips the full depth of the countertop for support.
Any overhangs longer than 15" require support to the oor.
Any overhangs longer than 15" require support to the oor.
Fig. 3
NOTE: Island and Overhang instructions on page 8