Version 1.
Contents 1 Device Overview & Installation ………… 02 1.1 Device Appearance 1.2 Components 1.3 Cable Connection 1.4 Device Installation 1.5 Dimensions 2 Device Initialization ……………………… 08 2.1 Set Up the Device 2.2 Register the Initial Administrator 2.3 Quick Registration 3 User Registration …………………………… 12 3.1 User Authentication Methods 3.2 Card Only User Registration 3.3 Face Only / Face and User ID User Registration 3.4 Face or Card / Face and Card User Registration 4 User Management ……………………… 17 4.
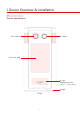
1 Device Overview & Installation 1.
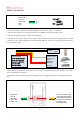
1.1 Device Appearance ▶ Power Connector 1.Power(12V~24V) 2.GND 3.TBD 4.
1.
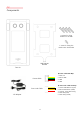
1.3 Cable Connection ▶ Power Cable 1 Red: 12V 2 Black: GND 3 TBD 4 TBD 1. Connect the power cable to the adapter. (Maximum consumption power = 0.5A@12V) 2. The door lock cable is for connecting the door lock (deadbolt, EM lock) and EXIT-button. 3. Connect the yellow and black cable to the exit button. 4. Connect the red cable of the door lock cable to the exit button of the door lock. (Relay contact provided) 5.
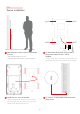
135 cm 1.4 Device Installation 1 Determine the correct position to install the 2 Fix the bracket firmly with fixing screws to the position where Face A+ will be installed. product. * The optimal height is 135 cm. * Avoid installing the device in direct sunlight. * Power cable, door lock cable and LAN cable must go through the hole in the bottom of the bracket. 3 Install Face A+ onto the bracket.
1.
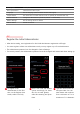
2 Device Initialization 2.1 Set Up the Device • If you are installing the device for the first time, you must set its purpose of use. • When turning on the device for the first time, the device setting screen appears as below. • Refer to the table below for a detailed setup. • To save the setting values, press Save. • After saving, user registration for initial administrator registration will begin. (To change the settings again after the initial setup, enter the Device Settings menu in the Main Menu.
Setting Item Description Door Open Sensor Check status of door open. Language Set the language (select between Korean and English). Tamper Switch The alarm turns on when the rear cover is opened (for unauthorized use). Admin Password Change the administrator password (default is 1234567890). Default Settings Set the setting values to default. Reboot Device Restart the device. 2.
4 Press Get Started to register your face. 5 Make sure your face stays within the guideline. You may need to adjust your position by moving the face back and forth. 6 Please remain in your position until the status bar reaches 100% and the face registration is complete. 2.3 Quick Registration • Changing ‘Quick registration’ setting such as View Button, Auth. Method, Auto-generated User ID. Glasses Option, Automatic User Approval, Select User Level.
Setting item Description View Button Select whether to display the ‘Register new’ button on Live View screen. Auth. Method Select either ‘Face only’ or ‘Face or card’. Auto-generated User ID Select whether to automatically generate an ID when registering a user. Glasses Option Select whether to display glasses option when registering a user. Automatic User Approval Select whether to automatically approve after user registration.
3 User Registration 3.1 User Authentication Methods • Maximum of 10,000 users (including administrators) can be registered. • You can register up to 10,000 users, including Face Only users (1:N authentication) and combined authentication users (combined authentication methods: Face + Card authentication or Face authentication + User ID). • The combined authentication method is called 1:1 authentication.
Guidelines for registering a face • Do not change your facial expression (don’t smile, wink, etc.). • Do not cover your eyes or eyebrows. • Do not wear hats, sunglasses or any accessory that covers your face. • Do not display two faces on the screen at the same time. Register one person at a time. • If wearing glasses, the user should register both with and without glasses.
3.2 Card Only User Registration 1 Select User 1. Management from the Main Menu. 3 Select Card Only. 2 Select Register User. 3. 2. 5. 5 Type the User ID and press Next. You can enter letters and numbers from a minimum of 6 to a maximum of 11 characters. 6. 6 Tag the card on the card recognition unit at the bottom of the product. 14 4 Select General for 4. User Level. 7. 7 When the registration is complete, a pop-up message will appear.
3.3 Face Only / Face and User ID User Registration 1 Select User 1. Management from the Main Menu. 3 Select Face Only 2 Select Register User. 3. 2. or Face and User ID. 5. 5 Type the User ID and press Next. You can enter letters and numbers from a minimum of 6 to a maximum of 11 characters. 6. 6 Press Get Started to begin the face registration. Make sure that your face is in the guideline. 15 4 Select User Level and 4. Glasses option.
3.4 Face or Card / Face and Card User Registration 1 Select User 1. Management from the Main Menu. 2 Select Register User. 2. 3 Select between 3. Face or Card and Face and Card. 4. 4 Select User Level and Glasses option. ※ Users who wear glasses should select Wearing, follow the steps first without glasses and then again with glasses. 5. 5 Type the User ID and 6.6 Tag the card on the 6.7 Press Get Started to 7.8 When the registration press Next.
4 User Management 4.1 Methods of Browsing Users • The administrator can browse or delete users and check their registration method(s) simply by User ID. • Depending on the authentication method, the administrator can browse and delete the users in several ways. Methods of Browsing User Description By Card Browse and delete users registered using a card. By Face Browse and delete users registered with face authentication. By User ID Browse and delete users registered using User ID.
4.2 Browse and Delete Individual Users 1 Select User 1. Management from the Main Menu. 2 Select Browse User. 2. 3 Select a search 3. method. 6. 5 On the Browse User screen, press Delete on the right at the top of the screen to delete the user. 4 44.-3 You can browse 5.-2 You can browse and delete users by tagging and delete users card. by entering User ID. 18 46.-1 You can browse and delete users by face recognition. 7. 6 Press OK to delete the user.
4.3 Browse and Delete User Groups 1. 1 Select User Management from the Main Menu. 2. 2 Select Browse User Groups. 3 On the Browse User 3. Groups screen, press the trash can icon to delete a user group. 19 6. 4 Press Confirm to delete the user group.
5 Browsing Access Logs 5.1 Methods of Browsing Access Logs • The administrator can search user's access time, authentication results and authentication method(s). • The administrator can also search the access record of a specific user by entering the User ID. Methods of Browsing Access Logs Description Period Access record by period (ex. today, yesterday, last 3 days, last week, last month, or the entire access record) Auth. Result Check the user's successful and/or failed authentication records.
6 Environment Settings 6.1 Face Authentication Setting 1. 1 Select Environment from the Main Menu. 2. 2 Select Face Auth Settings. 3. 3 The current face authentication settings. In general, it is recommended that you use it without change. Setting Item Description Save Thumbnail Select the options for saving thumbnail images after the face authentication is successful. A maximum of 300,000 images may be saved. Security Level Adjust the accuracy of matching level required to identify users.
6.2 Screen Setting 1.Select Environment in the main menu. 1. 1 Select Environment from the Main Menu. 2. 2 Select Screen Settings. 3. 3 The current screen settings. Setting Item Description Brightness Adjust the display’s brightness. Status LED Choose options for ‘Status LED’ located at the bottom of the device. Menu Timeout Select the duration of no activity in the menus after which the device would go back to the live view screen.
6.3 Sound Setting 1.Select Environment in the main menu. 1. 1 Select Environment from the Main Menu. 2. 2 Select Sound Settings. 3. 3 The current sound settings. Setting Item Description Volume Adjust the volume of the speaker of the device. Auth. Failure Alarm Select whether to sound the alarm and the number of times it sounds when card authentication fails.
7 Network Settings 7.1 TCP/IP 1. 1 Select Network from the Main Menu. 2. 2 Select TCP/IP. 3. 3 If you select Dynamic IP when connected to a router, an IP will be automatically assigned from the router. Setting Item Description Comm.Type For static IP, you must personally enter IP address, gateway and subnet mask. If you select Dynamic IP, IP address is automatically assigned when connected to a router. IP Address Enter the IP address. Gateway Enter the Gateway address.
7.2 Manager Server Configuration 1. 1 Select Network from the Main Menu. 2. 2 Select Manager. 3. 3 When connecting with Access+ Manager, turn on the Manager and enter its IP address. Setting Item Description Manager Select On to connect with Access+ (a server program that facilitates Face A+ management). IP Address Enter the IP address of the Access+ server. Port Number Enter the port number of the Access+ server.
7.3 Network Connection Test 1. 1 Select Network from the Main Menu. 2. 2 Select Network Connection Test. 26 3. 3 Test to check if the device is connected to the network. Enter the address of the gateway and press OK. After four ping tests, it checks whether the network is connected.
8 Meal Count 1 In Device Settings, select Meal Count. 2 When you scroll down at the Main Menu, you can see that Meal Count Settings has been added. 4 When the setting is complete, the meal and time appears on the Live View screen as above. 3 Select whether to use MultiPay* and set the schedule. 5 In the confirmation window, you can proceed to pay or not. If you do not click OK, payment will be cancelled. *Set whether to use multiple payment option. : the user will only be able to pay for one time.
9 Time and Attendance 1 In Device Settings, select T&A. 2 When you scroll down at the Main Menu, you can see that T&A Settings has been added. 3 Select in which mode* the device will run and set the schedule. Out 5 If the mode is set as 4 When the setting is Manual, after authentication, the users may choose from In, Out, Break, or Return. complete, the type and time appears on the Live View screen as above.
10 Trouble Shooting Guide Trouble Touchscreen doesn’t work. Guide - If the LCD touch panel is defective, touch may not work. - Check if there is any foreign substance on the touch panel. - Check if the LED of the Internet port on the back of the device is blinking. - If the LED is not blinking, check if the wire is properly connected. - Go to [Main Menu]-[Network Settings]. Network connection failure. - Select [TCP / IP] and check whether the IP address is correct.
Trouble Guide - Face may not be recognized in strong backlight conditions. - In backlight conditions, move your face closer to or away from Face is not recognized. the device and try the authentication again. - Check if face is covered by mask or hat. - For authentication, eyebrows and mouth must be recognized. - If updating through the Manager continuously fails, update Firmware update failure. using a USB.
Appendix Disclaimers • The information in this manual is provided with regard to CVT products. • The right to use is acknowledged only for products included in the terms and conditions of the sales agreement guaranteed by CVT. • The right of license to other intellectual property rights not discussed in this manual is not acknowledged.
Appendix Disclaimers This equipment has been tested and found to comply with the limits for a Class B digital device, pursuant to part 15 of the FCC Rules. These limits are designed to provide reasonable protection against harmful interference in a residential installation. This equipment generates, uses and can radiate radio frequency energy and, if not installed and used in accordance with the instructions, may cause harmful interference to radio communications.
Specifications Main CPU ARM Cortex-A9 Quad Core EMMC Memory 16GB DDR3 1GB LCD 4.2 inch WVGA Touch Screen Camera Dual FHD CMOS Camera RF Card 13.56Mhz Mifare Mobile Card NFC, BLE 1:N Verification Time < 300ms 1:1 Verification Time < 300ms # of Max. Users 20,000 Simultaneous Max Persons No limit Face Template Size 0.
CVT Co., Ltd. 306, Building D, Yangjae AI Hub, 39 Maeheon-ro 8gil Seocho-gu, Seoul, Rep. of Korea (Postal Code : 06770) Tel : +82-70-4490-9388 | Inquiry : info@cvtinc.co.kr | www.cvtinc.co.kr © 2021. CVT Co.,Ltd. All rights reserved. CVT and identifying product names and numbers herein are registered trademarks of CVT Co.,Ltd. Product appearance, build status and/or specifications are subject to change without notice.