
User's Guide
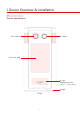

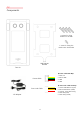
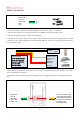
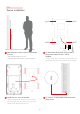
Table Of Contents
- 슬라이드 번호 1
- 슬라이드 번호 2
- 슬라이드 번호 3
- 슬라이드 번호 4
- 슬라이드 번호 5
- 슬라이드 번호 6
- 슬라이드 번호 7
- 슬라이드 번호 8
- 슬라이드 번호 9
- 슬라이드 번호 10
- 슬라이드 번호 11
- 슬라이드 번호 12
- 슬라이드 번호 13
- 슬라이드 번호 14
- 슬라이드 번호 15
- 슬라이드 번호 16
- 슬라이드 번호 17
- 슬라이드 번호 18
- 슬라이드 번호 19
- 슬라이드 번호 20
- 슬라이드 번호 21
- 슬라이드 번호 22
- 슬라이드 번호 23
- 슬라이드 번호 24
- 슬라이드 번호 25
- 슬라이드 번호 26
- 슬라이드 번호 27
- 슬라이드 번호 28
- 슬라이드 번호 29
- 슬라이드 번호 30
- 슬라이드 번호 31
- 슬라이드 번호 32
- 슬라이드 번호 33
- 슬라이드 번호 34
- 슬라이드 번호 35

Fix Face A+ to the bracket with the bracket
fixing screw.
4
* The optimal height is 135 cm.
* Avoid installing the device in direct sunlight.
* Power cable, door lock cable and LAN cable must
go through the hole in the bottom of the bracket.
6
135 cm
Device Installation
1.4
Determine the correct position to install the
product.
1
Fix the bracket firmly with fixing screws to
the position where Face A+ will be
installed.
2
Install Face A+ onto the bracket.
* Before installing the product on the bracket,
you must open the rear cover and connect the
cables to the appropriate port first.
3