Model 750 Illustrated Installation Instructions Contractors Wardrobe®, 26121 Avenue Hall, Valencia, CA 91355 | Phone: 661.257.1177 Fax: 661.257.4907 | CwDoors.
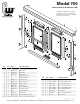
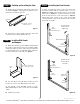
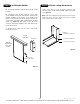
Model 750 15 Illustrated Parts Breakdown (IPB) A - Note: The Handle (#14) is installed in this location but is not displayed in the drawing. See Step 12 for installation instructions of the handle. 19 9 22 23 7 17 1 10 23 7 17 11 7 15 10 20 22 5 13 9 23 15 18 16 23 17 3 A 13 19 15 12 19 22 23 22 3 23 18 14 16 15 6 8 7 20 11 23 21 22 4 8 23 2 NO. QTY.
Congratulations on purchasing your new Cw ® tub/ shower enclosure. Now that you have opened the package, we want you to verify that you have all the necessary hardware supplied with your enclosure. Before beginning assembly of the product, make sure all parts are present. Compare parts with the checklist and package contents list. If any parts are missing or damaged, do not attempt to assemble the product.
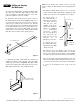
Step 1 C. Locate the Curb. Cut the Curb 1-1/16” shorter than the measurement you wrote down in 2A. Preparing your opening After determining that your newly purchased enclosure is the correct size, remove the existing enclosure and all its parts. Remove all screw anchors from the wall. Clean silicone sealant or caulking and any other contaminants from tub/ shower and wall surfaces. Note: The Curb must lie flat.
Step 3 Note: If your shower has curved corners, you may have to shape the Wall Jambs to fit snugly with the Curb. Drilling and aligning the Wall Jambs D. With the Wall Jamb in place, use a Level to ensure that the Wall Jamb aligns straight up and down. Use your Pencil to mark the hole locations. A. Locate the Wall Jambs. Looking at a Wall Jamb you will notice that the Wall Jamb has two side legs, one which is narrower than the other. This narrow leg will face into the shower. E.
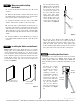
Step 4 Caulking and installing the Curb Step 6 A. Apply silicone along the underside of the Curb as shown in Figure 5. Only apply enough silicone to just barely overfill the grooves. Installing the Panel Locator In order to install the Panel Locator you must first determine which wall the shower head is on (See Figures 5a and 5b). If the shower head is on the right wall, refer to Figure 5a to position the Panel Locator. If the shower head is on the left, refer to Figure 5b.
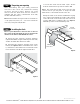
Step 7 A. Use two #8-32 x 3/8” HWH Screws and attach two Rollers to the top of the Outside Door Panel on the front surface of the “fin”, with the metal parts (the Nut side) against the frame and the plastic Roller facing out of the shower (the same side as the textured side of the glass) See Figure 7. Measuring and installing the Header A. Locate the Header and two #6 x 1/4” “B”- Point Screws. B. Measure the distance, wall to wall, at the top of the Wall Jambs.
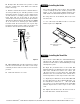
B. Gently lower the Rollers into position so that they are seated in the track. Make sure that the Panel rolls freely. Step 10 Installing the Guide A. Locate the Guide and one #6 x 3/8” PH SMS Screw. Standing inside the shower, position the Guide on the Curb exactly midway between the Wall Jambs. The Guide will lay flush on the Curb. C. Hold the Outside Door Panel so that the Rollers are facing towards you.
Step 12 Installing the Handles Step 13 Silicone sealing the enclosure Using clear silicone seal along the interior and exterior edges of the Header, Wall Jambs and Curb (See Figure 12). A. Locate two Handles and two #6 x 1/4” “B”-Point Screws. B. Standing in the shower, with the curved part of the handle facing into the shower, position the Handle midway on the frame of the Inside Door Panel (as measured from the bottom of the Panel), on the edge nearest the Wall Jamb near the shower head (See Figure 11).
Step 14 Cleaning and Removing the Door Panels The enclosure Door Panels are not designed to be removed once they are installed. However, inconvenient areas that you may want to clean, such as the overlap between the doors, can still be reached for cleaning. A. Carefully remove all the hardware from door. This will enable you to slide the glass Door Panels in either direction to clean them thoroughly. B. Clean the glass and Curb with a mild, nonabrasive cleaner. C.
Your Style. Our Quality. CwDoors.