
Installation Instructions

Contractors Wardrobe
®
, 26121 Avenue Hall, Valencia, CA 91355 | Phone: 661.257.1177 Fax: 661.257.4907 | CwDoors.com
Model 750-PRIN-1280-0220
3
Step 2 Installing the Curb
Note: If your tub/shower enclosure has a curve in
the corners at the side walls, be sure to measure the
distance from wall to wall ABOVE the curves.
A. Using the tape measure, measure between
right and left walls along the flattest part of the tub/
shower sill. Write this dimension down.
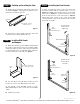
B. Using the tape measure, find the center of the
tub sill (See Figure 1). Make a mark where the center
is, and add 1” to this mark. Place a new mark on the
front of tub sill on both the right and left sides.
Step 1 Preparing your opening
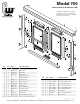
After determining that your newly purchased
enclosure is the correct size, remove the existing
enclosure and all its parts. Remove all screw
anchors from the wall. Clean silicone sealant or
caulking and any other contaminants from tub/
shower and wall surfaces.
Note: Views and directions given in these instructions
– left, right, front, back, etc. – are from outside the
enclosure, facing the tub/shower.
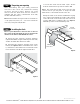
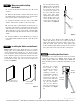
C. Locate the Curb. Cut the Curb 1-1/16” shorter
than the measurement you wrote down in 2A.
Note: The Curb must lie flat. If the enclosure has
curved corners you may have to shape the Curb
with the file so that it will lie flat on the sill.
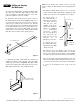
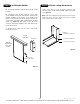
D. Lay the Curb on the shower sill with the sloping
face of the Track towards the inside of the shower.
Center the Curb on the shower sill, and secure it in
position with strips of painters tape (See Figure 2).
Mark the position on the sill with a pencil.
Figure 2
Outside
enclosure
Curb
(#2)
Painters tape
Inside
enclosure
Figure 1
Tub sill
center
Alignment
marks