
Installation Instructions

Contractors Wardrobe
®
, 26121 Avenue Hall, Valencia, CA 91355 | Phone: 661.257.1177 Fax: 661.257.4907 | CwDoors.com
Model 750-PRIN-1280-0220
6
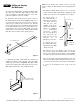
Step 7 Measuring and installing
the Header
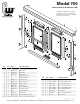
A. Locate the Header and two #6 x 1/4” “B”- Point
Screws.
B. Measure the distance, wall to wall, at the top of
the Wall Jambs. Cut the Header 1/16” shorter than
this measurement to allow for clearance.
C. Install the Header over the ends of the Wall
Jambs. Stand in the shower for the next steps.
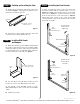
D. On both ends of the Header, measure 5/16” in
from the end and 5/16” up from the bottom edge
and mark these two points with a Pencil. Using a
7/64” Drill Bit, at each pencil mark, carefully drill
all the way through the Header and into the Wall
Jamb.
E. Finish installation of the Header by securing it
to the Wall Jambs with the two #6 x 1/4” “B”-Point
Screws.
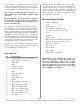
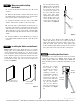
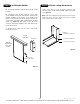
Step 8 Installing the Rollers on the Panels
Please note: Enclosures with Obscure or Smooth
Rough glass are installed with the textured surface
of the framed Panels facing out, or to the front. The
smooth surface of the glass will face into the shower.
This orientation gives you the front and back of each
panel. Now, select one of these panels to be the
Outside Door Panel and one to be the Inside Door
Panel (See Figure 6).
Outside Panel
(Textured side)
Inside Panel
(Smooth side)
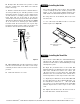
Frame
Top
Outside Panel
(Textured
side)
Nut
A. Use two #8-32 x 3/8”
HWH Screws and attach
two Rollers to the top of
the Outside Door Panel
on the front surface of
the “fin”, with the metal
parts (the Nut side)
against the frame and the
plastic Roller facing out
of the shower (the same
side as the textured side
of the glass) See Figure 7.
B. Use two more #8-32 x 3/8” HWH Screws to
attach two Rollers to the top of the Inside Door
Panel of the frame on the back surface of the “fin,”
with the metal parts (the nut side) against the
frame and the plastic Roller facing into the shower
(the same side as the smooth side of the glass).
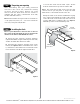
Step 9 Installing the Door Panels
Installing the door panels may be easier if you have
someone assisting you. Always wear gloves and
safety goggles whenever handling glass. Note: DO
NOT allow the panels to strike the shower/tile or each
other.
A. Hold the Inside
Door Panel so that
the Rollers are facing
away from you.
Standing outside of
and facing the shower
enclosure, lift the
Inside Door Panel up
and over the Curb and
then lift the Top Rail
up into the Header
and set the Rollers
into the rear track of
the Header (See Figure
8).
Figure 6
Figure 7
Outside
Shower
Inside
Shower
A
B
A
Figure 8