Coast Illustrated Installation Instructions ™ Contractors Wardrobe ®, 26121 Avenue Hall, Valencia, CA 91355 | Phone: 661.257.1177 Fax: 661.257.4907 | CwDoors.
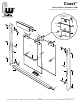
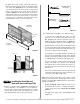
Coast™ Illustrated Parts Breakdown (IPB) Shown with Solana Towel Bar and Modern Header side facing out Top Rail Wheel Assembly (#9) 9c 5 9b 9a 1 8 9 9f 9 9d 9e 7 9 9 6 8 10 11 7 2L 5 13 5 8 7 6 8 3 2R 8 7 12 5 8 4 2 Coast™-PRIN-2800-0220 Contractors Wardrobe ®, 26121 Avenue Hall, Valencia, CA 91355 | Phone: 661.257.1177 Fax: 661.257.4907 | CwDoors.
Parts list NO. QTY. PART # 1 1 ALUM-7710* Reversible Header 2L 1 ALUM-7750* Left Wall Jamb 2R 1 Congratulations on purchasing your new Cw® tub/ shower enclosure. Now that you have opened the package, we want you to verify that you have all the necessary hardware supplied with your enclosure. PART DESCRIPTION Header Assembly Please read and understand these instructions in their entirety prior to assembly, installation and operation.
CAUTION: Do NOT cut tempered glass or allow the corners of the panels to strike the tub/tile, each other, any hard surface, wall or floor, as these actions may cause damage and the tempered glass will shatter. Keep the corner protectors on the glass during installation. Using safety glasses and safety gloves is highly recommended.
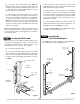
E. Locate the Panel Glide Strip. (See Figure 2). Using the wire cutters, cut it 3/4” shorter than the Curb. Re-install the Panel Glide Strip into the Curb so that the ends of Panel Glide Strip are evenly spaced at each end of the Curb. C. Use a pencil to mark the position of each of the three pre-drilled holes in the left Wall Jamb. Set the Wall Jamb aside for the moment. D.
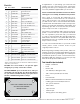
Step 5 Note: The Wheel may need to be loosened and moved in the opening later to adjust the position of the Panel. Installing the Header A. Using the tape measure, measure the width just above the top of the left and right Wall Jambs. (Remember, the width at the bottom of the enclosure may NOT be the same as the width of the top of the enclosure because walls may not be plumb and square). C. Locate the Inside Door Panel.
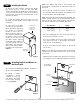
B. If someone is assisting you, have them hold the Inside Door Panel back, out of your way for this step. Hold the Outside Door Panel so that the Wheels are facing towards you. Standing outside and facing the shower enclosure, use the index fingers of both hands to carefully push the Inside Door Panel back and out of the way as you lift the Outside Door Panel up and over the Curb and then insert the Top Rail Wheel Assemblies up and into the Header (See Figure 7).
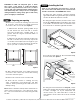
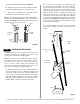
Step 8 Adjusting and aligning the Door Panels Step 9 WARNING! DO NOT ATTEMPT TO LOCK THE CENTER GUIDE IN PLACE UNTIL YOU ARE READY TO INSTALL IT! Once the Center Guide is in place the shower Door Panels will be extremely difficult to remove, and adjusting or removing the Center Guide will be nearly impossible. A. Slide the Inside Door Panel toward the wall with the shower head. Slide the Outside Door Panel to the opposite wall.
E. Slide the Center Guide under the two Door Panels. Center the Center Guide on the pencil mark you made (See Figure 9b). Press the Center Guide onto the Curb and lock it into position by pressing firmly on the back edge of the Center Guide as shown in Figure 9c. You should feel it lock into place. If the Center Guide doesn’t lock into position easily, it may be necessary to press firmly on one end to start the process and work along the back of the Center Guide in order to lock it into place.
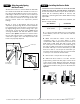
Knob and Recessed Finger Pull Assembly Towel Bar Assembly NO. QTY. PART DESCRIPTION NO. QTY. 13 1 13a 4 13b 13c 13d 2 Recessed Finger Pull Towel Bar 13a 4 Washer Washer 13b 2 Bushing 2 Bushing 13d 1 Recessed Finger Pull 2 Towel Bar Adapter 13e 1 Knob Note: The Inside Door Knob Assembly is included in the Towel Bar Combo. All part numbers can be found on the parts list on page 3.
B. Installing the Knob and Recessed Finger Pull on the Inside Door Panel 3. Detach the Recessed Finger Pull from the End Cap, keeping one Washer and Bushing on the Recessed Finger Pull. 1. Locate the Knob and Recessed Finger Pull. Refer to Figure 12 to help identify the parts. 4. From inside the shower, insert the Recessed Finger Pull with one Washer and Bushing through the hole on the Inside Door Panel, so that the end sticks out from the front side of the glass Panel. 2.
• Once a month: Each month after use, wet a nylon “light scrubber” and go over the wet glass, rubbing in a circular motion over all the glass. You should feel any “sticky” places return to “slick” again. Then carefully pour the water along the top edge of the glass in a stream as you move across the panel, just as you do after each use. • Never use harsh chemicals, as they will harm the CwShield™ Protective Coating.