
Installation Instructions

Contractors Wardrobe
®
, 26121 Avenue Hall, Valencia, CA 91355 | Phone: 661.257.1177 Fax: 661.257.4907 | CwDoors.com
Coast
™
-PRIN-2800-0220
3
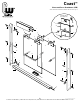
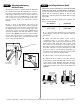
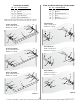
NO. QTY. PART # PART DESCRIPTION
Header Assembly
1 1 ALUM-7710* Reversible Header
2L 1 ALUM-7750* Left Wall Jamb
2R 1 Right Wall Jamb
3 1 ALUM-7760* Curb
4 1 VINY-118 5CL Clear Panel Glide Strip
(Pre-Installed)
5 4 HARD-2045 Panel Locator/Bumper
6 2 FAST-1250* #8 x 1-1/2” FH SMS Screw
7 4 FAST-1365* #8 x 1-1/2” PH SMS Screw
8 6 FAST-1440 Screw Anchor
9 4 Top Rail Wheel Assembly
9a 4 ALUM-7700* Top Rail
9b 4 HARD-2065 Wheel, Ball Bearing
9c 4 FAST-1430ZI #8-32 x 3/8” PHWH Screw
9d 4 HARD-2030 1/4” (6mm) Gasket
4 HARD-2035 5/16” (8mm) Gasket
9e 4 FAST-1550 Top Rail Bushing
9f 4 FAST-1560 Connector Bolt
Glass
10 1 Outside Door Panel
11 1 Inside Door Panel
12 1** HARD-2000* 1/4” (6mm) Center Guide
1** HARD-2005* 5/16” (8mm) Center Guide
Hardware
13 1** TBC-SLN3-20SK* Solana 20” Towel Bar Combo
(shown)
1** TBC-VCT5-20BK* Victoria 20” Towel Bar Combo
1** TBC-CTN3-20BK* Canton 20” Towel Bar Combo
*When reordering the part please indicate the SIZE and/or FINISH
**Based on your selection
Congratulations on purchasing your new Cw
®
tub/
shower enclosure. Now that you have opened the
package, we want you to verify that you have all the
necessary hardware supplied with your enclosure.
Please read and understand these instructions in their
entirety prior to assembly, installation and operation.
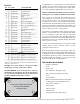
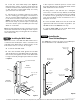
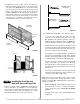
Use a level to check that the tub/shower sill is
reasonably level – not more than 1/8” out of level from
side to side. If the sill is out of level more than 1/8”,
you will need to order a custom-mitered filler that fits
under the Curb. This will level the Curb correctly. In the
absence of leveling the Curb with a mitered filler, and
depending upon the out of level amount, the Panels
may not stay in a closed or open position.
Use a level to check that the walls of the enclosure are
plumb – not more than 3/8” out of plumb. If the walls
are out of plumb by more than 3/8”, you will need
to order a custom-mitered filler that fits behind the
Wall Jamb. In the absence of a plumb Wall Jamb, and
depending upon the out of plumb amount, the Panels
may not close correctly.
To order custom-mitered filler for your Curb or Wall
Jambs, please contact customer service at your
original purchase location.
Before beginning assembly of the product, make sure
all parts are present. Compare parts with the parts list.
If any parts are missing or damaged, do not attempt to
assemble the product. Contact our Customer Service
department with any questions or concerns you may
have about this product at 661.257.1177.
Tool checklist (not included):
• Phillips screwdriver
• Level
• Electric drill
• 1/8” drill bit (for fiberglass stall)
• 3/16” masonry drill bit (for tile stall)
• Pencil
• Fine metal file
• Miter box & hacksaw with 32 tooth blade
• Caulking gun and clear tub/tile silicone
• 1/4” open end wrench
• Wire cutters
• Tape measure
• Painters tape
• Safety glasses and safety gloves
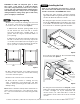
KEEP THE CORNER PROTECTORS
ON THE GLASS DURING
INSTALL ATION
DO NOT use a razor blade to cut open the paper
wrapping as you may scratch the contents.
DO NOT REMOVE your old shower door until you
check that your new shower door kit is the right size
for your shower and that all the proper parts are in
the box or hardware bag. Refer to Step 1.
Parts list