
Instruction Manual


3
10%OffOff
100% 100% 100%
OffOffOff
OffOffOff
master slave
1
100%100%100%
100% 100%
10%
OffOff
OffOffOff
2
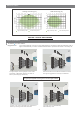
While the 1st sensor detects motion on the 1st floor, it
switches the light on at 100% and sends signal to all slave
units. All slaves on the 1st floor turn on and the sensor
highbay on the 2nd floor switches on at stand-by level.
The person walks to the 2nd floor, the 2nd Sensor
highbay switches the light on at 100%. All slaves on the
2nd floor turn the light on and the Sensor highbay on
the 3rd floor switches on at stand-by level.
Corridor
Corridor
B
For staircase and corridor (master and slave)
master slave
100%100%
10% 10% 10%
100%
100%100%
10%OffOff
3
10% 10%10%
Off Off Off
100%100%
100%100%100%
4
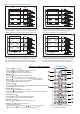
The person walks to the 3rd floor, the 3rd sensor highbay
switches the light on 100%. All slaves on the 3rd floor
turn the light on and the Sensor highbay on the 4th floor
switches onat stand-by level. Meanwhile, the lights on
the 1st floor are dimmed to stand-by level after hold-time.
The person walks to the 4th floor, the 4th sensor highbay
switches the light on at 100%. All slaves on the 4th floor
turn the light on Meanwhile, all sensors on the 1st floor
turn the light off after stand-by period, and all lights on
the 2nd floor dim to stand-by level after hold-time.
Corridor
Corridor
master slave
master slave
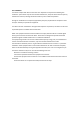
SECTION 2 REMOTE CONTROL
Note: the red LED indicator flash one time when RC
receives signal successfully
1. Press button “start” to program.
2. Select the buttons in “Detection range”, / “Daylight hreshold”, “Hold time”,
“Stand-by time”, “Stand-by dimming level” to set all parameters.
Scene prog. [ zone ] (One-key-commissioning)
RESET[ button ]
Press button , all settings go back to the default settings:
Detection range: 100% Hold time: 1min Stand-by period: 5min
Stand-by dimming level: 20% Daylight sensor: LUX disable
Shift [ button ]
Press button , the LED on the top left corner will flash to
indicate mode selection.
All values / settings in RED are valid for 20 seconds.
Auto Mode [ button ]
Press button to initiate automatic mode. The sensor starts working and all settings remain
as before the light was switched ON/OFF.
Brightness +/- [ button ]
Press button to adjust the light brightness between 10%~100% .
6
6
7
Power output [ button ]
Press button , the light output shifts between 80% and 100%.
Note: the function of “Sensor off” and “Twilight” are disabled.
Permanent ON/OFF [ button ]
Press button ,to select permanent ON or permanent OFF mode.
* Press button / to resume automatic operation.
The mode will change to AUTO Mode after power failure.
1
1
2 4
2
2
3
3
4
4
5
5
8
9
10
11
12
13
Semi-auto Mode
[ button & ]
1. Press button Shift (the red LED is on for indication),
2. press button to initiate semi-auto mode. The fixture is manually on by push-switch and
automatically off in semi-auto mode.
3
3
4
4
1
3
7
9
6
8
10
11
13
14
12
2
4
5
HRC-11
&
A
4
hh
4
h