Finally, in the Other tab, select “Show Backup/Restore Wizard on startup” to run the Wizard when the Backup & Restore window is opened, and select “Show warning when backing up partial registry” if you want a warning message to be displayed when partly backing up registries. Also, to set the time and date of backup files, select “Backup Timestamp”, and to set a size limit on backup files, select “Size limit per backup file”.
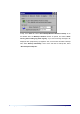
III. Backing up and Restoring by File PC-EPhone enables you to save data files created in various applications (Word, Memo, etc.) by copying them onto non-volatile memory rather than RAM. This section gives information on how to Backup/Restore by file. X Storing file in IPSM/CF Memory Cards This method is a safe way to manage files on your PC-EPhone, rather than a backup method.
Select the folder or file you need from this window, and copy or back it up to your desktop PC. You can also restore a file by selecting it from your desktop PC and copying it into a specific location on your PC-EPhone. When transferring files between your desktop PC and PC-EPhone, the file format may be converted to fit the target device depending on ActiveSync settings. For more information, see “Copying and Moving Files/Converting Files” in ActiveSync Help.
Chapter 6 Internet connection and Using Internet As your PC-EPhone has a built–in mobile phone module, you can access the Internet by direct DialUp connection, or access via separately purchased CF Type II LAN Cards and browse the Internet, manage E-mail and access corporate Intranet DBs. Before you can run applications needing Internet connection (including Web Browser and e-mail), you must be connected to the Internet by phone or a LAN connection.
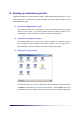
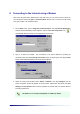
I. Connecting to the Internet using a LAN Card 1. On the Start menu, point to Settings, then tap Control Panel and the screen shown below is displayed. 2. Tap the Network icon and the Network Configuration screen is opened. 3. From the list of network drives installed in the device, select ‘NE20001:NE2000 Compatible Ethernet Driver’, a default setting for the LAN card. Then tap Properties, and ‘NE2000 Compatible Ethernet Driver’ Settings screen appears as shown below.
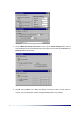
Make sure the “Obtain an IP address via DHCP” option box is checked and then tap OK, which will take you back to the Network Configurations screen. PC-EPhone automatically allots IP addresses, if “Obtain an IP address via DHCP” is selected. Contact local network administrator for information on how IP addresses are allotted, if you don’t use DHCP server. 4. Either tap the Internet Explorer icon on your desktop or the ‘WWW’ icon on the touch screen to open the PC-EPhone Web Browser screen. 5.
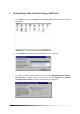
II. Connecting to the Internet using a Modem Other than using the built-in CDMA Phone and LAN Card, you can connect to the Internet on your PC-EPhone using a CF type or external modem. Here is how to connect to an ISP using a CF type modem or an external modem. 1. On the Start menu, point to Programs, Communications, then tap Remote Networking and the Remote Networking screen appears. Tap the Make New Connection icon ( ) and the Make New Connection screen appears as shown below. 2.
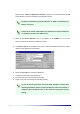
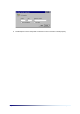
4. On the “Make New Dial-Up Connection” screen, tap the TCP/IP Settings button and the TCP/IP Settings screen will be displayed as shown below. Set each field under General and Name Servers as shown below. 5. Tap OK, then tap Next on the Make New Dial-Up Connection screen. Set the codes for Country, Area, and Telephone number and tap the Finish button to end settings.
6. Double-tap and run the newly made connection to see if connection is made properly.
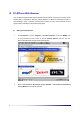
III. PC-EPhone Web Browser Your PC-EPhone supports Web-based wireless Internet services. PC-EPhone provides a Web Browser that is compatible to Microsoft Internet Explorer 4.0 Browser and supports HTML4.0 and JavaScript. Using a wireless communication module you may access Internet services equal to that of a desktop PC anywhere and anyplace. (1) 1.
(2) Functions of each menu 1) File Opens Web browser in a new window Opens Internet address not set by default Sets Printing and Printer preferences General Information Enables you to work Offline on documents and Web pages stored in your PC-EPhone Closes Web browser window When closing PC-EPhone Web browser, if you are currently connected to the Internet, a dialog box appears asking if you wish to disconnect “Internet”. You should disconnect if you no longer need Internet connection.
3) View Used to display image on screen Used to stop importing from Web page Used to reads updated pages frequently or used when graphic do not appear properly Changes text sizes Changes Encoding languages Used to see source codes Sets Internet connection method and changes start page and search page 4) Go Go to previous page Go to the next page Go to home page Opens search sites to search the Internet Lists previously opened pages 5) Favorites If you add your frequently visited sites or documents on the
(3) Setting Internet Options If you want to change PC-EPhone Web Browser’s preference, select Internet options on the View menu, then set Internet Options. X Start Page Indicates the home page that appears when initially connecting to the Internet. X Search Page Indicates the search page. X Cache Size You can change the cache memory size. X Authodial Name Internet Verizon is recommended in the United States. X Use LAN (no autodial) When using the Internet via LAN card, select the Use LAN box.
and places itself on the corresponding word. If you wish to continue the search, tap Find Next. 2) Managing the Favorites folder 1. Adding a homepage to the Favorites list ① Go to the homepage you wish to add to Favorites. ② Tap Add to Favorites on the Favorites menu and the following dialog box appears. ③ Input the homepage name, tap OK, and the homepage is added to Favorites. You may also change names of already listed homepages in this dialog box. 2.
② To create a new folder, tap New Folder on the File menu, and then input the name of the new folder. ③ To move a site to a folder, select the pertaining site and either drag it to the desired folder or select Cut on the Edit menu, move to folder of choice by double-tapping on it, then select Paste on the Edit menu. 3) Looking at a Web Page Offline By tapping Work Offline on the File menu, you can look at the last Web page you connected to while you were online right before disconnecting Internet.
IV. E-Mail As it has a built-in Internet connection module, your PC-EPhone enables you to utilize e-mail functions in mobile conditions just like you would on your desktop PC. To use E-mail, you must first set E-mail account, including Send/Receive E-mail preferences, and Internet connection options. (1) Setting up an E-mail Account To manage an account, you need a user’s account and password, and the names of the servers for receiving mail (POP3) and sending mail (SMTP).
Input the E-mail user account registered in the receiving server. 3. Input E-mail address, tap Next, and the E-mail server name setting dialog box appear. Input POP3 Host or IP address (for example: mail.cb.co.kr, or 211.162. 34.10) Input SMTP Host or IP address. 4. Input the names of the servers for receiving and sending mail, respectively, and then tap the Next button and the Log-in Mail Server dialog box appears.
5. Input password, then tap Next, and the Advanced set ups dialog box appears. If the contents of sent or received messages exceeds 100 lines, the exceeded parts including the attachments are not displayed. So select a value more than 100 or select the Get full copy of messages option. 6. After selecting necessary items, tap Next and the Congratulations dialog box appears informing you that you have successfully performed setups. 7. Tap Finish to complete the Internet E-mail account setup.
(2) Setting E-mail preferences Set preferences for sending and receiving E-mail. 1. Execute the E-mail program. The following window appears. 2. Tap Options on the Tools menu and the following dialog box appears. 3. Tap the Settings tab to activate the following display and set the items to your needs.
4. After completing settings, tap the Connect tab to activate the following display. 5. You can connect to the Internet by designating either “Use Dial-up” or “Use LAN”. When using LAN, check “Use LAN”. 6. Tap OK to end.
4) Message Used to write New Mail Used to reply to received Mail Used to forward received Mail to another person Used to delete Mail Used to move Mail to another folder Used to empty the [Deleted] folder (4) Using E-mail 1) Creating a New Message 1. Tap New on the File menu or tap the New message icon ( ). The New Message window appears as shown below. Recipient Input the E-mail address of the recipient or tap the button on the right side to select someone from Contacts.
Cc (when having selected “Show Full Header” on the View menu) Carbon Copy. You can either directly input an address or select from Contacts. Bcc (when having selected “Show Full Header” on the View menu) Blind Carbon Copy. You can either directly input an address or select from Contacts. Attachments Enables you to select Attachments on the File menu and add, open, or delete an attachment. You can add several attachments selecting Attachments, Add on the File menu.
3) Replying to Mail Select the message you wish to reply to from the list, then tap the Reply button ( ), or tap Reply on the Message menu. 4) Forwarding Mail Select the message you wish to forward, then tap the Forward button ( ), or tap Forward on the Message menu. 5) Deleting Mail Select the message you wish to delete, then tap the Delete button ( ) or tap Delete on the Message menu. 6) Creating a folder 1.
8) Deleting folders 1. Select the folder you wish to delete from the list of folders on the left. 2. Select Folder, Delete on the File menu. When you delete a folder, mail contained in that folder is transferred to the [Deleted] folder. You cannot rename or delete folders that are set by default (Inbox, Outbox, Sent, Deleted). 9) Moving messages Used to send a message saved in one folder to another. 1. Select the message you wish to move. 2. Select Move to Folder on the View menu. 3.
11) Adding contents of a file to new message 1. Tap Attachments, Insert File to Body on the File menu, and the Open dialog box appears. 2. Select the file you wish to attach, then tap OK, and the contents of the file are displayed in the New Message dialog box. 12) Saving attachments in Inbox 1. Select the message from the Inbox, then double-tap to open it. 2. Double-tap the attached file, and the Warning in opening Attachment dialog box appears. 3.
Chapter 7 Applications PC-EPhone provides you with programs including PC-EPhone Calendar, PC-EPhone Calculator, and PC-EPhone Contacts for your convenience. You can synchronize data in PC-EPhone Calendar, PC-EPhone Calculator, and PC-EPhone Contacts with your desktop PC using ActiveSync. As errors may occur when you use more than 1,500 items in PC-EPhone Calendar, PC-EPhone Calculator, and PC-EPhone Contacts. This chapter provides you with information on.
I. Contacts “Contacts” is a program that manages personal information, phone numbers, address, and more of your acquaintances. You can use the data in Contacts to search Web pages, send Email, and make a call or send SMS using the Phone program. (1) Features 1) Contacts Window 1. Menu: Menu consists of File, Edit, View, Go, and Tools. File New Contact Used to create new contacts. Import Used to bring in other contacts. Export Used to send contacts to other users. Exit Used to close Contacts.
View Text size Used to set character sizes. Refresh Used to update the contacts list display window. Go Calendar Used to go to Calendar. Contacts Used to go to Contacts. Task Used to go to Task. Mail Used to go to Mail. Tools Find Explore Web page Send Mail to Contact Phone Call Used to find a specific person in Contacts. Used to explore Web pages. Used to send mail to the selected contact. Used to make a phone call to the selected contact.
3) Customize Columns In the Customize Columns dialog box, you can select the columns you wish to display on the contacts list display window. X Available fields Lists the 27 items used in Contacts and of these 27, you can select which columns you wish to display on the contacts list display panel. X Show these fields Lists the columns that will be displayed on the contacts list display panel. X Add Moves the selected item from Available fields to the Show these fields list.
X Category list panel Displays the list of currently saved categories. X Function buttons Add: Used to add a category. Delete: Used to delete a category. Reset: Used to set the category list to default. (2) Using Contacts 1) Creating a New Contact 1. Tap the Add button ( 2. Input the pertaining data in the given spaces. 3. If necessary, you can input data under the Detail and Memo tabs. 4. Tap OK to save. ) or tap New Contact on the File menu.
When creating a contact other than the one you are currently working on, tap the “Save and Continue” button instead of tapping “OK”. 2) Editing a contact 1. ) button or tap After selecting the contact you wish to edit, tap the Modify ( Edit Item on the Edit menu, or double-click the selected contact. 2. The Modify dialog box appears along with data that was input before. 3. Correct the fields that need modifying. 4. If necessary, modify fields under the Detail and Memo tabs. 5. Tap OK to save.
As the number of categories that can be displayed is limited, all categories may not be displayed. 5) Editing the category list You can edit the category list, which enables you to view contacts by category. 1. Tap the arrow on the right of the Category Filter ( 2. Select . The Category list edit dialog box appears. 3. Input the new category you wish in the New Category box, then tap Add. 4. To delete, select from the category list the category to be deleted, then tap Delete. 5.
II. Calendar (1) Features The Calendar program consists largely of daily, weekly, monthly, yearly calendars and a new appointments dialog box, an agenda, and a customize categories dialog box. 1) Functions of each menu 1. File Used to add new appointment Used to add new all day event Used to make a new meeting Used to exit Calendar 2. Edit Used to edit an item Used to delete an item Used to edit the category list 3.
4. Go Used to easily go to other windows while using Calendar. Used to go to Calendar Used to go to Contacts Used to go to Tasks Used to go to E-mail Used to go to a specific date Used to go to today’s date Used to go to previous day Used to go to next day 5. Tool Provides items you need when using Calendar.
2) All day Events Screen The All day Events screen divides the day into time slots and displays events by the time slots. Tap “Day” on the View menu, or tap the All day Events button ( ). 3) Weekly Events Screen The Weekly Events screen divides a week by days and displays events happening throughout the week. Tap “Week” on the View menu, or tap the Weekly Events button ( Page 7-10 ).
4) Monthly Events Screen The Monthly Events screen divides the month by days and displays events happening throughout the month. Tap “Month” on the View menu, or tap the Monthly Events button ( ). 5) Yearly Events Screen The yearly events screen divides the year by months and displays the dates with events in Blue. Tap “Year” on the View menu, or tap the Yearly Events button ( Applications ).
6) Agenda Screen The Agenda screen lists the event of a particular day. Tap “Agenda” on the View menu, or tap the Agenda button ( ). 7) Customize Columns Screen To set agenda items, tap ”Customized Columns” on the Tool menu. The Customize Columns dialog box then appears. X Available fields You can select which columns you wish to display on the Agenda screen from this list. X Show these fields Lists the columns that will be displayed on the Agenda screen.
X Remove Moves the item you wish to delete from Show these fields back to the Available fields list. X Move Up Moves the selected items up one notch in the Available fields and Show these fields lists. X Move Down Moves the selected items down one notch in the Available fields and Show these fields lists. X Reset Brings the Show these fields back to default (Date, Subject, Location, Category). (2) How to use Calendar 1) Making a New Appointment 1.
this feature when you wish to jot down more detailed information on the appointment. 5. When you need to select or edit a category, tap the Edit Category icon ( ) and the Categories window appears with an Edit Category button below it. 6. If you need to set recurrences, tap the arrow in the Recurrence selection box, and select an item from the list. If the item you want is not listed, tap Edit pattern, and the Edit pattern dialog box appears. 7.
8. Finally, if you wish this appointment to be private, tap the box next to Private to make a check. And if you wish to attach a reminder to this appointment, check the box next to Reminder. 9. Tap OK to save settings. If you wish to close without saving input data, tap Cancel. 2) Making a new all day event 1. Tap New All Day Event on the File menu. The Calendar dialog box appears. This display is a little bit different from the New Appointment dialog box : the Allday Event box is already checked. 2.
2. The steps hereon are similar to those of Making a New Appointment. Refer to the Making a new appointment section. 4) Editing an Appointment 1. Double-tap the appointment you wish to edit, or tap Edit Item on the Edit menu. 2. Modify the contents of the appointment. 3. Check to see if the modified contents are correct, then tap OK. If you wish to close without saving the modified contents, tap Cancel.
III. Tasks (1) Features The Tasks program consists largely of a Task Screen, New Task dialog box, Category List dialog box, Customize Categories dialog box, Filter on Categories dialog box, and an Options dialog box. 1) Functions of each menu 1. File Used to create New Task Used to close 2. Edit Used to edit an existing task Used to delete existing tasks Used to delete completed tasks Used to edit category list 3.
4. Go Used to easily go to other windows while using Tasks. Used to go to Calendar Used to go to Contacts Used to go to Tasks Used to go to E-mail 5. Tools Provides items you need when using Tasks.
3) Create New Task Screen Tap New Task on the File menu or the New Task button ( ) and the Tasks dialog box appears as shown below. 4) Category list screen Tap Category list on the Edit menu, and the Category list edit dialog box shown below appears. 5) Customize Columns Screen Tap Customize Columns on the Tools menu and the Customize Columns dialog box shown below appears.
X Available fields You can select which columns you wish to display on the Task screen from this list. X Show these fields Lists the columns that will be displayed on the Task screen. X Add Moves the selected item from Available fields to the Show these fields list. X Remove Moves the item you wish to delete from Show these fields back to the Available fields list. X Move Up Moves the selected items up a notch in the Available fields and Show these fields lists.
Default priority indicates that when creating a New Task, priority will be initially set as the priority level is set here. However, priority can be changed depending on the task. Automatically set reminder indicates that when creating a New Task, Reminder will be initially set as it is set here. However, reminder settings can be changed depending on the task. (2) How to use Tasks 1) Creating a New Task 1.