G G Pocket PC/POZ G User’s Manual
Copyright G G G Cyberbank assumes no responsibility for any damage or loss resulting from the G use of this manual. And also Cyberbank assumes no responsibility for any damage or loss caused by deletion of data as a result of malfunction, dead battery, or repairs. Be sure to make backup copies of all-important data on other media to protect against data loss. The information contained in this document is provided “as is” and is subject to change without notice.
FCC RF Exposure Information In August 1996 the Federal Communications Commission (FCC) of the United States with its action in Report and Order FCC 96-326 adopted an updated safety standard for human exposure to radio frequency electromagnetic energy emitted by FCC regulated transmitters. Those guidelines are consistent with the safety standard previously set by both U.S. and international standards bodies. The design of POZ complies with the FCC guidelines and these international standards.
Safety Information Please read these simple guidelines before using your phone. Failure to comply with these guidelines may be dangerous or illegal. Do not use a hand held phone whilst driving a vehicle; park the vehicle first. Switch off your phone when in an aircraft. The use of cellular phones whilst airborne is illegal in some countries. It may disrupt the operation of the aircraft. Follow any regulations or rules regarding air travel. Wireless phones can cause interference.
USER INFORMATION Acknowledging Special Precautions and the FCC Industry Canada Notice Cautions Modifications not expressly approved by the party responsible for compliance could void the user’s authority to operate the equipment. FCC compliance Information When used the This device complies with part 15 of FCC Rules. When used a computer peripheral, Operation is subject to the following two conditions: 1. This device may not cause harmful interference, and 2.
Contents G G 1 | About Device ...................................................................................................... 1-1 What’s in the Box...................................................................................................... 1-2 Hardware Features ................................................................................................... 1-3 Using the Stylus ........................................................................................................
6 | Configuring Device............................................................................................ 6-1 Settings ..................................................................................................................... 6-2 7 | Using the Mobile Phone .................................................................................... 7-1 Phone Program.........................................................................................................
Chapter 1 About Device # # # Congratulations on purchasing PDA (personal digital assistant/model CP-X315) device powered by Microsoft® Windows® for Pocket PC 2003. Your device lets you keep your most important business and personal information current and close at hand. Your device includes Microsoft Pocket PC Software 2003 second edition, which includes the latest version of Microsoft Pocket Outlook®, so you can read and write e-mail while on the road and manage your appointments and contacts.
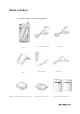
What’s in the Box? Your device package includes the following items: G kG j i GOGGjPG G wGjOhjGhP yGjG jGjkGMGiGjk |ziGjG lTwG |GtGMGxGy |˅GtG G XTY
Hardware Features G G The illustration below introduces you to the various buttons and other features of your device. G :fcbh G G G G G G G ྚG ྞG ྟ ྙ G G ྛ G G G ྜྷ G G G G G G G ྜ G ྥ G G ྠ G ྡྷG ྡ G G G ྣG ྤ G G G 1. 2. 3. 4. 5. G Antenna Swivel Camera Lens : allows you to make a digital shot with 300K pixels. Speaker: allows you to listen to music or set audible reminders and alerts and hear the voice while communicating on the mobile phone.
6. Hot key(POZ Launcher) : Press to open POZ Launcher program. This program allows you to easily open other program you want. When LCD is off, if you want to open POZ ) button > Settings > System Launcher, then change the settings, as follows : tap Start( tab > “System” icon > “Wake up” tab > select “Open program while in Sleep mode”.
@YZh G]XY G G G G G G G G G G G ྙG ྚG G G G G ྛG G G G G G G G G 1. 2. 3. Stereo headphone jack: Connect a proprietary stereo headphone. Up/down control button: Scroll through documents. Enter button: Press it once to have the last called phone number displayed on the phone display with the phone program on and press it once to finish your communication you want. Mini SD (Secure Digital) card slot: Insert an optional SD card to add memory.
G F][\h g]XY G G G G G G G G G G G ྙ G G G G G G G G G G G ྚ G G G 1. Power( ) button: Press to turn your device on and off. 2. Stylus: Use the stylus to navigate on the touch screen.
G IddYf G G ྙG G G G G ྚ G G G 1. GPS : 2. Infrared port: Beam files to other mobile devices. G 6chhca G G G G G G ྚG ྙ G 1. USB port: Connect to your desktop PC using the supplied cradle, or directly through an optional sync cable. 2. Soft Reset switch: Use the stylus to press the reset button and restart your device so that all your unsaved files will be deleted.
G FYUf G G G G G G G G G G G G G ྙ G G G G G G G G G 1. Battery: main battery(1500 or 1200mAh). The main battery may be drained during the transportation from the factory to the user; therefore you should connect AC power to the cradle and place device in it in order to charge the battery when using your device fir the first time.
G FYachY 7cbhfc` G G ྙ G G ྟ ྚ ྞ G ྛ G ྜྷ G ྜ G G G G 1. Playback/Pause button : allows you to playback or pause temporarily in the POZ MusicBox program. 2. Stop button : allows you to stop in the POZ MusicBox program. 3. Previous button : allows you to move to the previous track in the POZ MusicBox program. 4. HOLD : while POZ MusicBox program is on, push it to the right side not to operate all function buttons, except SEND/END button when you got the incoming call. 5.
Using the Stylus Use the stylus to navigate and select objects on the screen. Wds# Wrxfk#wkh#vfuhhq#rqfh#zlwk#wkh#vw|oxv#wr#rshq#lwhpv#dqg#vhohfw#rswlrqv1# Gudj# Hold the stylus on the screen and drag across the screen to select text and images. Drag in a list to select multiple items.# Wds#dqg#krog# Tap and hold the stylus on an item to see a list of actions available for that item. On the pop-up menu that appears, tap the action you want to perform.
Soft Reset & Hard Reset When your device is running slow or improperly, use the stylus to press the Reset button located on the bottom. This is called “Soft Reset” in this manual. When you perform a Soft Reset, you will lose all unsaved data. Be sure to save all data in open documents or programs beforehand. This is similar to pressing the Reset button on your desktop.
Microsoft Pocket PC Software Your device already includes the full suite of software you need to function as a mobile professional. These programs are introduced below. Detailed information can be found in later chapters. The programs listed below are preinstalled in Flash ROM or in the Built-in Flash. These preinstalled programs will not be deleted if your device suffers a loss of power. ActiveSync. Synchronize information between your device and desktop computer. Calendar.
Where to Find Information G ActiveSync & Acrobat Reader You can install ActiveSync 3.7.1 from the provided Companion CD. In case that you lose the companion CD, download and install the latest ActiveSync 3.7.1 on www.microsoft.com/mobile/pocketpc/download on your desktop PC. Also you can download Acrobat Reader from www.acrobat.com . Using Help on Your Device You can get help for specific programs and for Microsoft Pocket PC software by tapping Help on the Start menu.
Chapter 2 Getting Started This chapter will help you start using your device. You will become familiar with the hardware and learn how to set up your device. When you finish this chapter, you will have all the information you need to begin working with your device. ඝ This chapter includes step-by-step instructions to help you.
Complete the Welcome wizard G Follow the steps in this section to start using your device for the first time or after performing hard-reset. G G G G G G G G G G G G G G G G G G G G G G G G G G G G G G G G G G G G G G G Gently touch the screen with stylus. From now on, it is called “tap”. G A target (+) will move in the order of “center o upper left o lower left o lower right o upper right” on your screen.
G G G G G G G This is the way of how to single-tap and tap and hold, tap the Next button. Tap and hold this location to have next window.
It is called “Pop-up” menu. Select Cut.. Tap and hold this location next to 11 to paste the cut contents. Then you will have the new pop-up menu.
Select Paste on this list. The pasted contents have appeared. Tap the Next button. G jGYGnGzG G YT\
Select a time zone you stay from the drop-down list box. Tap the screen to finish the Welcome wizard.
Using Today Screen After finishing the Welcome wizard, put your device on the cradle connected to your desktop PC to automatically synchronize through Microsoft ActiveSync so that you have the next screen. G G Start menu uGG G G G G G Enter your personal information which is not synchronized with your desktop PC. G G G G G G G G G G G G jGG Synchronize today with your desktop PC through ActiveSync. G |GpG Now, you are ready to enter Owner information.
G G G G G G G G G G G G G G G G rGG G lG uSGGG G G For more personal information if needed, select the Notes tab. G {GvrGGGGGUG G G G G G G G G Select this option box to have your personal information displayed whenever you turn on your device.
Jc`iaY {GGGGGGGGGGGUGG G G G G G G G G G G GaGGGGGUG GaGGGGGGGGG UG G G G G G G G H]aY {GGGGGGGGGGGGGSGGGG UGG G G uGG G G G G G G G G G G G G G G G G G G G G G jGYGnGzG G YT`
{GGGGGGGUGG G Vhohfw#wkh#wlph#dqg#gdwh1# Iru#h{dpsoh/#vhohfw#wkh#duurz#ehvlgh#gdwh1# # # # # # # # # # # # # # # # # # # \rx#fdq#fkdqjh#wkh#gdwh#|rx#zdqw#khuh1# # # # # G |˅GtG G YTXW
CdYb h\Y fYWYbh`m igYX dfc[fUa ghUfh h\Y dfc[fUa mci kUbh XU GGz GUG YU GGG GGGGGGGzGGGGGGGG GG UG uGi zGG GG G G U zGGG {GGzGG¡UG jGiG G CdYb dfc[fUa X]fYWh`m mci kUbh Zfca h\Y HcXUmg gWfYYb {GˈuˉGGGjGGGGG GGGGG{ GUG G G G G G G G G G G G G G G
{GzG GGeGzGeGwGGeGtG GGUG GGG¡GGzGGGGuG Tap OK to save these settings. :]`Y 9ld`cfYf This File Explorer of your device is similar to Window Explorer of desktop PC. Select the Start menu > Programs > File Explorer. Select to go to the higher level of a folder. Select a folder below My Device you want to move to.
ඝ View the contents of Mini SD(Secure Digital) card Insert Mini SD cards into the Mini SD card slot so that SDMMC Disk folder appears. Tap this folder to view the contents of Mini SD card.
lGGGGUGzGˈkˉGGGTGG GGGGGGGGGG UG G G G G G G G G G G G G G G G G G Copy and Paste Tap and hold the file you cut, copy, rename and delete to have Pop-up menu displayed. Also tap and hold out of files or folders to have a little different pop-up menu that includes new folder. Now we show you an example of process where we copy a file from a folder and paste it to another folder.
zGˈwˉGGGGUG G G jGYGnGzG G YTX\
Powering up device G AU]b VUhhYfm @]!Dc`maYf Because the data and files you save on your device are stored in RAM, maintaining a continuous power supply to the device at all times is extremely important. If your device runs out of power, all information stored in RAM is lost. The preinstalled programs will not be deleted even if your device suffers a loss of power; however, any custom settings and programs you have added will be erased.
AC Power with Cradle To avoid running out of battery power, you can operate your device on AC power using the supplied AC adapter. The AC adapter accepts 100 V to 240 V, enabling you to connect to AC power anywhere in the world. When you travel, you may need adapters to accommodate different electrical outlets, but the AC adapter will safely convert AC line voltage to the DC voltage required by your device. While your device is connected to AC power, the battery is charged automatically.
Because the battery is charged automatically whenever your device is connected to ac power, simply connect the AC power adapter or put your device on the USB cradle to recharge it when the power is low. Zkloh#|rxu#ghylfh#lv#frqqhfwhg#wr#DF#srzhu/#wkh#fkdujlqj#vwdwxv#OHG# lqglfdwhv#dv#iroorzv#=# ଝଝ#Uhg#=#fkdujlqj+qrw#ixoo|#fkdujhg,/#Eoxh#=#ixoo|#fkdujhg1# Power Tips ඝ Follow these tips to ensure the longest use of your device between charges: Turn off the display manually.
G Managing Memory Your device uses three kinds of memory: 64 MB of ROM, 64MB of storage and program memory (RAM), and optional SD memory cards. Storage and Program Memory (64MB of RAM) The volatile RAM memory on your device is allocated between storage memory and program memory. The operating system automatically manages the allocation between storage and program memory; however, in some situations—such as when memory is low—it may not be able to adjust the memory properly.
Wkh#Iloh#Vwruh#lv#qrq0yrodwloh#phpru|#vr#wkdw#lw#zloo#qrw#eh#hudvhg#diwhu# shuiruplqj#kdug0uhvhwwlqj1#Krzhyhu/#zkhq#|rx#plvwdnhqo|#hudvh#wkh#vxe0 iroghu#ri#|rxu#Iloh#Vwruh#iroghu#zkhuh#wkh#vrph#surjudpv#duh#lqvwdoohg#iurp# |rxu#Frpsdqlrq#FG/#|rx#kdyh#wr#uh0lqvwdoo#wkhp#iurp#Frpsdqlrq#FG1# For more information on backing up your device to the File Store(NAND Flash), see “Backing Up and Restoring Data” in chapter 4.
Chapter 3 Using Input Panel ඝ In this chapter you have several options for entering new information: - Block Recognizer - Keyboard - Letter Recognizer - Phone Dialer - Transcriber G Chapter 3 Pocket PC Overview 3-1
Using the Input Panel G Use the Input panel to enter information in any program on your device. You can write using keyboard, Block Recognizer, Letter Recognizer, or Transcriber. In any case, the characters appear as typed text on the screen. To show or hide the Input panel, tap the Input panel button. Tap the arrow next to the Input Panel button to see your choice.
Keyboard G G G G G G G G G G G G G G G G G G G G G G G Back space Return Punctuation entry Space Input Panel for Keyboard ඝ To type with the soft keyboard 1. Tap the arrow next to the Input panel button, and then tap Keyboard. 2. On the keyboard that is displayed, tap the keys with your stylus.
ඝ Using Letter Recognizer 1. Tap the arrow next to the Input panel button, and then tap Letter Recognizer. 2. Write a letter in the box. When you write a letter, it is converted to typed text that appears on the screen. For specific instructions on using Letter Recognizer, open Letter Recognizer and then tap the question mark next to the writing area. G G Transcriber backspace Settings Tap here to select Transcriber Letter shapes Display the current mode. Mini keyboard.
Move the slide to right/left side to select speed and quality. Add space after entry Select the width of pen and see sample displayed below Tap the button to refer to how to make strokes. Selected character Select one of 3 options according to how often you use the selected shape. Tap these arrows to see more choices.
G {GGGMG G GGGGGGG U With Transcriber you can write anywhere on the screen using the stylus just as you would on paper. Unlike Letter Recognizer and Block Recognizer, you can write a sentence or more of information; then, you pause and let Transcriber change the written characters to typed characters. ඝ To type with Transcriber 1. Tap the arrow next to the Input panel button, and then tap Transcriber. 2. Write anywhere on the screen.
Chapter 4 Connecting to Desktop To get the most from your device, you will want to connect to your desktop or notebook PC. This chapter describes how to establish the connection between your device and your desktop PC, and how to synchronize and transfer files between your device and your desktop (or any PC that has Microsoft ActiveSync installed). G wGwjGYWWYGG hz GZU^UXG wGwjGYWWZGG ̺G hz GZU]G ̺G ̺G hz GZU\G ̺G G G iGwGwjGYWWZGGGG
Install Microsoft ActiveSync and establish a partnership =bghU`` A]WfcgcZh 5Wh]jYGmbW G G G G G G G G G G G z GyG z ~GYWWWGUG z tGvGYWWYGUG z vGYWWWGUG z tGpG[UWXGzwXGGGUG z XYG¥G]\GtiGGGGGG z `GGY\TGGSGpkhGGG|ziO|GzGiPGGG z jkTyvtGG z }nhGGGGY\]GGGGG z r GMGtG G GGGh
To get the most from your device, you have to connect to your desktop or notebook PC. Microsoft ActiveSync enables you to synchronize the information on your desktop PC with the information on your device. In addition, you can back up data from your device to your desktop PC and restore this data to your device, and copy files between your device and desktop PC. Before you begin synchronization, install ActiveSync on your desktop PC from the provided Companion CD.
Click Yes to move to the next screen. Click Next. Click Next. When the process becomes 100%, automatically it will go to the next screen. Connect USB port to desktop PC and the power cable to cradle. Then seat your device into USB cradle.
A wizard of finding a new hardware will begin automatically as below. Click Next. Click Next. Select CD-ROM drive and click Next.
Click Next. Click Finish and automatically the synchronization process will begin. And then the following processes will appear on your desktop PC. Now you are ready to synchronise between your device and the desktop PC. It may take a while for synchronisation to finish. When set up as a Guest, you can find files by pressing the Explore button on the Toolbar. Instead of synchronizing, you may set up your device as guest.
partnership, you can select one of the options. A desktop PC can establish partnerships with several devices while one device can establish partnerships with up to two desktop PCs. However, you cannot synchronize two devices with one desktop PC at the same time. Click Next. Select any items you want to synchronize and otherwise, deselect the others. Click Next.
Click Finish. Now, you are ready to establish a new partnership. You will have the Microsoft ActiveSync screen as shown below. This is the partnership name that is established with your desktop PC through ActiveSync. These are the items you have selected for synchronizing with desktop PC. When you perform hard reset on your device, you need to change the partnership name that is preset as Pocket_PC.
Synchronizing Data Synchronization compares the data on your device with your desktop PC and updates both computers with the most recent information. For example, you can synchronize Microsoft Word and Microsoft Excel files between your device and desktop PC. Your files are automatically converted to the correct format. And you can synchronize e-mail messages in Inbox on your device with e-mail messages in Microsoft Outlook on your desktop PC.
Select Contacts and click the Settings button. Select any option you want to customize Pocket Contacts during the synchronizations. Select Tasks and click the Settings button. Select any option you want to customize Pocket Tasks during the synchronizations.
Select Favorites and click the Settings button. Select Inbox and click the Settings button. You have to select the folder you have made to be synchronized in the Inbox program. In this example, while synchronizing, it is set as copy at most 100 lines to save space, copy messages from the last 5 days.
Select Files and click the Settings button. This is the folder that includes the file synchronized with your desktop PC. You will find the Shortcut to the Files icon( )on your desktop PC. After you customized ActiveSync and completed the first synchronization, you can control when synchronization occurs by selecting a synchronization mode. Select one of the 3 options: continuously while the device is connected, only upon connection and manually.
Copy, Paste and transfer files Select the file(s) you want to copy and select Copy on the Edit menu or select Copy on the pop-up menu. For pasting file(s), select the Explore button on the Microsoft ActiveSync screen of your desktop PC to have the Mobile Device screen displayed as below : First, select the folder you want to paste and select Paste on the Edit menu or select Paste on the pop-up menu.
Select Conversion Settings. Deselect this option box not to change the file format.
Full Backup & Restore using Backup/Restore of ActiveSync You can back up files, database, PIM data and programs installed in RAM to your desktop PC using Microsoft ActiveSync, and restore them when needed. Backup can either be performed automatically when your device is connected to your desktop PC, or manually whenever needed. Also, you can back up updated or new data only or choose to back up all data. Automatic backup is only possible when a Partnership is established with a desktop PC.
Do not remove your device from the cradle or disconnect the USB cable during backup. Restore As newly installed programs or new files created on your device since your last backup will be lost after restore, you should move them to your desktop PC or to File Store (NAND Flash memory) before you restore data. 1. Connect your device to desktop PC. 2. Close all programs running on your device. 3. Establish a partnership as Guest. Select this options box to set up your device as guest. 4.
5. Tap the Restore Now button. 6. Select the backup file you want to restore and select OK to begin. 7. Click Restore to begin the restore process. 8. When completed, perform soft Reset on your device with your stylus and seat your device on your cradle to synchronize.
How to install programs using ActiveSync Using Setup.exe or Install.exe 1. Download the program to your desktop computer (or insert the CD or disk that contains the program into your desktop computer). 2. Connect your device to your desktop PC. 3. If the program includes an installer program (typically named Setup.exe or Install.exe), double-click the installer program on the desktop PC. The installer program copies the necessary files to your device. Using cabinet (*.cab) file 1.
Connecting to Device Connecting by USB Cradle Using the USB cradle, you can charge and synchronize your device at the same time even though the charging circuit is not included on your cradle. Keep your device in the cradle when you are not carrying it with you, so it is always charged, synchronized, and ready to go. Turn off your device or remove it from the cradle before you shut down your desktop PC.
G Chapter 5 G G G Using the Internet & E-mail G G G G G In addition to connecting your device to your desktop PC, you may want to connect to remote computers so you can access e-mail, browse the Internet, or retrieve files from a corporate network, whether you are at home or on the road. ඝ To start the connection, simply open a program that requires a connection to the Internet. Your device will attempt to connect automatically.
Browsing the Web on your device You have to set up the Internet Settings before you use the Internet Explorer for the first time. For more information, refer to the Internet Settings section later in Chapter 6. Once you are connected to an ISP or to a network, you can browse the Internet or a corporate intranet. You can also use Pocket Internet Explorer to browse Web and WAP content while you are not connected—by downloading mobile favorites and channels to your device.
2. On the View menu, tap Address Bar. 3. Enter address you want on the address bar located on the top of screen and tap the arrow next to the address bar, then it will automatically connect to the Internet using CDMA module. 4. When the internet connection is completed, the internet connect ( ) icon will appear on the Navigation bar. 5. When you want to finish using Internet, tap the stop ( so that you have the Internet browse( ) button on the Command bar ) icon stopped.
Mobile Favorites folder Only items stored in the Mobile Favorites subfolder in the Favorites folder in Internet Explorer on your desktop PC will be synchronized with your device. This folder is created automatically when you install ActiveSync. You can only view the mobile favorites offline that was synchronized with your desktop PC. If the page is not synchronized with your desktop PC, it will be dimmed in the Favorites list of your device.
To make the Mobile Favorites button on the Tools menu of your desktop PC Select Tools bar > Customize on the View menu of Microsoft Internet Explorer to add the Mobile Favorites button on the Tools bar. Select Create Mobile Favorites on your left pane and click the Add button to send that item you select to the right pane as described above. Then you will find the Mobile Favorites( ) button on your tools bar of your Microsoft Internet Explorer.
2. Then select the Favorites check box and click the Settings button. 3. Deselect pictures and sounds for the Mobile Favorites and click OK. To view Mobile Favorites offline 1. Tap the Favorites button on Pocket Internet Explorer of your device to display your list of favorites. Tap the favorite you want to view. Tap to add or delete a folder or favorite link. 2. In the list, tap the page you want to view.
Sending and Receiving E-mail If you have an e-mail account with an ISP or on a corporate network, you can use Inbox to send and receive e-mail messages in two ways: Synchronize e-mail messages with Microsoft Outlook on your desktop PC. Send and receive e-mail messages by connecting directly to an e-mail server through an ISP or a network.
Select the folders you want to synchronize. Make selections as you want and click OK to copy the Inbox folder of your desktop PC to the Inbox folder of your device. Here is the list of mail messages after you synchronize through ActiveSync. Shows you this is a mail message with attachments that need to be downloaded. Shows you this is a read mail message. This is unread message. This is unread message with attachments that need to be downloaded. This is already read message.
If you want to download the attachments, tap and hold the corresponding message to have pop-up menu displayed. Then select Mark for Download. Then this icon will be changed to . Using the Message List Messages you receive are displayed in the message list. By default, the most recently received messages are displayed first in the list. Select the sort order for messages. Tap to connect and to send and receive e-mail. Tap to connect to the selected service.
When you receive a message, tap it to open it. Tap to return to the message list. When you select this message with attachments that is already downloaded, the message will open with attachments displayed on the bottom of screen. Tap to view the previous or next message. Tap to reply to or forward this message. Tap to delete this message. You can mark the messages that you want to retrieve in full during your next synchronization. In the message list, tap and hold the message you want to retrieve.
2. In the To field, enter an e-mail address of one or more recipients, separating them with a semicolon, or select a name from the contact list by tapping the Contacts button. 3. Compose your message. To enter preset or frequently used messages, tap My Text and select a message. 4. G When you have finished the message, tap Send.
Delete a message When your device is synchronized with your desktop PC, and when you want to delete a message on your device, tap and hold the message to have pop-up menu displayed. Then select Delete. If your device is not synchronized with your device, the next time your device is synchronized, the corresponding message on your desktop PC will be deleted.
Connecting Directly to an E-mail Server In addition to synchronizing e-mail messages with your desktop PC, you can send and receive e-mail messages by Inbox on your device using CDMA module. The ISP or network must use a POP3 or IMAP4 e-mail server and an SMTP gateway. Customize a new mail service You can use multiple e-mail services to receive your messages. For each email service you intend to use, first set up and name the e-mail service.
After the status becomes Completed as shown above, tap Next. Enter your name and password and then tap Next. Select POP3 or IMAP4 if it is supported, enter a name in the Name box (for example, My Mail).
lGGGGGuGGOGSGt GtPGGGuU Enter server names in the Incoming mail box and the Outgoing mail box(for example, mail.bigpond.com), and if needed, tap Options to set the other options. For more detailed information, ask your the network administrator or corporate mail-server administrator. G To connect to an e-mail service In Inbox, tap Services, and then tap Connect. Then through CDMA module, you will be connected to mail server.
To synchronize your own local folder through ActiveSync If you want to synchronize your own local folder through ActiveSync, select the local folder(for example, POP3 as shown below) and on the Tools menu, select Manage Folders. Select the subfolder you want to synchronize through ActiveSync and tap OK on the upper-right corner. By default, each mail service is composed of 5 subfolders.
To download the attachments of message You can download the attachments of message through directly connecting to mail server using the CDMA module. Tap the Connect ( ) icon to directly connect to the mail server. Then you will find the connect Tap the connect icon on the navigation bar. icon on the navigation bar to finish this connection. Tap and hold the message to download the attachments and select Mark for Download on the pop-up menu.
G G G G Chapter 6 Configuring Device G G G G G G G G This chapter details ways you can optimize your device using the Settings, and describes ways you can expand features and functionality by adding programs. This chapter also offers important tips on safeguarding your data by managing power and memory.
Settings G On the Start menu, tap Settings. You will see 3 tabs: Personal, System and Connections. 1. the Personal tab Tap the Buttons ( ) icon to assign functions to the 4 buttons located on the front of your device. You can assign some functions to the hardware buttons using this setting. G G G G G G G G G First, select a button among the 4 buttons and select a program you want for that button on the assignment.
G G G G G G G Move the slide to adjust the delay before first repeat. G G Move the slide to adjust the repeat rate.
Tap the Input ( ) icon to adjust a setting on the Input Panel. G G G G G Select the default mode among Block Recognizer, keyboard, Letter Recognizer, Phone Dialer and Transcriber. G G G G G G G G G G G G G G G G G G G G G G G G G G G G G It is recommended that you select the default mode of voice recording format to conserve your memory size.
Tap the Menu ( ) icon to adjust the programs listed on the Start menu and New menu. G G G G G G G G Selected items appear in the Start menu. Otherwise, the rest appear in Programs. G G G G G G G G G G G G G Select the Turn on New button menu item to have the selected items displayed on the New menu list.
{GGvGpGOGGGGGPGGGG GGUG G G G G G G G G G G G G G G G G G G G G G Select this option box to show this information when device is turned on.
Tap the Password ( ) icon to change a password. G G G G G G G G G G G G G G G G G G G When you select the Strong alphanumeric password item, you have to enter the 7-digit password: a combination of the English upper case and lower case letters.
Tap the Sounds & Notifications ( ) icon to adjust sounds that is enabled for events, programs, screen taps and hardware buttons. G G G G G G G G G G G G G G G G G G G G G According to each event, select the corresponding sounds or notifications.
Tap the Today ( ) icon to use an image file as the background and select programs that appear on the Today screen.
2. the System tab Tap the About ( ) icon to see the version and copyright. G G G G G G G G G G G G G G G G G G G G G G G While synchronized, this will be used for identifying itself and establishing a partnership.
Tap the Backlight ( ) icon to adjust the backlight. It is recommended to conserve your battery life that you turn off backlight if device is not used for the time you select here.
Tap the Clock ( ) icon to adjust the current time and alarms. Select the right one according to where you stay.
Tap the Memory ( ) icon to adjust the allocation of memory temporarily. To conserve the program memory, you can stop programs that are not being used.
Tap the Power ( ) icon to see the state of battery. G While being seated on cradle, if main battery is not fully charged, it will move from 0 to 100% on the charging bar Display the state of backup battery.
Tap the Regional Settings ( ) icon to adjust the time, number, especially period, money and data type. Select where you stay.
Tap the Remove Programs ( ) icon to remove the programs that are installed on your device. When the storage memory is short, remove the program installed on your device.
Tap the Screen ( ) icon to adjust the touch screen if your device is not responding accurately to screen taps. Press down the up button of the up/down control and press the power button at the same time to have the Align Screen displayed.
Tap the Sound icon to adjust the sound effectively.
Tap the System icon to see system information and adjust the wake up, USB and GPS.
3. the Connections tab Tap the Beam ( G ) icon to adjust the beam settings of your device.
Tap the Connections ( G ) icon to set the options for a modem connection.
{GGuGjGGGGGGGGUG G User’s Manual 6-22