PoE VoIP Paging Gateway Operations Guide SiP Compliant 010846 CyberData Corporation 2555 Garden Road Monterey, CA 93940 (831) 373-2601 930098C VoIPon www.voipon.co.uk sales@voipon.co.
VoIP Paging Gateway Operations Guide 930098C SiP Compliant 010846 COPYRIGHT NOTICE: © 2007, CyberData Corporation, ALL RIGHTS RESERVED. This manual and related materials are the copyrighted property of CyberData Corporation. No part of this manual or related materials may be reproduced or transmitted, in any form or by any means (except for internal use by licensed customers), without prior express written permission of CyberData Corporation.
Revision History Revision Date Released Description of Changes B 3/01/2007 Updates Figure 2-7 through Figure 2-13. C 4/12/2007 Changes the Authenticate ID and password character limit from 30 to 25 in Table 2-4. CyberData Corporation 930098C Operations Guide VoIPon www.voipon.co.uk sales@voipon.co.
Chapter CyberData Corporation 930098C VoIP Paging Gateway Operations Guide VoIPon www.voipon.co.uk sales@voipon.co.
i Contents Chapter 1 Product overview 1 Chapter 2 Implementing the VoIP Paging Gateway 3 2.1 Parts list ...................................................................................................................................................3 2.2 Typical Installation .................................................................................................................................5 2.3 Setting up the VoIP Paging Gateway ..........................................................
ii CyberData Corporation 930098C VoIP Paging Gateway Operations Guide VoIPon www.voipon.co.uk sales@voipon.co.
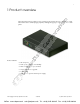
1 1 Product overview The VoIP Paging Gateway enables access to existing paging speakers through a VoIP phone system. This interface uses a standard paging amplifier, and supports paging to multiple zones from a VoIP phone.
2 Product overview Supported ● Asterisk™ SIP server Offers Open Source benefits with the rich and flexible feature set of a large, proprietary PBX system. ● HTTP Web-based configuration Provides an intuitive GUI for easy system configuration and verification of gateways operations. ● DHCP Client Dynamically assigns IP addresses in addition to the option to use static addressing. ● TFTP Client Facilitates Web-based firmware upgrades of the latest speaker capabilities.
3 2 Implementing the VoIP Paging Gateway The topics in this chapter provide information on setting up, configuring, and using the VoIP Paging Gateway. 2.1 Parts list The packaging for the VoIP Paging Gateway includes the parts in this illustration. Table 2-1.
4 Implementing the VoIP Paging Gateway Table 2-1. Parts List (continued) Quantity 2 CyberData Corporation Part Name Illustration #4 x 1-1/4" Round Phillips Wood Screws 930098C VoIP Paging Gateway Operations Guide VoIPon www.voipon.co.uk sales@voipon.co.
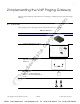
Implementing the VoIP Paging Gateway 5 2.2 Typical Installation Figure 2-1 illustrates how the VoIP Paging Gateway is normally installed as part of a paging system: ● When you call to make a page, the VoIP Paging Gateway generates a tone over the phone. ● When you hear this tone, enter the two-digit code for the zone that you want to page. ● The VoIP Paging Gateway sends the code to the paging amplifier.
6 Implementing the VoIP Paging Gateway 2.3 Setting up the VoIP Paging Gateway Before you set up the VoIP Paging Gateway, be sure that you have received all the parts described in Section 2.1, "Parts list".
Implementing the VoIP Paging Gateway 7 2.3.2 Connect to the Network Plug one end of a standard Ethernet cable into the Paging Gateway Ethernet port. Plug the other end into your network. Figure 2-3. Connecting to the Network 48V DC 2.3.3 Confirm that the VoIP Paging Gateway is up and running The indicator lights on the front of the VoIP Paging Gateway verify the unit’s operations. VoIP Paging Gateway Operations Guide 930098C CyberData Corporation VoIPon www.voipon.co.uk sales@voipon.co.
8 Implementing the VoIP Paging Gateway Figure 2-4. Paging Gateway Indicator Lights Link Test/Reset switch On when network connection is established Orange when baud rate = 100Mbps Yellow when baud rate = 10Mbps Act. Status Paging Blinks to indicate network activity Blinks when unit is up and running Blinks when unit is paging 2.3.3.
Implementing the VoIP Paging Gateway 9 2.3.4.1 Connect the VoIP Paging Gateway to a Paging Amplifier Plug one end of a modular telephone cord into the Paging Gateway Line Out port. Plug the other end into your paging amplifier. Figure 2-5. Connecting to a Paging Amplifier 48VDC 2.3.4.2 Connect the VoIP Paging Gateway to a Telephone Plug one end of a modular telephone cord into the Paging Gateway Line Out port. Plug the other end into a touch tone telephone. 2.3.
10 Implementing the VoIP Paging Gateway Figure 2-6. Test/Reset Switch Once the VoIP Paging Gateway is running and connected to a paging device, use the Test/Reset switch to broadcast a test message to all zones in the paging system. Note When the VoIP Paging Gateway has been configured and connected to a paging device, you can also broadcast a test message to a paging zone that you specify. Refer to Section 2.4.
Implementing the VoIP Paging Gateway 11 Parameter Factory Default Setting Password admin Subnet Mask 255.255.255.0 Default Gateway 192.168.3.1 To restore these parameters to the factory default settings: 1. Press and hold the Test/Reset switch while the unit beeps after one second and all indicator lights on the front of the unit come on. 2. Continue to press the switch until after the indicator lights go off, and then release it.
12 Implementing the VoIP Paging Gateway 2.4 Configuring the VoIP Paging Gateway Perform the following steps to configure the VoIP Paging Gateway online: ● Gather the Required Configuration Information ● Log in to the Configuration GUI ● Configure the Network Parameters ● Change the Default Username and Password ● Configure the SiP Parameters 2.4.1 Gather the Required Configuration Information Have the following information available before you configure the VoIP Paging Gateway. 2.4.1.
Implementing the VoIP Paging Gateway 13 2.4.2 Log in to the Configuration GUI To log in: 1. For the initial configuration of the VoIP Paging Gateway, open your browser and enter the following address: http://192.168.3.10 Note To work with the VoIP Paging Gateway configuration after the initial configuration, log in using the IP address you assign to the device. Section 2.4.3, "Configure the Network Parameters" provides instructions for entering the IP address. 2.
14 Implementing the VoIP Paging Gateway Table 2-1. Home Page Overview Web Page Item Description IP Addressing Shows the current IP addressing setting (DHCP or static). IP Address Shows the current IP address. Subnet Mask Shows the current subnet mask address. Default Gateway Shows the current default gateway address. Link to the Network Setup web page. Link to the Gateway Setup web page. Link to the SIP Setup web page. Link to the Upgrade Firmware web page.
Implementing the VoIP Paging Gateway 15 Figure 2-8. Network Setup Page 4. On the Network Setup page, enter values for the parameters indicated in Table 2-2. Table 2-2. Network Setup Parameters Web Page Item Description IP Addressing* Select either DHCP IP Addressing or Static IP Addressing by marking the appropriate radio button. If you select Static, configure the remaining parameters indicated in Table 2-2. If you select DHCP, go to Step 3. IP Address* Enter the Static IP address.
16 Implementing the VoIP Paging Gateway Table 2-2. Network Setup Parameters (continued) Web Page Item Description Link to the Upgrade Firmware web page. Link to the Home page. On this page: 1. Specify whether you use Static or DHCP IP Addressing by marking the appropriate radio button. Then, if you select Static, go to Step 2. Note Changing the IP Addressing selection causes the system to reboot when click Save Settings. 2. For Static IP Addressing, also enter values for the following parameters: a.
Implementing the VoIP Paging Gateway 17 Figure 2-9. Gateway Configuration Page 4. On the Gateway Setup page, enter values for the parameters indicated in Table 2-3. Table 2-3. Gateway Setup Parameters Web Page Item Description Device Name Enter the name of the device.
18 Implementing the VoIP Paging Gateway Table 2-3. Gateway Setup Parameters (continued) Web Page Item Description Click on this button to do an audio test. Generates a voice message for testing the speaker audio quality and volume. Link to the Network Setup web page. Link to the SIP Setup web page. Link to the Upgrade Firmware web page. Link to the Home page. To change the default Web access Username and Password: 1.
Implementing the VoIP Paging Gateway 19 Figure 2-10. Gateway Configuration Page To broadcast a test message to a specific paging zone. 1. Enter the paging Zone you want to test. 2. Click Audio Test. The VoIP Paging Gateway sends a brief audio message to that zone. Notice that the round, green Paging light below the Status light blinks when a page is in progress 2.4.6 Configure the SiP Parameters The SIP parameters enable the VoIP Paging Gateway to contact and register with the SIP server.
20 Implementing the VoIP Paging Gateway Figure 2-11. SIP Configuration Page 3. On the SIP Setup page, enter values for the parameters indicated in Table 2-4. Table 2-4. SIP Setup Parameters Web Page Item Description SIP Server* Enter the SIP server represented as either a numeric IP address in dotted decimal notation or the fully qualified host name (FQHN) up to 64 characters. Remote SIP Port* Enter the Remote SIP Port number (default is 5060).
Implementing the VoIP Paging Gateway 21 Table 2-4. SIP Setup Parameters (continued) Web Page Item Description Click on this button to save your configuration settings. Changing a parameter that has an asterisk next to it will cause a system reboot when saved. Link to the Network Setup web page. Link to the Gateway Setup web page. Link to the Upgrade Firmware web page. Link to the Home page. 1. Enter the IP address of the SIP Server. 2. Enter the port numbers used for SIP signaling: a.
22 Implementing the VoIP Paging Gateway 2.5 Upgrading the Firmware The firmware on the board consists of two files: a Kernel and an Application, that can be loaded separately. Uploading the firmware files requires a host machine running a TFTP server. If you need to set up this server, Appendix A, “Setting up a TFTP server” provides instructions. Figure 2-12. Firmware Upgrade Page CyberData Corporation 930098C VoIP Paging Gateway Operations Guide VoIPon www.voipon.co.uk sales@voipon.co.
Implementing the VoIP Paging Gateway 23 To upload a firmware file, log in as instructed in Section 2.4.2, "Log in to the Configuration GUI". Table 2-5 shows the web page items on the Firmware Upgrade page. Table 2-5. Firmware Upgrade Parameters Web Page Item Description System Configuration Shows the current configuration. Bootname Shows the current boot loader filename. Kernel Shows the current kernel filename for partition 1 and 2.
24 Implementing the VoIP Paging Gateway 2.6 Rebooting the VoIP Paging Gateway To reboot the system, log in as instructed in Section 2.4.2, "Log in to the Configuration GUI". Figure 2-13. .Firmware Upgrade Page 1. On the Home page, click Upgrade Firmware to open the Firmware Upgrade page. Go to the Reboot section on the right side of the page. 2. Select Partition 1 or Partition 2 for the Kernel and the Application. 3. Click Reboot.
25 Appendix A: Setting Up a TFTP Server Upgrading the firmware requires a TFTP server on which you access the Web interface where you upload the firmware files. A.1 Set up a TFTP Server Upgrading the VoIP Paging Server firmware requires a TFTP server on which you access the Web interface where you can upload the firmware files. A.1.1 In a LINUX Environment To set up a TFTP server on LINUX: 1. Create a directory dedicated to the TFTP server, and move the files to be uploaded to that directory. 2.
26 CyberData Corporation 930098C VoIP Paging Gateway Operations Guide VoIPon www.voipon.co.uk sales@voipon.co.
27 Appendix B: Troubleshooting/Technical Support B.1 Frequently Asked Questions (FAQ) Go to the following URL to see CyberData’s list of frequently asked questions: http://www.cyberdata.net/support/voip/paginggateway.html B.1.1 Documentation The documentation for this product is released in an English language version only. You can download PDF copies of CyberData product documentation at: www.CyberData.net—>Support—>Drivers, Utilities & Manuals—>Product Drivers & Documentation—>VoIP Paging Gateway B.
28 B.3 Warranty CyberData warrants its product against defects in material or workmanship for a period of two years from the date of purchase. Should the product fail within the warranty period, CyberData will repair or replace the product free of charge. This warranty includes all parts and labor. If the product is out-of-warranty and fails, a flat rate repair charge of one half the product purchase price will be assessed.
29 Index Symbols configuration information 12 current settings, reviewing 14 CyberData contact information, corporate, sales, tech support, service 27 +48V DC power supply 6 Numerics D 100 Mbps indicator light 8 default gateway 11 IP address 10 subnet mask 11 username and password 10 default gateway 11, 15 default gateway for static addressing 16 default password for configuration GUI 13 default settings, restoring 10 default username and password for configuration GUI 13 DHCP addresssing 12, 16 DHC
30 G N gateway configuration 14 gateway configuration page 16, 18 gateway setup button 14, 16, 18 green light, blinking 10, 19 green link light 8 green paging light 8 GUI username and password 16 network activity, verifying 8 network configuration page 14 network parameters, configuring 14 network setup button 14 network, connecting to 7 O H orange link light 8 http web-based configuration 2 P I paging amplifier connecting to 8 in typical installation 5 paging gateway configuration 12 paging light
31 user ID for SIP server login 20 user ID for SIP server registration 21 user ID, SIP 20 username restoring the default 10 username for configuration GUI 12, 16 password 12, 18 requirements for upgrading firmware 22 reset switch 18 resetting the IP address to the default 27 restoring factory default settings 10 ring out 17 RMA returned materials authorization 27 RTP Audio Version 2 2 V S verifying baud rate 8 network activity 8 network connectivity 8 VoIP phone in typical installation 5 server SIP 14
32 CyberData Corporation 930098C VoIP Paging Gateway Operations Guide VoIPon www.voipon.co.uk sales@voipon.co.