
Owner`s manual


Video Setup Options
Adjusting Video Settings in the Video Setup Page
The Video Setup Page contains settings that will be determined by the type
of TV you’re using, along with settings based on your personal preferences.
You can adjust the player to function with NTSC or PAL television types, as
well as normal and wide screen models. Also, display properties such as
Sharpness, Brightness and Contrast may be adjusted with this menu.
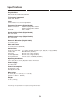
TV TYPE - PAL/MULTI/NTSC
Your DVD Player will work with TVs based on the NTSC and PAL
standards, as well as TV designed to function with both standards, or
“Multi” models. NTSC is the standard TV system used in the USA, Canada,
Japan and many other countries. The PAL TV system is used in Europe,
Africa and the Middle East, among other places. Refer to your TV’s
documentation to make sure which model you have.
TV DISPLAY - (NORMAL /PS4:3)/(NORMAL/LB4:3)/WIDESCREEN16:9
You can setup your DVD Player to work with normal and wide screen televisions. If you are using a wide screen TV,
set this option to WIDESCREEN16:9 to match the aspect ratio of your TV. When used with a normal TV (4:3 aspect
ratio), the NORMAL/PS4:3 setting results in the typical “Pan & Scan” display, where a movie is clipped on the sides
to fit into the TV screen. The NORMAL/LB4:3 setting will enable the “Letterbox” format, where the movie is presented
in wide screen format with black lines at the top and bottom of the screen.
SHARPNESS, BRIGHTNESS & CONTRAST - HIGH/MEDIUM/LOW, +-16
You may adjust the Sharpness of the picture to one of three levels: High, Medium or Low. The Brightness and
Contrast are adjustable from -16 to +16. Use the UP and DOWN ARROW keys to adjust the Brightness and Contrast.
SetupEnter
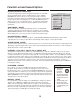
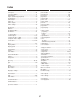
VIDEO SETUP PAGE
TV DISPLAY
SHARPNESS
BRIGHTNESS
MAIN PAGE
MULTI
TV TYPE PAL
NTSC
CONTRAST
To Reset to NTSC:
STOP > SETUP > DOWN ARROW > DOWN ARROW > ENTER > RIGHT ARROW > DOWN ARROW > DOWN ARROW > ENTER
To Reset to PAL:
STOP > SETUP > DOWN ARROW > DOWN ARROW > ENTER > RIGHT ARROW > UP ARROW > UP ARROW > ENTER
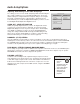
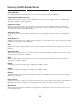
Quick Tips
Use Caution when Changing the TV Type
Choosing the wrong TV Type may cause the screen to flicker and become unreadable. So, change
this setting with caution. If you have changed the TV Type to the wrong setting, you may need to
program the correct setting without being able to read the display. In this case, take the disc out of
the player and turn the power off. After a few seconds, turn the power on and input one of the
following code sequences to change the TV Type:
31
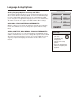
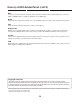
VIDEO OUTPUT
VIDEO OUTPUT - YCbCr/S-VIDEO
3
2
1
VIDEO
VIDEO
S-VIDEO
OUT
Y
Cb
Cr
COMPONENT
VIDEO
VIDEO
OUT
3
2
1
Choose the setting that corresponds to the Video Output Connector you are using:
COMPOSITE VIDEO OUT: This is the typical connection type supported on most TVs.
This connection does not require a change to the VIDEO OUTPUT setting.
S-VIDEO OUT: You must first connect the unit using the COMPOSITE VIDEO
connector and cable in order to enter SETUP and change this setting to S_VIDEO,
activating the S-VIDEO Output. Next, connect the unit using the S-VIDEO cable and
unplug the COMPOSITE video cable. Switch the TV’s Video Input setting to S-VIDEO.
COMPONENT VIDEO OUT: You must first connect the unit using the COMPOSITE VIDEO connector and
cable in order to enter SETUP and change this setting to YCbCr, activating the COMPONENT VIDEO Outputs.
Next, connect the unit using the COMPONENT VIDEO cables and unplug the COMPOSITE video cable.
Adjust the TV’s Video Input setting to correspond to the COMPONENT Input.