
Operation Manual


Chapter 4: Adjustments
35
using the photo information (texture, lighting, and shading) that surrounds
it.
- Size: use the slider to set the size of area that the tool covers up.
- Feather: use the slider to set the transition level between the area being
covered up and the pixels around the area.
- Opacity: use the slider to set the transparency of the applied cover up.
3. Click on the part of the photo you want to touch up and then drag the spot
removal tool to the part of the photo you want the spot to resemble.
4. Click Done to finish the adjustments and close the panel.
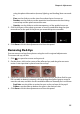
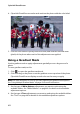
Removing Red-Eye
You can remove red-eye from photos using the tool in regional adjustments.
To remove red-eye, do this:
1. Click to open the remove red-eye tools.
2. On the photo, click in the center of the affected eye, and drag the mouse to
resize a color spot that is placed over the red-eye.
3. CyberLink PhotoDirector should auto detect the red-eye, and then fix it for you.
If it is unable to detect it properly, click and drag the applied spot to center it
over the red area, and then use the available sliders to manually fix it as follows:
- Pupil size: use the slider to resize the spot on the red area of the pupil.
- Darken: use the slider to darken the spot to the desired color.
4. Click Done to finish the adjustments and close the panel.