
Operation Manual


Table Of Contents
- Contents
- Introduction
- PowerDirector Editing Modes
- PowerDirector Workspace
- PowerDirector Projects
- Importing Media into PowerDirector
- Importing Media Files
- Capturing Media
- Capturing from a DV Camcorder
- Capturing from an HDV Camcorder
- Capturing from a TV Signal
- Capturing from a Digital TV Signal
- Capturing from a Webcam
- Capturing from a Microphone
- Capturing from a CD
- Capturing from an AVCHD Camcorder
- Capturing from an Optical Device
- Captured Content
- Quality Profile Setup
- Capture Settings
- Capture Preferences
- Downloading Media
- Detecting Scenes and Extracting Audio
- 3D Media
- Arranging Media in Your Production
- Editing Your Media
- Content Aware Editing
- Splitting a Clip
- Unlinking Video/Audio Clips
- Trimming Video and Audio Clips
- Setting a Media Clip's Duration
- Setting TV (Video Clip Interlacing) Format
- Adjusting Video Clip Aspect Ratio
- Stretching Images
- Cropping Images
- Changing the Shape of Media
- Fixing and Enhancing Images/Videos
- Utilizing Keyframes on Media
- Power Tools
- Muting Audio
- Advanced Audio Editing
- Time Info
- Magic Fix
- Magic Cut
- Adding Effects
- Creating PiP Effects
- Adding Particle Effects
- Adding Title Effects
- Using Transitions
- Mixing Audio and Recording Voice-Overs
- Adding Chapters
- Adding Subtitles
- Producing Your Project
- Creating Discs
- PowerDirector Preferences
- PowerDirector Hotkeys
- Appendix
- Technical Support
- Index
99
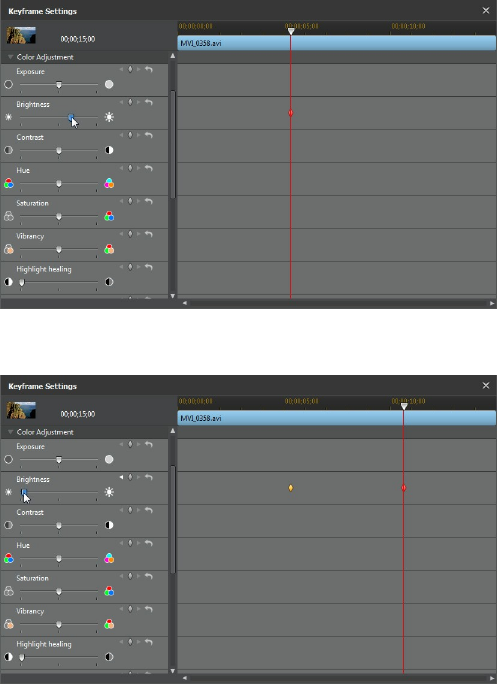
Editing Your M edia
3. Use the player controls to find the next moment you want to add the next
keyframe, and then modify the clip properties as required again,
4. Repeat these steps to create the kind of effect you want in your video
production using keyframes. In the above example, the brightness of the
media clip will slowly dim between the two keyframe moments.