
Operation Manual


CyberLink PowerDirector 6
198
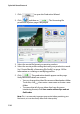
6. When production is complete, the Write to DV Tape dialog box
opens.
7. Locate the position at which you would like to begin writing to
tape. You may do this in one of the following ways:
• Use the playback buttons.
• Drag the time slider.
• Enter a timecode in the timecode box.
8. Your produced movie file appears in a list in the window.
• Click to add new files to the file list. Select a file and click
to remove it from the file list.
• Select a file then click to bring it closer to the
beginning of your movie when writing to tape. Click
to move it toward the end.
• To ensure that all of your video clips have the same
interlacing format, click Scan source video clips and set
field order.
Note: This is an extremely important step to take before producing your
final movie, as it can drastically affect final video quality!