Firewall & In-built Anti-Virus Virtual Private Network QUICK START GUIDE NG11EO Appliance Share your USB modem Internet Connection Website Filtering Application Filtering NetGenie is furnished under the terms of Cyberoam's End User license agreement, which is available in this Quick Start Guide from page 11 onwards. By using this Appliance, it shall be presumed that you have read the said license and you agree to be bound by the terms and conditions of the same.
Unified Threat Management For SOHO - Small Office, Home Office Quick Reference Page Section no. no. Know your NetGenie Unboxing Your New NetGenie… What else do you need… Details to Remember NetGenie: The Appliance 1. Front Side 2.
Section 1 Unboxing Your New NetGenie… Congratulations on your purchase of NetGenie Secure Internet Appliance. After unboxing NetGenie, please ensure that you have all these components: 1. NetGenie Wireless Base Unit - NG11EO 2. Two (2) detachable WiFi Antennas 3. One RJ-45 Ethernet Cable 4. One Power Adapter 5. Quick Start Guide Please immediately contact your vendor if you find anything missing. 1 3 2 5 4 What else do you need… 1.
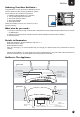
2 Section Getting your NetGenie Ready Before you begin surfing the Internet using NetGenie, you need to assemble the appliance. 1. Screw in detachable WiFi antennas in their respective jacks provided in the back panel. 2. Look out for a sticker at the bottom of the appliance containing the default wireless network name, technically known as SSID and a pass key specific for your appliance. These details pre-secure your wireless network from any unauthorized access attempts.
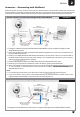
Section 2 Scenarios - ‘Connecting with NetGenie’ Please check how you connect to the Internet in your office and make note of it before making any changes. We have provided four (4) different usage scenarios. Scenarios 1 and 2 are for wired connections; scenarios 3 and 4 for wireless connections. Please check the relevant scenario applicable for you and follow given instructions.
Section 2 2. Use the RJ-45 Ethernet cable provided with the NetGenie appliance to connect your computer to any of the “LAN” NetGenie sockets. 3. Switch on your NetGenie appliance. Wait till the Power LED and WAN LED turns green. 4. Switch on your computer now. NetGenie's “LAN” LED will turn green and remain steady. 5. Open your browser and start surfing the Internet, you will be served with NetGenie Splash Screen (Page 7).
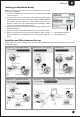
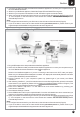
2 Section Scenario 4 Secure Internet Connectivity over WiFi Internet Wireless Desktop Card Direct Cable ADSL/Cable Modem NetGenie Secure Internet Appliance 5 Laptop Or Desktop Computer Modem Power Cable NetGenie Power Cable Connect your Internet cable / WAN here 1. Use the cable that comes with your NetGenie appliance to connect it to the ADSL Router/ Cable Modem. Insert one end of the cable in the “WAN” NetGenie socket and the other end in your modem “LAN”.
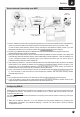
Section 3 2. Select PPPoE and fill up the required details. Once the valid details have been entered and you apply the configurations, NetGenie will automatically connect to the Internet. 3. Open your browser and start surfing the Internet, you will be served with NetGenie Splash Screen. Your computer is now secured from online threats and malware with the Quick Security feature automatically turned on.
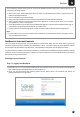
Section 3 This introductory splash screen gives an overview of NetGenie features along with multiple options. You can perform following actions: 1. Click 'Learn more about NetGenie's Security' button to read detailed information regarding security features offered by NetGenie. 2. Click 'Continue Surfing' to skip this page. 3. Click 'Learn Why NetGenie' to know benefits of NetGenie over other available products. 4. Click 'Customer Portal' to access customer portal of NetGenie.
3 Section Step 2: Basic Configuration Once you have logged in into the appliance, 1. You can select your preferred language. 2. In ideal case, NetGenie appliances are programmed to automatically set time zone according to your geographical location within first 30 seconds, once the Internet is connected. We suggest you to verify the time zone from System > Time and update it, if required. 3. Register your NetGenie appliance from System > Registration to avail support. Step 3: Adding your office users 1.
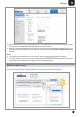
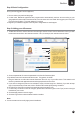
Section 3 Step 4: Start Surfing 1. Open a new browser window and enter a URL of the website that you want to visit, e.g. www.google.com, in the address bar. You will come across a user authentication page. Click the image associated with your username and enter the password. 2. You will come across the following page. 4. Click the given link to open the website. After surfing, do not forget to click the Logout button for security reasons.
Step 5: Deleting Users or Deactivating/Activating Users Deleting Users 1. If you wish to delete a user, click the icon next to username in the left hand panel of the Internet Controls page. 2. When prompted, confirm your action by clicking the OK button. 3. The user will be deleted. Deactivating or Activating Users 1. If you wish to deactivate a user, click the icon next to username in the left hand panel of the Internet Controls page. To activate the user, click again the icon next to username. 2.
section 5 ("Transfer") and section 12 ("Open Source Software") below), nonexclusive license to use the Firmware and Software for your internal business purposes, in accordance with the terms set forth in this License Agreement. You agree not to assign or sublicense such license provided to You under the terms of the License Agreement, except as may be specifically permitted vide the terms of the License Agreement.
TO THE MAXIMUM EXTENT PERMITTED BY LAW, NO IMPLIED WARRANTY, INCLUDING ANY IMPLIED WARRANTY OF MERCHANTABILITY, FITNESS FOR A PARTICULAR PURPOSE, APPLIES TO THE PRODUCT AFTER THE APPLICABLE PERIOD OF EXPRESS LIMITED WARRANTY STATED ABOVE, AND NO OTHER EXPRESS WARRANTY OR QUARNTY, EXCEPT AS MENTIONED ABOVE. 10. Tax Liability. You agree to be liable and responsible for the payment of all taxes imposed at any time whatsoever on this transaction. 11. General Provisions.
2. You may modify your copy or copies of the Program or any portion of it, thus forming a work based on the Program, and copy and distribute such modifications or work under the terms of Section 1 above, provided that you also meet all of these conditions: a) You must cause the modified files to carry prominent notices stating that you changed the files and the date of any change.
distribute software through any other system and a licensee cannot impose that choice. This section is intended to make thoroughly clear what is believed to be a consequence of the rest of this License. 8.