User Manual Power Distribution Unit www.CPSww.
Table of Contents Model List...............................................................1 Introduction............................................................1 Package Contents.................................................................. 1 For 1U Series............................................................1 For 2U Series............................................................2 Safety Precautions.................................................................2 Product Features.........
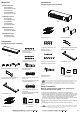
Introduction Model List Package Contents (For 2U Series) 1U Switched Series PDU15SW8FNET PDU15SWHVIEC8FNET PDU20SW8FNET PDU20SWT8FNET PDU20SWHVIEC8FNET 1U Monitored Series PDU15M8FNET PDU15MHVIEC8FNET PDU20M8FNET PDU20MT8FNET PDU20MHVIEC8FNET PDU 2U Switched Series PDU30SWT16FNET PDU30SWHVT16FNET 2U Monitored Series PDU30MT16FNET PDU30MHVT16FNET Cable Ties / Qty.
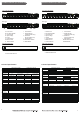
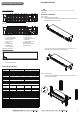
Product Features (1U 15A Series) Product Features (1U 20A Series) Front panel description NEMA Type Front panel description NEMA Type B E C D G F YU0-0000026-00 3 4 5 6 7 8 H I Tx/Rx Link Volts Serial Port Select Serial Port KW N 1 L M K 2 3 4 5 6 7 8 PDU20SWT8FNET Reset J A N L M K IEC Type IEC Type B E C D 4 5 6 7 8 J A A. Power Cord B. AC Output Outlets C. Current Level D. Input Voltage E. Power F. Load Indicator G. Ethernet Port H.
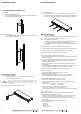
Product Features (2U Series) Installation Guide Front panel description NEMA Type CAUTION!! B C G H Horizontal Installation Bank 1 , 20A 100-120VAC 50/60 Hz 24A MAX 1 2 Bank 2 , 20A 8 7 6 5 4 3 YU0-0000028-00 B1 B2 - Normal - Warning - Overload Amps Volts Select 10 11 12 13 14 15 16 I J Reset K A Tx/Rx Link Serial Port KW 9 D F E O M N Please use only the provided screws through the entire installation process. For 1U Model Step 1.
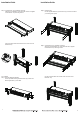
Installation Guide Installation Guide Step 3. Cord Retention Tray Installation (optional) Attach the Cord Retention Tray to the PDU with the 4 supplied Cord Retention Tray Mounting Screws. Step 2. PDU Mounting Use the supplied Washers (4) and Screws (4) to secure the PDU to your existing rack system. Use the provided Cable Ties to fasten each cord to the Cord Retention Tray. For 2U Model Step 1.
Installation Guide Installation Guide Vertical Installation (1U Model Only) For 1U Model Step 1. Mounting Bracket Installation Use the provided Mounting Bracket Screws (8) to attach the SHORT Mounting Brackets (2) to the PDU. Step 2. PDU Mounting Use the supplied Washers (2) and Screws (2) to secure the PDU to your existing rack system. Step 3 – Attach equipment It is extremely important not to exceed the PDUs maximum current load (as outlined in the Specifications section).
Installation Guide Operation 4. Type “setup” and press Enter to enter the Authentication menu. 5. Enter the user name and password of the PDU device at the Authentication menu. Note: The default username is “cyber” and the default password is “cyber”. For further information and configuration via Hyper Terminal, see Appendix A- Hyper Terminal.
Firmware Upgrade Customer Service & Warranty 5. Upgrade the cpspduafw_XXX.bin, type * ftp > bin * ftp > put cpspduafw_XXX.bin 6. Upgrade complete, type * ftp > quit 7. The system will reboot after you type “quit” 8. Login to the FTP again * ftp * ftp> open * To [current ip of the PDU] [port] ; EX: To 192.168.22.126 21 * Input USER NAME and PASSWORD 9. Input USER NAME and PASSWORD Upgrade cpspduadata_XXX.bin * ftp > bin * ftp > put cpspduadata _XXX.bin 10. Upgrade complete , type * ftp > quit 11.
Customer Service & Warranty Appendix B-Power Device Network Utility Who pays for shipping? We pay when we send items to you; you pay when you send items to us. What Are Some Things This Warranty Does Not Cover? 1. This Warranty does not cover any software that is damaged or needs to be replaced due to the failure of the Product or any data that is lost as a result of the failure or the restoration of data or records, or the reinstallation of software. 2.
Appendix B-Power Device Network Utility Appendix B-Power Device Network Utility Launch Program To launch the Power Device Network Utility and get started, select Programs from the Start menu in Windows and locate the new folder and icons for Power Device Network Utility. Select Power Device Network Utility from the program folder (Shown in Figure 3.). Step 2.