
Service manual


18
3 / INSTALLATION
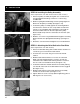
STEP 10-Installing the Pulley Assembly
(Tools required–One 1/4” Allen wrench and one 9/16” wrench.)
1. Select one pulley assembly along with one 3/8-16 lock nut,
two spring bracket bushings, and one 1/2 x .625” long
shoulder bolt.
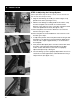
2. Slide two spring bracket bushings into the spring alignment
bracket on the pulley assembly. (See figure 3-29.)
3. Position the pulley assembly against the mounting bracket
onto the frame. Orient it in such a way that the head of the
3/8-16 x 2.50” long bolt heads towards the center tube on
the frame and the offset on the lower part of the pulley
bracket heads away from the center tube on the frame. (See
figure 3-29.)
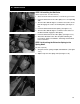
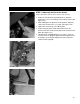
4. Slide the 1/2 x .625” long shoulder bolt through the mounting
bracket and the two spring bracket bushings. (See figure 3-
30.)
5. Attach the 3/8-16 lock nut and tighten to a 22 ft-lb minimum.
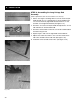
STEP 11-Attaching the Drive Belt to the Foot Plate
(Tools required–One 1/8” Allen wrench.)
1. Select one drive belt along with one belt retainer and two 1/4
x 5/16” long set screws into the belt retainer.
2. Insert the two 1/4 x 5/16” long set screws into the belt
retainer.
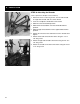
3. Slide the belt retainer with the set screws on to the belt.
Make sure that the belt position is such the at teeth are
towards the floor and the belt retainer position is such that
the set screws are towards the floor. (See figure 3-31.)
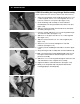
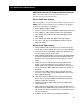
4. Position the belt onto the belt attachment assembly making
sure that all of the teeth on the belt attachment are engaged.
(See figure 3-32.)
5. Slide the belt retainer over the belt attachment assembly
until the two ends are flush. (See figure 3-32.)
6. Tighten both set screws securely. (Before tightening, place a
dab of grease on each screw.)
Fig. 3-29
Fig. 3-30
Fig. 3-31
Fig. 3-32