
Service manual


B. Run your hand under the belt on the top of the deck surface. If you feel
excessive ridges or cracks, or if the deck feels grooved yet highly
polished, the deck should be flipped so that an unused surface faces
the top. If the deck is worn on both sides it should be replaced. In time,
a worn belt and deck can cause high current draw and ultimately, motor
failure. For instructions on replacing the belt and deck, see Running Belt
and Deck in the the Service chapter.
4. Clean under the belt.
A. To minimize the effect of friction between the deck and the running belt,
Cybex recommends cleaning the underside of the running belt and the
top of the running deck surface by wiping them with a clean, dry towel.
This cleaning should be done each time you check the belt and deck
condition to prevent premature wear of the deck, running belt and the
drive motor system. See the Service Schedule in this chapter.
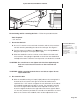
5. Replace the side rails and motor cover.
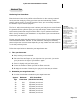
A. After completing the inspection and cleaning of the deck surface, snap
the side rails back down into their original position.
B. Using a 3/16” Allen wrench, attach the two button head screws on the
sides of each side rail. See Figure 2.
C. Lower the motor cover in place and tighten the two Phillips screws. See
Figure 2.
Cybex 700T Treadmill Owner’s Manual
Page 4-5
Front Pages
About this Manual . . . . . . . . . . i
FCC Compliance Information . i
Declaration of Conformity . . . . ii
Table of Contents. . . . . . . . . . . iii
3
Operation
Quick Operation Guide . . . . 3-1
Detailed Operation Guide . . 3-1
Stopping the Treadmill. . . . . 3-3
Control During Operation . . 3-4
Data Readouts. . . . . . . . . . . 3-5
Selecting Programs &
Options. . . . . . . . . . . . . . . 3-6
Displaying Heart Rate . . . . . 3-6
Use of Programs . . . . . . . . . 3-7
P1 - Manual Mode. . . . . . . . 3-7
P2 - Speed Challenge . . . . . 3-8
P3 - Cardiovascular
Program . . . . . . . . . . . . . 3-10
P4 - Weight Loss Program 3-12
P5 - Fitness Test Program. 3-14
P6 - Saved Program . . . . . 3-16
Workout Tips . . . . . . . . . . . 3-17
4 Preventive Maintenance
Regular Maintenance
Activities . . . . . . . . . . . . . . 4-1
Cleaning Your Treadmill . . . . 4-1
Running Belt Maintenance . 4-2
Other Preventive
Maintenance . . . . . . . . . . . 4-6
Service Schedule . . . . . . . . . 4-7
Log Sheet . . . . . . . . . . . . . . . 4-8
5
Setup & Assembly
Quick Setup . . . . . . . . . . . . 5-1
Choosing & Preparing a Site 5-1
Electrical Power
Requirements . . . . . . . . . . 5-3
Unpacking . . . . . . . . . . . . . . 5-3
Assembling the Treadmill . . . 5-4
Testing the 700T Operation . 5-9
Setting Operation Options. 5-10
6 Customer Service
Contacting Service . . . . . . . . 6-1
Serial Number & Voltage. . . . 6-1
Warranty . . . . . . . . . . . . . . . . 6-1
Return Material Authorization
(RMA) . . . . . . . . . . . . . . . . 6-4
Damaged Parts. . . . . . . . . . . 6-4
Ordering Parts . . . . . . . . . . . 6-5
7
Service
Service Instruction . . . . . . . . 7-1
Motor Brushes. . . . . . . . . . . 7-1
Motor Current & Voltage . . . 7-4
Running Belt & Deck . . . . . . 7-7
Drive Belt . . . . . . . . . . . . . . . 7-9
Front Roller . . . . . . . . . . . . . 7-9
Rear Roller. . . . . . . . . . . . . 7-10
Error Codes . . . . . . . . . . . . 7-11
Diagnostic Tests . . . . . . . . 7-14
End
Caps
Side
Rails
Screws (2)
Figure 2
Motor
Cover
Screws (2)
Screws