
Service manual


To exit the diagnostic test mode, press the STOP key at any time. This will
return you to the mode you were in before entering Diagnostic Tests.
d1: Software Revision and Heart Rate Sensor
This test displays the configuration information for the main program chip in the
control panel. “d1” is displayed in the left control panel window, and the right
control panel window displays the revision level of the main program.
For example:
d1 2.06
Active keys during this test (hold keys for two seconds):
START/ENTER will advance you to the next diagnostic test.
STOP will exit the test mode and return you to the mode you were in
before entering Diagnostic Tests.
SHIFT backs you up one step in the diagnostic test menu.
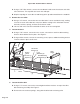
Also active in this diagnostic window is the test for the heart rate. The backlit
heart symbol will pulse with every received pulse. Note that the usable range of
the Polar Transmitter is only about 30” (76 cm) from the console cross rail
where the pickup sensor is embedded.
d2: Actual Speed
This test displays the diagnostic test number d2 and flashes the set speed, in
0.1 mph (kph) increments, in the left control panel window. NOTE: The decimal
point is not displayed. The right control panel window displays the actual
measured speed of the drive motor in mph (kph) by using the signal from the
speed sensor.
9.5 mph, for example:
d2 95 9.50
Active keys during this test (hold keys for two seconds):
START/ENTER will advance you to the next diagnostic test.
STOP will exit and return you to the mode you were in before
entering Diagnostics Tests.
SHIFT backs you up one step in the diagnostics test menu.
The - and + keys change the set speed in 0.1 mph (kph) increments.
d3: Current Draw
The diagnostic test number d3 is displayed in the left control panel window.
The right control panel window displays the current draw of the drive motor
when the treadmill is running. You must start the treadmill before entering
diagnostics in order for this test to be valid. See nn 2 for details.
For example:
d3 4.8
Cybex 700T Treadmill Owner’s Manual
Page 7-15
Front Pages
About this Manual . . . . . . . . . . i
3 Operation
Quick Operation Guide . . . . 3-1
Detailed Operation Guide . . 3-1
Stopping the Treadmill. . . . . 3-3
Control During Operation . . 3-4
Data Readouts. . . . . . . . . . . 3-5
Selecting Programs &
Options. . . . . . . . . . . . . . . 3-6
Displaying Heart Rate . . . . . 3-6
Use of Programs . . . . . . . . . 3-7
P1 - Manual Mode. . . . . . . . 3-7
P2 - Speed Challenge . . . . . 3-8
P3 - Cardiovascular
Program . . . . . . . . . . . . . 3-10
P4 - Weight Loss Program 3-12
P5 - Fitness Test Program. 3-14
P6 - Saved Program . . . . . 3-16
Workout Tips . . . . . . . . . . . 3-17
4
Preventive Maintenance
Regular Maintenance
Activities . . . . . . . . . . . . . . 4-1
Cleaning Your Treadmill . . . . 4-1
Running Belt Maintenance . 4-2
Other Preventive
Maintenance . . . . . . . . . . . 4-6
Service Schedule . . . . . . . . . 4-7
Log Sheet . . . . . . . . . . . . . . . 4-8
5
Setup & Assembly
Quick Setup . . . . . . . . . . . . 5-1
Choosing & Preparing a Site 5-1
Electrical Power
Requirements . . . . . . . . . . 5-3
Unpacking . . . . . . . . . . . . . . 5-3
Assembling the Treadmill . . . 5-4
Testing the 700T Operation . 5-9
Setting Operation Options. 5-10
6 Customer Service
Contacting Service . . . . . . . . 6-1
Serial Number & Voltage. . . . 6-1
Warranty . . . . . . . . . . . . . . . . 6-1
Return Material Authorization
(RMA) . . . . . . . . . . . . . . . . 6-4
Damaged Parts. . . . . . . . . . . 6-4
Ordering Parts . . . . . . . . . . . 6-5
7 Service
Service Instruction . . . . . . . . 7-1
Motor Brushes. . . . . . . . . . . 7-1
Motor Current & Voltage . . . 7-4
Running Belt & Deck . . . . . . 7-7
Drive Belt . . . . . . . . . . . . . . . 7-9
Front Roller . . . . . . . . . . . . . 7-9
Rear Roller. . . . . . . . . . . . . 7-10
Error Codes . . . . . . . . . . . . 7-11
Diagnostic Tests . . . . . . . . 7-14
Parts List . . . . . . . . . . . . . . 7-21
Exploded View . . . . . . . . . . 7-25
700T Schematic . . . . . . . . . 7-26