CycleOps Pro Series Indoor Cycles User Guide 400 Pro 300 Pro 200 Pro 100 Pro Deutsche Anweisungen www.cycleops.com/userguide Istruzioni italiane www.cycleops.com/userguide Nederlandse instructies www.cycleops.com/userguide Norsk instruksjoner www.cycleops.
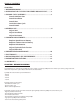
TABLE OF CONTENTS Chapters: 1. before beginning................................................................................1 2. Unpacking the CycleOps pro series indoor Cycle............2 3. Indoor cycle Assembly....................................................................3 Attach Stabilizer Feet Attach Handlebar Attach Seat Level the Indoor Cycle Attach Pedals 4. GENERAL USE............................................................................................
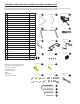
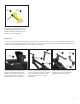
CHAPTER 2: Unpacking the CycleOps Pro series Indoor Cycle Place the box upright and cut the plastic binding straps. Lift the top of the box to expose the indoor cycle and packaging. Remove all parts from the box including foam inserts.
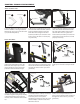
CHAPTER 3: indooR CyClE AssEmbly Attach Stabilizer Feet Rear stabilizer A Front stabilizer B A Rear stabilizer B Front stabilizer A 1. Note the difference between the front and rear stabilizers. The larger stabilizer with wheels goes in the rear of the indoor cycle (under the flywheel). 2. Attach the rear stabilizer to the rear of the main frame with four 5mm stabilizer bolts and stabilizer washers using the 5mm Allen wrench.
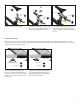
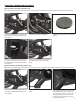
Large L handles Small L handles M N Push Rotate 7 Push black button and rotate handle on small and large L handles to position the handle without tightening. Release the button and allow the handle to seat to tighten or loosen an adjustment. Attach Seat A seat has been included with the CycleOps Pro Series indoor cycle. If desired, the indoor cycle can accommodate an off-the-shelf seat to personalize the fit, feel and ride.
Seat F Seat F Seat post Seat post clamp G End cap Seat post clamp 4. Attach seat to seat post clamp. E K G 5. Loosen the 6mm bolt and place seat rails 6. Secure the plastic end cap to the seat within the clamp. Adjust to desired seat post using two end cap screws with the placement using 6mm Allen wrench. Phillips screwdriver side of the 6mm Allen wrench. Level the Indoor Cycle Move the indoor cycle to where it will be used and level it by rotating the adjustable feet underneath the stabilizers.
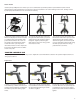
Attach pedals If desired, the CycleOps Pro Series indoor cycle can accommodate any standard pedals to personalize the fit, feel and ride. Install using the pedal manufacturer’s specifications. Improper installation can result in damage to the crank. Damage caused by improper pedal installation is not covered under warranty. Pedal Set R Right pedal Left pedal L 1. Attach the pedals onto the indoor cycle with the multi-purpose wrench included or a pedal wrench (not included).
Adjust handlebar N Small L handle Large L handle 1. Adjust handlebar to maximize comfort or duplicate outdoor riding position. Stop the flywheel and dismount the indoor cycle before making adjustments. M 2. Turn large L handle counterclockwise to loosen. Raise or lower the handlebar post to the desired height. Turn large L handle clockwise to tighten. 3. Turn small L handle counterclockwise to loosen. Move the handlebar forward or back to achieve proper handlebar position.
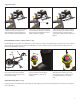
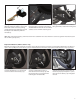
CHAPTER 5: Common AdJUsTmEnTs Replace Speed Sensor Battery (200 Pro only) Over time, the lithium battery in the speed sensor will need to be changed. See Preventative Maintenance for when to replace. 1. Using a 4mm Allen wrench, remove the three chain guard bolts and remove the chain guard. 2. Locate speed sensor next to hub. 4. Using the new battery, remove the battery cover on the back of the sensor by turning counterclockwise approximately one half turn. 5.
4. Using the new battery (compatible CR2032), remove the battery cover on the back of the cadence sensor by turning counterclockwise approximately one half turn. Replace the old battery with the new battery. 5. Secure the cadence sensor to the main 6. Using a 4mm Allen wrench and three frame using the previously removed bolt chain guard bolts, reattach the chain guard. and 4mm Allen wrench. Be sure to hold the cadence sensor arm while attaching bolt.
Adjust Flywheel/Chain Tension Over time and after substantial use, the chain on the CycleOps Pro Series indoor cycle will stretch. Adjusting the tension/alignment is a difficult task and improper adjustment can lead to premature chain/cog wear. It is recommended this task be done with assistance from an authorized indoor cycle dealer. The chain tension has been adjusted properly when there is little or no play felt when the pedals are rocked back and forth.
Adjust Brake Pad (100 Pro, 200 Pro, 300 Pro only) The brake mechanism has been adjusted at the factory. However, over time due to chain stretch and brake pad wear, it may need to be adjusted. To replace/adjust brake pad, use the following procedure: 1. Back off resistance until it the knob stops turning (counterclockwise). Then turn clockwise 180 degrees (1/2 turn). 2. Loosen the clamping bolts with a 5mm Allen wrench. Align the brake pad by sliding it towards the flywheel.
Weekly In addition to daily maintenance, perform the following each week: • Inspect and adjust brake pad. • Properly tighten pedals and all hardware attaching toe clips/straps (if applicable). Tighten pedals to 300 in-lbs. • Inspect handlebar clamp assembly. Tighten clamp bolt if loose. • Inspect seat post clamp and clamp assembly. Tighten clamp bolt if loose. • Inspect stabilizer feet. Tighten if necessary. • Inspect flywheel. Check for proper alignment. Tighten flange locking nuts to 75 in-lbs.
Chapter 8: Radio Frequency (RF) interference Radio frequency (RF) interference with other devices may cause intermittent loss of information. Wireless Internet access points, microwaves, cordless phones, or other wireless devices may cause frequency interference. To mitigate the chance of interference, set wireless access points to the lowest channel possible and keep indoor cycles away from interfering devices. To change the channel on the access point, please consult manufacturer’s documentation.
Chapter 10: WARRANTY Manufacturer’s Warranty (under normal use) Frame: Lifetime (Home) Fifteen Years (Commercial) Main frame assembly Stabilizers Parts: Three Years Excludes wear items: Brake pads Chain Pawls Seat post sleeve Handlebar sleeve Electronics: One Year In the event of a warranty issue, Saris Cycling Group, Inc. will repair or replace the item at its discretion. Saris Cycling Group, Inc.