4.
1 Introduction T43H Introduction Thank you for choosing a Cydle product. We hope you will find the instructions in this owner’s manual clear and easy to follow. If you take a few minutes to look through this user manual, you’ll learn how to use all the features of your new Cydle T43H to provide maximum enjoyment.
1 Introduction 1. Introduction T43H Contact Contents 1 2 2 3 2. Before you start Safety precaution What’s in the box Name of Parts Installation Connecting to Ext. FM HD Radio antenna Switch on and switching off Volume on and Volume off Reset Speaker icon and Mute Back Light off to save power Battery saving mode Battery notes Charging the battery Menu 6 6 7 8 9 12 13 13 13 14 14 15 15 15 16 3. Getting started GPS Driving View Menu page 18 19 21 4. Finding your destination a.
1 Introduction 37 37 38 38 40 42 5. Traffic information using HD Radio Technology Real-time traffic information Traffic service status Traffic Menu Traffic on Route Traffic Map Traffic Flow Traffic Details Traffic List Traffic Classes Traffic Setting Traffic Station 43 43 43 44 44 45 45 46 46 47 48 49 6.
1 Introduction 61 8. Music 63 9. Movie 66 10. Picture 69 11. Calculator 71 12. Utility Introduction 7. GPS status 72 Calendar Stopwatch 72 73 13. HD Radio Technology 74 14. Setting 78 Sound setting Display setting Selecting System Language Date & Time setting Selecting Theme Calibration System Information 78 79 80 81 81 82 82 15. Update 83 OS update Software update App +Map update App update Map update 83 85 86 88 89 16. Specification 91 17.
Before you start Your unit contains a number of electronic components that can be damaged permanently when exposed to shock or vibration. To protect your unit from damage, please keep your unit in a stable place and avoid dropping your unit . Also, do not operate it in high–shock and high-vibration environments. Clean the outer case of your unit using a cloth dampened with a mild detergent and then wipe it dry. Avoid chemical cleaners that can damage plastic components.
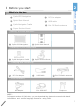
2 Before you start a Cydle GPS Navigation e DC Car adaptor b Quick Start Manual f USB cable c Cydle Navigator Cradle g Ext. FM Radio antenna d Super Suction Mount Before you start What’s in the box Getting to know and start… a Cydle GPS Navigation b Quick Start Manual Installing in your automobile c Cydle Navigator Cradle d Super Suction Mount Charging and connecting e DC Car adaptor f USB Cable g Ext. FM Radio antenna Sold separately AC adaptor Ext.
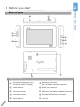
2 Before you start Before you start Name of parts a b c d f g e h i j Name of parts f Earphone connector/ Ext.
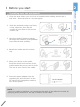
2 Before you start This unit is designed to install on dashboard or windshield found in every vehicles. Please install your unit in safe manner. NOTE: It is the end-users’ responsibility to install and operate this unit in a manner in accordance with local, state and federal laws. Before you start Installation Installing on Dashboard 1. Clean the area where your unit is installed with rubbing alcohol and a soft cloth. Allow to dry. A 2.
2 Before you start 1. Clean the area where your unit is to be installed with rubbing alcohol and a soft cloth. Allow the area to dry thoroughly. 2. Push the pedestal suction cup firmly to the connector, then flip the number A lever down to secure the suction cup. 3. Use the number B knobs to adjust the angle and rotation of the pedestal to provide the best visibility. A Before you start Installing onto the windshield B 4. Attach the cradle onto the suction cup. 5. Place your device in the cradle.
Before you start • Please make sure that you install the navigator where it does not block the driver’s view. • Do not install the product over an air bag cover or within the air bag deployment zone. Before you start NOTE : 2 CYDLE has no responsibility of liability for injury or death as a result of car crashes and/or air bag deployment. • The navigator cradle may fall off the windshield if it is attached to the windshield with a suction cup for an extended period of time.
Before you start < Improving reception > This unit is designed to receive digital radio channels and traffic information using HD Radio Technology. To improve HD Radio reception, an external FM HD Radio antenna is included with the package contents. Before you start Connecting to the External FM HD Radio antenna 2 1. After installing your unit on the dashboard or windshield, please connect the external FM antenna to improve HD Radio reception.
2 Before you start The power switch is located on the upper right side of your unit as shown in the Name of Parts chapter. • • Powering your unit on : Press and hold the Power switch for more than 3 seconds Powering your unit off : Press and hold the Power switch for more than 3 seconds Before you start Switching on and switching off Volume up and Volume down There are two ways to use volume controls. One is tapping the speaker icon and the other is pressing hard keys.
2 Before you start • The speaker icon is located at the top of the screen. It indicates the current volume level from Mute to 12 level. (Default volume level is 10 level) • In each application, the Mute button will allow you to set volume “0 level” with one easy click. The speaker icon indicates that the volume is muted. • To cancel the mute function, simply tap the Mute button again and T43H will automatically un-mute.
2 Before you start Battery saving mode You can use Battery saving mode when you’re not using your unit but you don’t want to turn it off. Using Battery saving mode significant electrical consumption and also allows you to avoid having to wait for your unit to reboot. When you press and hold the Power switch for 2 seconds, your unit will be under the Sleep/Wake up. When your unit is locked, nothing happens if you touch the screen.
Before you start - Battery notes 1 2 3 4 USB Cable The USB port is used to link the unit directly to a personal computer. Through the USB port in the unit you can charge your battery as well. DC adaptor The DC adaptor included in the box allows you to charge the battery efficiently. When your unit is being charged with the DC adaptor, the battery icon will be changed to the DC adaptor icon Before you start Charging the battery 2 The link involves several steps as shown below.
2 Menu NAVIGATION Get to your destination more quickly with clear guidance from your T43H. HD Radio Listen to FM channels with clear high definition sound. MOVIE PLAYER Watch movies transferred from your PC or SD card. MUSIC PALYER Listen to songs transferred from your PC or SD card with clear sound . PICTURE VIEWER View pictures with rotation view and full screen view. CALCULATOR Add, subtract, multiply and divide. UTILITY Use the calendar of your T43H.
Getting started GPS Getting started. Initial Screen. < Declaration screen > Getting started GPS To start Navigation , Click the icon for Navigation in menu screen. Cydle T43H has Cydle XE traffic preinstalled as navigation software. Cydle XE traffic will start by showing Driving view with along detail information about your current position, speed, destination and more. 3 After GPS starts, you will see the declaration screen as shown above.
Getting started GPS The navigation system automatically locates your current position on the map by receiving GPS signals. If the navigation system doesn’t receive GPS signals properly, it could take some time to locate your current position. 1 2 Getting started GPS Driving View 3 Zoom out: Zooming out from level 1 to level 21 Compass: By tapping this icon, you can change the map display mode To Track up, North up or 3D view.
Getting started GPS Current time 10 Expected time to arrival at destination 11 Remaining travel time from current position to destination 12 Remaining travel distance from current position to destination (To go to Route Summary page, tap anywhere from 9-12) 13 Menu button: Tap to go to Menu 14 Map scale: Indicates current map scale level 15 Voice guidance repeat button: Repeats the last voice instruction Getting started GPS 9 3 20
Getting started GPS The main menu can be accessed by pressing the ‘Menu’ button on the map screen. Descriptions of each button are as follows. Getting started GPS Menu page 3 1) [Where to?] Search for a location in various ways. 2) [My Route] Editing the current route or retrieving the current route information. 3) [Traffic] Traffic information menu. 4) [Clear route] Remove all existing locations from route. 5) [Settings] Customizing settings of the navigation system.
Finding your destination The following ‘Where to?’ screen is accessed by pressing the ‘Where to?’ button on the
Finding your destination 4 Finding your destination 9) [Zip Code] Searching for locations by zip code. 10) [Point on Map] Searching for locations by pointing on the map. 11) [Cities] Searching for locations by city name. 12) [POI Category] Searching for POI around your current position. 13) [POI Name] Searching for locations by POI (Point Of Interest) name. 14) [POI In City] Searching for a POI in a certain city. 15) [POI Telephone No.] Searching for locations by telephone no.
Finding your destination This function allows you to quickly navigate to your home. You can also search for your home location via ‘Favorites’. Finding your destination Home 4 Select ‘Go Home’ on [Where to?] screen. This [Go Home] button will be activated if you registered your home location via [Add to favorites] explained on page 25 or [Settings]>[Home]. Only one place can be registered as the home location.
Finding your destination 4 This function allows you to save addresses or Points of Interest (POI) that you frequently visit; for example, you may want to save your work address or friend’s address so that you can quickly and easily navigate to it. 1. Select ‘Favorites’ on [Where to?] screen. 2. Press the button to add a location to your favorite list. 3. To navigate to a favorite, simply tap on the favorite name. Select alphabetically.
03. Main Function Finding your destination In case of an emergency, quickly search the nearest emergency point of interest (e.g. hospital) from your current position without any complicated searching procedures. It will then find a route and start guidance automatically. Finding your destination Emergency 4 Recent Destination Searching for recent destinations. (Automatically saves up to twenty destinations.) 1. Select ‘Recent Destination’ on [Where to?] screen. 2. It will list recent destinations. 3.
03. Main Function Finding your destination 4 Searching for a location by using address. Finding your destination Address 1. Select ‘Address’ on [Where to?] screen. 2. For your convenience, previously searched state/province name and city name are initially selected on the first stage of address search. If you want to change state/province, tap [Change] button.
03. Main Function Finding your destination Intersections Searching for a location by using intersection. Finding your destination (Instead of searching [House No.], searching by intersection is also possible. Tap this intersection image button , then it will list intersections of the selected street. Select one on the result list, then tap 'Done' button.) 4 1. Take the searching steps [STATES]-[CITY]-[STREET], then it will list intersections of selected street.
03. Main Function Finding your destination Search for a location by using zip code. Finding your destination Zip Code 4 1. Select ‘Zip Code’ on [Where to?] screen. 2. After searching zip code, proceed to the next searching steps [Street][House no.] or [Intersection]. (Refer to address search on page 27.) Point on Map Searching for a location by pointing on the map. 1. Tap: Tap anywhere on the map and you will see the street address.
03. Main Function Finding your destination 4 To change the labeling option on the map, tap the button You can turn on and off three map labeling options: ‘Street Name’, ‘POI Symbol & Name’, and ‘Favorites Symbol & Name’. Refer to [Settings]-[Label On Map] on page 28 for more information. Itinerary Finding your destination ‘Point on Map’ may be accessed at any time simply by tapping on the main map window. In this page, you can plan the details of your itinerary.
Finding your destination 2. Select [New] button, then enter a name for a new itinerary. Tap 'Done' button. • Start Navigation: Start travelling. • New: Create a new itinerary. • Rename: Rename the current itinerary. • Load: Load one of itineraries. • Delete: Delete one of itineraries. 3. To add a location to your itinerary as departure, via point, or destination, tap Finding your destination 1. The initial itinerary page is empty.
03. Main Function Finding your destination Search for the center of city. After taking searching steps [STATE]-[CITY], press [Done] when ready. Refer to [STATE]-[CITY] searching steps on page 27. POI Name Finding your destination Cities 4 Searching for a location by using POI name. 1. Select ‘POI Name’ on the [Where to?] screen. 2. The previously searched state/province name and city name are initially selected. If you want to change state/province or city, tap […] button.
03. Main Function Finding your destination 4 Finding your destination POI In City Searching for a POI in a particular city. 1. [POI Category] screen (left screen image) is shown when you finish [State/Prov]-[City] searching steps. The 28 POI categories are arranged in the order of frequency of driver’s use. (Refer to ‘Address’ search on page 27 for [State/Prov]-[City] search.) 2. Select one of POI categories, then it will list POIs in order of distance from current position.
03. Main Function Finding your destination Finding your destination Start Travelling Guidance 4 To start guidance, you should tap the start button on the [Route Summary] page. The above screen image is the captured image when traveling guidance has begun. (Refer to
03. Main Function Finding your destination 4 The Turn List presents a full list of all maneuvers for the journey. This screen may be accessed by pressing the List button in the Turn by Turn mode. The default setting of this option is ‘Distance from position’. If you want to change this option, tap ‘Options’ button at the bottom of screen. Finding your destination < Turn List > • Distance since departure Shows distance from departure to each turning point.
03. Main Function Finding your destination In case of unexpected shutdown during the journey, the navigation system will remind you of the last destination when restarted. If you want to restore your previous route, select 'Done' button. Otherwise select ‘Cancel’ button. In addition to this, any VIA point that was unreached in the journey will be remembered. By going to [Menu] > [My Route], you can check via and destination points. Finding your destination Turning off device before journey is complete.
Finding your destination Routing Options may be used to create a new route or to edit an existing route. Create Route / Edit Route buttons will change depending on situation. Manage your route Finding your destination b. Route options 4 • Create Route / Edit Route [Create Route] is available if a route has not been set. [Edit Route] is available if a route has already been set. Use this option to edit your existing route.
03. Main Function Finding your destination This function is available if no route has been set. Finding your destination Create Route 4 • Add a Location to your route Press the ADD button to add a location to your route. For short routes, you may add up to 20 Via Points . The number of Via Points may be less for longer routes. • Position the location within the route The first location you set automatically becomes the destination. You may add another location to this route by pressing the ADD button.
Finding your destination This function is available if a route already exists. Finding your destination Edit Route 4 • Add a Location to your route Press the ADD button to add another location to your route. • Position the location within the route The first location you set automatically becomes the destination. You may add another location to this route by pressing the ADD button.
Finding your destination 4 This function is for editing your route. After editing your route preferences, the navigation system will recalculate a new route automatically. Finding your destination Detour You can change your route via four functions as follows: • Avoid part of route Make a detour to avoid some part of existing route. • Avoid roadblock Make a detour to avoid a roadblock.
Finding your destination This will bring you into the normal [Where to] screen. Choose from any of the available methods to find a location to add to your route. • Recalculate Original This button allow you to recalculate the original route by removing any detours or others changes that may have been set. Finding your destination • Travel Via Add a via point to your route.
Finding your destination 4 If your decision on [Route Decision] page created a route and [Settings][Routing Options]-[Show ‘Route Summary’ page automatically] option in setting is enabled, the [Route Summary] page will show up. In this page, you can check route information such as total distance, time, etc. It’s also possible to reroute via three options as follows. Finding your destination Route summary page • Faster Time Reroute considering faster time.
Traffic information using HD Radio Technology Your device is equipped to receive real-time traffic information. The traffic service is only available in certain areas. The device must be in data range of a radio station transmitting traffic data in order to receive traffic information. Cydle is not responsible for the accuracy of the traffic information. Using a special radio receiver, the device simply receives traffic data from a traffic service provider and displays this information on your product.
Traffic information using HD Radio Technology The Traffic Menu allows you to access all pages that are related to traffic information. It can be accessed by Pressing the Traffic button on the Main Menu, or by pressing the radio reception indicator on the main map. The and will only contain traffic information once the system is a) tuned to a radio station broadcasting traffic information and b) traffic information has been received for your area.
04. Traffic Traffic information using HD Radio Technology The traffic map will present summarised information about the traffic incident(s) affecting your route. The traffic symbol indicate the type of traffic event. • Next / Previous Scroll through the list to see the multiple events that exist on your route. • Avoid Press Avoid to reroute around the traffic incident. • Details Press Details to go into a page with full details on the traffic incident.
04. Traffic Traffic information using HD Radio Technology At times, you may need to get more information on a specific traffic event. When in the traffic map or List page, press ‘Details’ to access this page. Traffic List Traffic messages are organized into two groups: • On Route: Traffic events on your calculated route. You may only avoid ‘On Route’ traffic events. • All Messages: Traffic events that are within 50km of your vehicle’s position. This includes events on your route.
Traffic information using HD Radio Technology Traffic messages are organized into classes and each class has a name and symbol. This symbol will appear next to each event in the list, detail and map. Traffic information using HD Radio Technology Traffic Classes 5 The traffic classes are color-coded to indicate their status: • On Route: These “Red & Yellow” icons appear for “On Route” event only. These messages are listed in the “On Route” list.
Traffic information using HD Radio Technology Traffic information may be turned on/off for certain traffic classes. The following options are available: • Show: Show this traffic class on the map/list etc. • Sound: Audible alert when a message from this traffic class appears on my route. If you uncheck for a particular class, you will not receive any notification of events within this class. See the section for more details.
Customizing Cydle XE The Traffic Station page displays the station the traffic system is currently tuned to and allows you to adjust the station selection. There are three methods to manage the station: • Tune: If you know the station frequency you wish to tune to, use the arrow buttons to the left and right of station to manually set the station frequency. • Seek: The seek function may be used to manually seek the next available HD Radio Traffic Station.
Customizing Cydle XE In this page, you can customize the settings of the Navigation system. Customizing Cydle XE Settings 6 Descriptions of each option are as follows: 1. [Color Mode] You can set the color mode of map as ‘Daytime’, ‘Nighttime’, or ‘Auto mode’. Auto mode will allow the navigation system to automatically choose day or night mode based on the current system time. 2. [Map View] You can change the view mode of map as ‘Track up’, ‘North up’, or ‘3D View’ mode. 3.
Customizing Cydle XE 9. [Voice/Text Language] You can change voice/text language of Navigation. 10. [Routing Options] Changing routing options. 11. [Units] Change distance units (miles or meters) Customizing Cydle XE 8. [Label on Map] You can turn on/off displaying some labels on map. 6 12. [Set Clock] Setting your navigation time and apply some options such as ‘Daylight saving’ and ‘Sync. with GPS time’. 13. [Time Zone] Select time zone. 14. [Speed Limit] Turn on/off the speed warning.
Customizing Cydle XE Change the color mode of map as ‘Daytime’, ‘Nighttime’, or ‘Auto’ mode. Customizing Cydle XE Color Mode 6 • Daytime: Daytime color mode. • Nighttime: Nighttime color mode. (Refer to the right side image.) • Auto: Automatically change the map color by time. Map View • Track up: The direction of car is always upside of map screen. • North up: The map screen is fixed to north direction up. • 3D View: 3-dimensional ‘Track up Mode’.
6 Customizing Cydle XE By touching the map images, adjust day or night brightness of map screen according to your preference. Then tap 'Done' button. • Day: Adjust day brightness of map screen. • Night: Adjust night brightness of map screen. Customizing Cydle XE Set Brightness Map Colors By touching the map images, change day or night color of map screen according to your preference. Then tap 'Done' button. • Day Color: Select day color of map screen. • Night Color: Select night color of map screen.
Customizing Cydle XE Register or change your home location. You will probably this menu more than other. And your home location can be a place you go often, for example, your office or school. It can be your actual home address, but it can also be any address you like. Label on Map Customizing Cydle XE Home 6 Show/hide some labeling options on the map screen. Select options that you wish to be displayed on the map screen, then tap the 'Done' button to apply these settings on the map screen.
Customizing Cydle XE Change voice / text language option. Customizing Cydle XE Voice / Text Language 6 • Voice Language: Gogo offers several languages to choose. Each language has a male/female voice. And if you want to hear the sample voice of the selected one, tap To apply the selected voice language, tap 'Done' button. • Text Language: Choose text languages for user interface. Routing Options Set routing options. • To route considering faster time, select ‘Faster Time’ option.
Customizing Cydle XE Set distance units. You can choose one of following two options. • Miles/Feet • Kilometers/Meters Customizing Cydle XE Units 6 Set Clock Set time manually. • Sync with GPS: Synchronize the time on your device with GPS time. • Daylight Saving: Apply daylight saving. Time Zone Set time zone. • Select one of 30 time zones. The default time zone is US-Pacific.
Customizing Cydle XE Control how speed limit sign and warnings are given. The map data contains speed limit information for some, but not all roads. This information exists generally for highways and other major roads. For your convenience, the speed limit unit; i.e. miles or kilometers, matches the Customizing Cydle XE Speed Limit 6 system’s unit setting. Speed warning: An acoustic warning is given when the speed limit is exceeded.
Customizing Cydle XE Set current fuel price, and adjust consumption estimates according to vehicle. Your journey’s fuel cost estimate will appear on the ‘Route Summary’ page. You can access this screen via [Menu] > [My Route] > [Route Summary]. • Fuel Price Fuel prices fluctuate throughout the year. This setting allows you to adjust the fuel prices according to current prices.
Customizing Cydle XE Set volume. Volume setting to control voice guidance. Pressing the minus <–> or plus <+> button will sound a chime to indicates the volume level. • Link volume to car speed: increases or decreases the volume to compensate for road noise; for example, the volume will automatically get louder when you drive faster, and conversely, it will return to normal volume level for moderate driving speeds.
Customizing Cydle XE Restore all settings to factory defaults.
GPS status GPS Status Checking GPS status 7 • Blue satellite: GPS fix is established. • Pink satellite: GPS fix is unavailable. Pressing the button will reset the GPS module. It may take up to one minute to reacquire the GPS signal It may take some time to receive GPS signals. Please refer to page 39 for GPS signal disturbance. Note The GPS satellites in space are programmed to follow an exact orbit pattern each day.
GPS status To prevent GPS signal disturbance, please make sure that you are outside and the GPS antenna has a good visibility of the open sky. • In order to have clean satellite data reception, make sure the GPS antenna is horizontal with the sky. GPS status Precautions for receiving GPS signal 7 • If you are in the downtown area where buildings are crowded densely, it may cause the GPS signal reception disturbance.
8 Music To listen to music, Click on the icon for music in the menu screen. *Please us SD card to store the audio files , video files and photos. Music Music Player Cydle GPS can recognize up to 8 G SD card. Music Playback NOTE: Only select music and media when you are stationary. It is dangerous to select songs and make adjustments while you are driving. Not all audio files contain information about the song, such as the artist or genre.
8 Music Your unit allows you to listen to the songs in your playlist with the buttons of Music Player display. Music Display Music Button operation o n m a b c l d e f g h i j k a Title of song and play status b Shuffle songs- the next song is selected randomly. c Click to change the play mode d Information about the song e Play/pause f Stop g i Play a previous/ a next file in the selected storage h Fast reverse/ Fast forward j Mute/ Un-mute k Volume down/up.
8 Music Minimize the Music player. Music player keeps its operating and allows you to go back to the Main menu n Back to the Main menu o Select the storage card Music m < Replay setting > You can set to repeat the song in various play modes with the following.
9 Movie With T43H you can see video contents, Click the icon for the Movie Movie Player Movie Player in the menu screen. The video plays in Wide screen to take full advantage of the display. Movie playback NOTE: Only select music and media when you are stationary. It is dangerous to select movies and make adjustments while you are driving. *Please us SD card to store the audio files , video files and photos. Cydle GPS can recognize up to 8 G SD card. Browsing movie files 1.
9 Movie and Downward button Movie 4. Select a movie by tapping the Upward and tap to start play. 5. As soon as you choose a movie file, your unit start to play it.
9 Movie Stop Movie play f Fast forward g Play a next file in the selected storage h Shuffle play i Select Repeat mode j Open file k Open Library l To see Movie with the wide screen of the display m Volume control b n Back to the Main menu Movie e 68
10 Picture To Look at photo files , Click the icon Picture viewer in the menu screen. With T43H help you can carry your photo in SD card. Picture Picture Viewer *Please us SD card to store the audio files , video files and photos. Cydle GPS can recognize up to 8 G SD card. Looking at Photos 1. Tap Picture Viewer in the Main Menu. 2. Your unit search the file that can be viewed in its memory automatically. The Picture Viewer starts, showing the Picture file listed first in the storage. 3.
10 Picture Set the time for Slide show mode (1sec, 3secs, 5secs and toggle) g Start Slide view: it allows you to see the slide show with the time set h Full Screen View i Scroll down/up the play list j Back to Main the menu l Select the storage card Picture f Looking at Photos in full screen mode Full screen view is available when you click middle of the image in the screen.
11 Calculator the Main Menu. You can check today’s date and use the full function calculator. Calculator Calculator and Calendar are available when you click Utility in Using Calculator 1. Tap Utility in the Main Menu. 2. Tap on the Calculator to open this application. 3. You can use the basic functions of the Calculator such as add, subtract, multiply and divide just as you would with any other calculator.
12 Utility you click Utility in the Main Menu. Utility Calendar and Stopwatch are available when You can check today’s date and use the full function calculator. Using Calendar 1. Tap Utility in the Main Menu. 2. Tap on the Calendar 3. Calendar lets you view the today’s date in a continuous list, by day, or by month. Calendar Display You can manually set the date (year, month, day) with several buttons in the calculator of your unit.
Utility Utility Using Stopwatch 12 Stopwatch Display You can use this stopwatch timer with lap for any event to calculate the time. Easy 4 buttons for operation of stopwatch increase your experience with useful function of Cydle T43H.
HD Radio Technology To listen to the HD Radio stations, click the HD Radio icon in the menu screen. Your unit will help you listen to high quality FM channels through multicasting. About HD Radio Technology About HD Radio Technology HD Radio Technology allows CD-quality digital broadcasting of your local FM radio stations. HD Radio broadcasts can include multiple channels on the same frequency, which is called multicasting.
13 HD Radio Technology Your unit allows you to tune or seek for the stations you want to listen to with the buttons in the bottom line of HD Radio display. n HD Radio Display m l k a j b HD Radio Technology Button operation i c d a Radio station indicator b Information display e f g h c Touch to tune backward / forward in one step d Touch to seek backward / forward e Auto Store: Press to automatically store the first six strongest stations.
13 HD Radio Technology Increase/ Decrease Volume i Touch to seek for HD Radio stations only j Preset list (Up to six stations can be set as your preset) k Minimize the HD Radio.
HD Radio Technology You can store up to 6 stations as your preset list which you listen to often. Six numbered preset buttons store and recall stations for the FM band. All 24 stored stations (P1-P6) for the FM1-FM4band appear on the screen. < Storing preset stations> You can store presets in the following two ways: AS (Auto Store): The radio searches from the current frequency and checks the signal strength level until a cycle search is finished.
14 Setting Setting Settings allow you to customize T43H applications, set the date and time, Sound, Display, Update and Calibration as you would usually. Sound setting The sound setting on your unit is used for features such as spoken instructions , tap sound, Video and Audio. Tap Sound setting in the Setting menu to start your sound setting. You can change your volume level in the following three ways. • Press and hold the Volume hardware key on the left side of the unit.
14 Setting Setting Sound setting Display You can connect external speakers to your unit by using an audio cable. Note: If your car stereo has a line-in connector, you can play sound from your unit through your car speakers. Display setting The Display setting on your unit is used for features such as Brightness, Battery left indicator, Sleep mode option. Tap Display setting in the Setting menu to start your display setting.
14 Setting Setting Display setting Display Selecting the system Language You can set the system language which will be displayed on the screen. Your unit allows you to choose from 12 different languages. 1. Tap Language 2. Choose the language you want to use in your unit by tapping it. in the Setting Menu.
14 Setting These settings apply to the time shown in the status bar at the top of the screen. Tap Date & time setting Set the date and time by tapping in the Setting Menu. or Setting Date & Time settings . When you click the Month or year, it will highlighted and you can set the Date or time as you would usually. These settings apply to the time shown in the status bar at the top of the screen. Selecting Theme Your unit has 3 different Themes for the Main menu.
14 Setting To make the feel of the Touch screen more smooth and accurate, you can stand up the Calibration of your screen. When you click Calibration , you will see the Coordinates Setting Calibration for calibration Carefully press and hold the centre of Coordinate to follow its movement. System information Registration of the Cydle site requires the serial number of your unit to serve you as our member patron.
Update Cydle releases OS update and Software update regularly every quarter through the Cydle site. To maximize the performance of your unit, download and install new OS and Software from the Cydle site. Visit www.cydle.com And then access to “SUPPORT”-> “DOWNLOAD CENTER”. Update Update 15 SYSTEM UPDATE – OS Update 1) To start the OS update the device, connect your unit to the DC adaptor and prepare the SD card with Backup data or an update program.
15 Update Update E: 3) Please insert the SD card which contains Backup data or the Update program . As shown below, you can find the SD slot at the bottom of the device. 4) After insert SD card to slot, tap SETTING -> Tap “UPDATE” 5) The user is able to select Software and OS update as they want. Please click the button for OS update. When you click the “OS UPDATE” for OS update will start.
15 Update 1) To start the OS update the device, connect your unit to the DC adaptor and prepare the SD card with Backup data or an update program. Update SYSTEM UPDATE - Software Update NOTE: Do not disconnect the DC adaptor while you are trying to update the OS and Software. If the cable is disconnected, the computer memory may be lost. Under these conditions, take extra caution during installation to avoid causing a short circuit.
15 Update When you click the “Software UPDATE” update will start. button, the procedure for OS Update 5) The user is able to select Software and OS update as they want. Please click the button for OS update. 6) While OS update is being processed, the system will display the info dialog such as “Do not take out the SD card and disconnect the AC power”. Please keep the connection with Power to finish the OS update safely and completely.
15 Update Update E: Cydle 3) Please insert the SD card which contains Backup data or the Update program. As shown below, you can find the SD slot at the bottom of the device. 4) After insert SD card to slot, tap SETTING -> Tap “UPDATE” 5) The user is able to select Software and Map update as they want. Please click the button for OS update. When you click the “App + Map UPDATE” update will start.
15 Update App Update contain Application data of Navigation system. App Update can be use if your unit need to update most features of Navigation application excepting digital map data. Update NAVIGATION UPDATE - App update 1) To start the map update the device, connect your unit to the DC adaptor and prepare the SD card with Backup data or an update program. NOTE: Do not disconnect the DC adaptor while you are trying to update the map. If the cable is disconnected, the computer memory may be lost.
15 Update 5) After insert SD card to slot, tap SETTING -> Tap “UPDATE” The user is able to select Software and Map update as they want. Please click the button for OS update. When you click the “App UPDATE” will start. 6) 7) Update 4) button, the procedure for Map update While Map update is being processed, the system will display the info dialog such as “Do not take out the SD card and disconnect the AC power”. Please keep the connection with Power to finish the Map update safely and completely.
15 Update Update E: Cydle 3) Please insert the SD card which contains Backup data or the Update program . As shown below, you can find the SD slot at the bottom of the device. 4) After insert SD card to slot, tap SETTING -> Tap “UPDATE” 5) The user is able to select Software and Map update as they want. Please click the button for OS update. When you click the “Map UPDATE” will start.
16 Specification 122mⅹ82mⅹ17m Weight 220g(7.7oz) Display 4.3 inch TFT LCD, Touch screen Resolution (480*272) WQVGA Operating temperature range -5~+55℃(23℉-131 ℉) Charging temperature range 0~+40℃(32℉-104 ℉) Data storage Internal memory and optional removable SD card. Computer interface USB 2.0 Power input Cydle Navigator T43H uses a vehicle power using the car battery adaptor or AC power using an optional accessory.
Specification This product contains the transmitter. This transmitter must not be colocated or operating in conjunction with any other antenna or transmitter. FCC Compliance Statement Specification FCC Declaration of Conformity 16 Caution: Changes or Modifications not expressly approved by the party responsible for compliance could void the users authority to operate the equipment.
User information and precautions 1. We are not responsible for any accident that occurs while operating our software. 2. The suggested route and guidance may be different with actual traffic and road conditions. Please drive safely and obey the traffic rules. 3. The map screen images and user interface information printed on this manual may not correspond with actual device due to additional features or any modifications.
Copyright Copyright Cydle America Corp. 18 3555 Voyager St. Ste 204 Torrance, CA 90503 Toll free number : 1-866-407-9160 Cydle Corp. 12th floor, KofomoTower, Sunae-Dong, Bundang-Gu, Seongnam-City, Kyonggi-Do, Korea All right reserved. Copyright and intellectual property rights of all documents written by Cydle corporation are the property of the Cydle corporation.
EULA EULA End-User License Agreement (EULA) IMPORTANT – READ THESE TERMS AND CONDITIONS OF THIS END USER LICENSE AGREEMENT CAREFULLY BEFORE USING THE SOFTWARE. This End-User License Agreement (“EULA”) is a legal agreement between you and EnGIS Technologies, Inc. (EnGIS). This EULA applies to (the use of) EnGIS navigation software (also known as Gogo Navigation Software), including Internet-based services, and all contents and contents programs offered by EnGIS (“Software”).
EULA EULA End-User License Agreement (EULA) ⅵ. make more copies of the Software than specified in this agreement, ⅶ. publish the Software for others to copy; ⅷ. rent, lease or lend the Software; or ⅸ. use the Software in any way that is against the law. 4) CONFIDENTIALITY: You acknowledge and agree that the Software was developed at considerable time and expense by EnGIS and is confidential to and a trade secret of EnGIS and/or third parties.
EULA EULA End-User License Agreement (EULA) 7) LIMITATION OF LIABILITY: a) NEITHER ENGIS NOR ITS SUPPLIERS SHALL BE LIABLE TO YOU OR TO ANY THIRD PARTY FOR ANY INDIRECT, INCIDENTAL, CONSEQUENTIAL, SPECIAL, OR EXEMPLARY DAMAGES (INCLUDING IN EACH CASE, BUT NOT LIMITED TO, DAMAGES FOR THE INABILITY TO USE ANY THIRD PARTY EQUIPMENT OR ACCESS DATA, LOSS OF DATA, LOSS OF BUSINESS, LOSS OF PROFITS, BUSINESS INTERRUPTION OR THE LIKE) ARISING OUT OF THE USE OF OR INABILITY TO USE THE SOFTWARE EVEN IF ENGIS HAS BEE