
Manual


PRODUCT MANUALPRODUCT MANUAL
98
UTRACK 24 FRONT PANEL UTRACK 24 FRONT PANEL
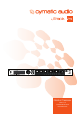
8. UTRACK 24 FRONT PANEL
1
2
3 4 7 8 9 10 12 13 14
11 156
5
1. USB Port
This port allows connection of a standard, off-the-shelf USB drive. The uTrack 24 records and
plays back up to 24 tracks of audio to/from the connected USB drive. The uTrack supports USB
drives from sizes ranging from 2GB to 16TB.
2. Front Panel Display
This monochrome LCD screen displays assorted useful information while recording and playing
back audio, as well as when working with the settings menus.
3. Encoder Wheel
Rotate the encoder wheel to adjust various settings; it also contains a “push” function, allowing
it to work as button.
4. MENU/LOOP Button
Press the MENU/LOOP button to bring up the uTrack 24 settings menus, allowing various
adjustments to the products’ settings. When playing back audio, this button helps to setup the
playback loop.
5. BACK Button
Press the BACK button to navigate backwards through the menu trees. Pushing it multiple times
will return you to the home screen.
6. BROWSE Button
Press the BROWSE button to switch the BROWSER screen on/off. In the BROWSER screen you
can navigate the les on the attached USB drive and select them for playback.
7. Skip Back/Forward Buttons
During playback, press the skip back/skip forward buttons to navigate among saved markers in
an audio take (recording). When playing back a playlist, press the buttons to navigate among the
different songs in the playlist.
8. STOP Button
Press the STOP button to stop a current recording, or to stop the unit from playing back audio.
9. PLAY Button
Press the PLAY button to begin playback of the currently loaded audio project. When recording,
each press of the PLAY button will add a new marker at the current timeline location.
10. RECORD Button
Press the RECORD button to begin a new recording. The uTrack 24 is always ready to start a new
recording as soon as the RECORD button is pressed.
! NOTE: when the uTrack 24 is neither playing back nor in playlist-mode, it will automatically switch
to “pre-recording” mode. This means that it will constantly buffer a minimum of 2.7 seconds
(depending on the number of recorded channels, sample rate and resolution) of the incoming
audio signal and write this audio data to the recorded le once you have pressed the record
button.
This means that if you do not remember to press RECORD until the band actually starts playing,
you will still have all of the rst song’s audio recorded as long as you press RECORD within a few
moments of the downbeat of the rst song.
In short; the uTrack24 allows you to capture the whole performance, even if you pressed the
RECORD button a few seconds too late!
11. Meters
The 24 separate LED meters display the signal strength for incoming signals during recording
and display outgoing signals during playback. The meter LEDs work in two different ways:
• When recording or playing back audio, the 24 separate LEDs represent the input/output
levels of channels 1-24. Each channel’s LED illuminates in three separate colors, acting as a
3-segment meter:
○ Green: -30dB
○ Yellow: -6dB
○ Red: Overload
• When working with the onboard monitor mixer for recording or playback, the meter bridge
operates as a single, 24-segment input/output meter for the currently selected channel
(“channel focus mode”).
12. Main Output Volume Control
Rotate to adjust the listening level of the rear panel’s main outputs, which carry the stereo signal
of the onboard monitor mixer (standalone recorder/player mode) or outputs 1-2 of your DAW
software (Computer Audio Interface).
13. Headphone Volume Control
Rotate this control to adjust the listening volume level of the front panel headphone output, which
offers the same signal path as the main outputs.
14. Headphone Connector
Connect a pair of headphones to listen to the onboard monitor mix or channels 1-2 of your DAW
software. The uTrack 24’s onboard headphone amplier outputs a strong, clean signal to the
connected headphones.
15. Footswitch Connector
Connect a standard two-position footswitch to this connector for hands-free operation of various
functions. For specics, see “footswitch” in the menus section of this document.