
Specifications


3
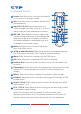
6. OPERATION CONTROLS AND FUNCTIONS
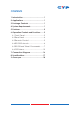
6.1 Front Panel
POWERMENU
-
+
1
CHANNEL
INPUT
234
4
1
2
3
1
A
WINDOW
2
3
4
12
3
4
2
3
4
1
1
234
B C D E
G H
F
21 3 4 5 6
1
IR Window: Accepts the IR signal from the supplied remote control.
2
POWER: Press to turn the unit on or to put it into standby mode.
3
MENU Button: Press this button to bring up the On-screen Display
(OSD) menu on screen.
4
MINUS/PLUS (−/+): Press these buttons to navigate down/up the
OSD menu.
5
CHANNEL INPUT 1~4: Press to cycle through the four HDMI sources to
be displayed in the corresponding window. All windows can display
the same input or each channel can display a different input.
6
WINDOW A~H: Press these hot keys to select the required screen
conguration. Windows A to D will display the selected channel in
full screen. Windows E to H can display a combination of channels
on the same screen.
Windows A to D's source selection corresponds to channel inputs 1
to 4. To change the input channel for Window A, press the button
for channel input 1. You will not be able to select the buttons for
channel inputs 2 to 4 when window A is selected. The sizes for
Windows E to H are adjustable through the OSD menu settings.
Note: Only Window G is PIP(Picture-in-Picture) whereas E, F and H
are POP (Picture-out-of-Picture) modes.
The order of priority when windows overlap each other is Channel
4>Channel 3>Channel 2>Channel 1 i.e Channel 4 will cover
Channel 3, Channel 3 will cover Channel 2 and so on.
Note: Under some circumstances the window borders may show
some interference, adjusting the display's motion setting may
resolve this issue.