
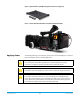
Specifications


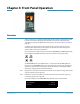

Ki Pro Quad v5.2 www.aja.com
29
action and causes the display to change to the TRANSPORT mode if it is not already
displayed. Settings you’ve made in the MEDIA menus are observed (more on that later).
You’ll always know you are in TRANSPORT mode as long as one of the MENU buttons
aren’t lit (STATUS, MENU, or MEDIA)—if one is lit, then you are in a “menu”.
When in the “Idle” mode, the CONFIG and MEDIA set-up menus can be accessed to adjust
various parameters that control Ki Pro Quad's operation.
Note that you must be in STOP, not PAUSE to access these menus—if you try to access
these menus without first having stopped playback, a “PRESS STOP” prompt will appear
on the LCD display. You can tell if the STOP button is in “pause” if the button is flashing.
There are certain times when transport controls are locked out. For example, when
ejecting media, or entering an IP address, the transport controls are locked out until the
operation is completed. Most other menu functions do not lock out the transport
controls.
At any time you only need to hit any transport button to exit (or “exit” a STATUS, CONFIG,
or MEDIA menu by pushing its button). Pressing a transport button sends the display into
the TRANSPORT default menu.
Several operations may result in an “ARE YOU SURE” interaction; for example, FORMAT
MEDIA. This protects you from inadvertent actions and ensures that accidental button
presses don’t have negative repercussions. When you answer yes to an ARE YOU SURE
prompt, the display then changes to an “in progress display”, and automatically returns
to the menu when the operation is complete.
When recording, Ki Pro Quad is in an E-to-E state.
Certain parameters are stored in non-volatile memory so that the parameter is
remembered between power cycles, for example: system name and date/time.
Recording a Clip There is more than one way to record a clip since you can control Ki Pro Quad in
numerous ways. The MEDIA and CONFIG menus presented later in this chapter detail the
parameters available to control recording. Before we get into that level of detail, here’s an
example of just how simple recording can be:
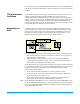
1. Press the STATUS button. You’ll see the currently selected input and input format (line
1) and the chosen recording format and audio input (line 2).
2. If these settings are acceptable, then push the red RECORD button below the display.
3. The green LED slot indicator (and the green LED on the Pak media) will begin
blinking indicating a recording is in progress. You will also see the timecode
changing on the UI display.
4. When you’ve finished recording, press the STOP button.
You can, of course, customize your configuration via the CONFIG and MEDIA menu
parameters.
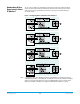
NOTE: To change Apple ProRes settings prior to recording, Press MEDIA, and then repeatedly press
SELECT until you see 14.1 Encode Type. Then press ADJUST up or down to select:
•ProRes 444
• ProRes 422LT
• ProRes 422PX
• ProRes 422HQ
• or ProRes 422