CY8CKIT-042-BLE Bluetooth® Low Energy (BLE) Pioneer Kit Guide Doc. # 001-93731 Rev. *A Cypress Semiconductor 198 Champion Court San Jose, CA 95134-1709 Phone (USA): 800.858.1810 Phone (Intnl): +1.408.943.2600 www.cypress.
Copyrights © Cypress Semiconductor Corporation, 2014. The information contained herein is subject to change without notice. Cypress Semiconductor Corporation assumes no responsibility for the use of any circuitry other than circuitry embodied in a Cypress product. Nor does it convey or imply any license under patent or other rights.
Contents Safety Information 1. Introduction 1.1 1.2 1.3 1.4 1.5 1.6 1.7 1.8 3.5 3.6 3.7 3.8 3.9 24 Theory of Operation...................................................................................................24 BLE Pioneer Kit USB Connection ..............................................................................26 Placing Modules on Baseboard .................................................................................26 Programming and Debugging BLE Device .........................
Contents 4.3 4.4 4.5 4.6 4.2.3 Flow Chart......................................................................................................51 4.2.4 Verify Output ..................................................................................................52 CapSense Proximity ..................................................................................................62 4.3.1 Project Description .........................................................................................62 4.
Contents 6.4 6.5 6.6 6.7 6.3.2 Building a Normal Project for PSoC 5LP......................................................143 PSoC 5LP Factory Program Restore Instructions ...................................................144 6.4.1 PSoC 5LP is Programmed with a Bootloadable Application ........................144 Using FM24V10 F-RAM...........................................................................................150 6.5.1 Address Selection ......................................................
Safety Information The CY8CKIT-042-BLE Bluetooth Low Energy (BLE) Pioneer Kit is intended for use as a development platform for hardware or software in a laboratory environment. The board is an open system design, which does not include a shielded enclosure. Due to this reason, the board may cause interference with other electrical or electronic devices in close proximity. In a domestic environment, this product may cause radio interference.
General Safety Instructions ESD Protection ESD can damage boards and associated components. Cypress recommends that the user perform procedures only at an ESD workstation. If an ESD workstation is not available, use appropriate ESD protection by wearing an antistatic wrist strap attached to the chassis ground (any unpainted metal surface) on the board when handling parts. Handling Boards CY8CKIT-042-BLE boards are sensitive to ESD. Hold the board only by its edges.
Regulatory Compliance Information The kit contains devices that transmit and receive radio signals in accordance with the spectrum regulations for the 2.4-GHz unlicensed frequency range. Cypress Semiconductor Corporation has obtained regulatory approvals for this kit to be used in specific countries. These countries include United States (FCC Part 15), Canada (IC RSS210) and Japan (JRF/ TELEC). Additional regional regulatory agency approval may be required to operate these throughout the world.
CAUTION: The changes or modifications not expressly approved by the party responsible for Compliance could void the user’s authority to operate the equipment and must not be co-located or operating in conjunction with any other antenna or transmitter. Canada (IC) This device complies with Industry Canada license-exempt RSS standard(s).
Japan (TELEC) Model:CY8CKIY-142 FCC ID : WAP-CY8CKIT-142 IC : 7922A-CY8CKIT142 TELEC : 005-100919 Model:CY5671 FCC ID: WAP-CY5671 IC: 7922A-CY5671 TELEC: 005-100920 CY8CKIT-042-BLE Bluetooth® Low Energy (BLE) Pioneer Kit Guide, Doc. # 001-93731 Rev.
1. Introduction Thank you for your interest in the CY8CKIT-042-BLE Bluetooth® Low Energy (BLE) Pioneer Kit. This kit is designed to showcase the functionality and ease-of-use of the PSoC® 4 BLE and PRoC™ BLE devices while developing Bluetooth Low Energy (Bluetooth Smart) applications. Cypress's BLE solution has an easy-to-use, intuitive GUI to configure the BLE protocol stack using the BLE component available in the Cypress standard integrated development environment (IDE), PSoC Creator.
Introduction Figure 1-1. Kit Contents If any part of the kit is missing, contact your nearest Cypress sales office for help: www.cypress.com/ go/support. 1.2 Board Details The BLE Pioneer baseboard consists of the blocks shown in Figure 1-2. 1. RGB LED 2. BLE module reset button 3. CapSense proximity header 4. User button 5. CapSense slider 6. Arduino compatible I/O header (J2) 7. Arduino compatible power header (J1) 8. Digilent Pmod compatible I/O header (J5) 9. Cypress F-RAM 1 Mb (FM24V10-G) 10.
Introduction 18.BLE power supply jumper (J15) - for current measurement 19.BLE module headers (J10/J11) Figure 1-2. BLE Pioneer Baseboard CY8CKIT-042-BLE Bluetooth® Low Energy (BLE) Pioneer Kit Guide, Doc. # 001-93731 Rev.
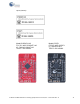
Introduction Figure 1-3 shows a markup of the onboard components, where red BLE module denotes the PSoC 4 BLE module and black BLE module denotes the PRoC BLE module. Figure 1-3. BLE Module Markup .
Introduction The dongle board consists of the blocks shown in Figure 1-4. Figure 1-4. BLE Dongle Markup $: $ -5* -1 14P$ -1 QSPHSBNNFS BOE EFCVHHFS 13P$ FYUFSOBM QSPHSBNNJOH IFBEFS 6TFS -&% 6TFS CVUUPO ,)[ DSZTUBM CPUUPN TJEF 4UBUVT -&% 8JHHMF BOUFOOB 64# QMVH "OUFOOB NBUDIJOH OFUXPSL "./ 1PXFS -&% .)[ DSZTUBM 14P$ -1 QSPHSBNNJOH UFTU QPJOUT 13P$ #-& SFTFU CVUUPO 48%*0 48%$-, 93&4 (/% 7#64 1 @ 1 @ $:#- -29* 13P$ #-& EFWJDF 1.
Introduction 1.4 Getting Started This guide will help you get acquainted with the BLE Pioneer Kit: 1.5 ■ The Software Installation chapter on page 20 describes the installation of the kit software. This includes the PSoC Creator IDE for development and debugging applications, PSoC Programmer for programming hex files, and the CySmart PC tool for BLE host emulation.
Introduction 1.5.3 PSoC Creator Example Projects These simple example projects demonstrate how to configure and use PSoC Creator components. To open an example project in PSoC Creator, go to File > Example Project (see Figure 1-5) and choose the required example project. Figure 1-5. PSoC Creator Example Projects 1.5.4 Component Datasheets Right-click a component and select Open Datasheet (see Figure 1-6). Visit this page for the BLE component datasheet. Figure 1-6. Opening Component Datasheet 1.5.
Introduction 1.5.7 1.6 Other Related Resources ■ Digilent PMod: www.digilentinc.com/pmods/ ■ Arduino: http://arduino.cc/en/Main/ArduinoBoardUno Technical Support For assistance, go to our support web page, www.cypress.com/support, or contact our customer support at +1 (800) 541-4736 Ext. 2 (in the USA) or +1 (408) 943-2600 Ext. 2 (International). 1.7 Documentation Conventions Table 1-1.
Introduction 1.8 Acronyms Table 1-2.
2. Software Installation This chapter describes the steps to install the software tools and packages on a PC for using the BLE Pioneer Kit. This includes the IDE in which the projects will be built and used for programming the kit. 2.1 Before You Begin All Cypress software installations require administrator privileges. Ensure you have the required privileges on the system for successful installation. Before you install the kit software, close any other Cypress software that is currently running. 2.
Software Installation 3. Click Install CY8CKIT-042-BLE Kit to start the kit installation, as shown in Figure 2-1. Figure 2-1. Kit Installer Screen 4. Select the folder in which you want to install the CY8CKIT-042-BLE kit-related files. Choose the directory and click Next. 5. When you click Next, the CY8CKIT-042-BLE Kit installer automatically installs the required software, if it is not present on your computer.
Software Installation 6. Choose the Typical/Custom/Complete installation type in the Product Installation Overview window, as shown in Figure 2-2. Click Next after you select the installation type. Figure 2-2. Product Installation Overview 7. Read the license agreement and select I accept the terms in the license agreement to continue with installation. Click Next. 8. When the installation begins, a list of packages appears on the installation page.
Software Installation 2.3 Uninstall Software The software can be uninstalled using one of the following methods: ■ Go to Start > All Programs > Cypress > Cypress Update Manager > Cypress Update Manager; select the Uninstall button. ■ Go to Start > Control Panel > Programs and Features for Windows 7 or Add/Remove Programs for Windows XP; select the Uninstall/Change button. CY8CKIT-042-BLE Bluetooth® Low Energy (BLE) Pioneer Kit Guide, Doc. # 001-93731 Rev.
3. Kit Operation This chapter introduces you to the BLE Pioneer kit and the features that will be used as part of the kit operation. We will discuss features such as USB connection, programming/debugging, and programmer firmware update. The chapter also describes the USB-UART and USB-I2C bridges along with the PC tools that can be used to communicate with the BLE device on the kit. 3.
Kit Operation Figure 3-2. BLE Module Block Diagram BLE I/Os 20 pin Header (Digital, Power and Ground Pins) KHz Crystal Power SAR Bypass Cap GPIO VREF Decaps MHz Crystal 4 pin header CMOD PRoC BLE/ PSoC 4 BLE CTANK RX/ TX/ Gnd Test points Decaps VDDD/A/R Power GPIO Power Ferrite Bead RF matching BLE I/Os 24 pin Header (Analog, Power and Ground Pins) This kit includes two modules boards. These boards act as a basic breakout board for the CY8C4247LQI-BL483 and CYBL10563-56LQXI BLE silicon.
Kit Operation 3.2 BLE Pioneer Kit USB Connection The BLE Pioneer kit connects to and powers from a PC over the USB interface (J13). The kit enumerates as a composite device, as shown in Table 3-1. Note: Ensure that you install the kit installer on the system for successful enumeration. To download and install the BLE Pioneer Kit, visit www.cypress.com/go/CY8CKIT-042-BLE. Table 3-1.
Kit Operation To remove the BLE modules from the BLE Pioneer kit, hold the BLE Pioneer kit in one hand and the BLE module in the other, as shown in Figure 3-6, and pull it out using a rocking motion. Figure 3-6. Remove BLE Module Connected on BLE Pioneer Kit 3.4 Programming and Debugging BLE Device The BLE Pioneer kit and BLE dongle can be programmed and debugged using the onboard PSoC 5LP programmer and debugger.
Kit Operation Figure 3-7. Connect USB Cable to J13 2. To program the BLE dongle, plug the dongle into the USB port of the PC, as shown in Figure 3-8. The dongle will enumerate as a composite device. Figure 3-8. Connect BLE Dongle to PC 3. The onboard PSoC 5LP uses SWD to program the PSoC 4 BLE or PRoC BLE device. See Figure 3-9 for this implementation. Figure 3-9.
Kit Operation 4. To load the desired example project, open PSoC Creator and go to File > Open > Project/ Workspace. This will provide the option to browse to and open your saved project. 5. Build the project by choosing Build > Build or [Shift] [F6], as shown in Figure 3-10. Figure 3-10. Build an Example Project 6. If there are no errors during build, program the firmware into the kit by choosing Debug > Program or pressing [Ctrl] [F5], as shown in Figure 3-11.
Kit Operation 3.4.2 Programming using PSoC Programmer PSoC Programmer (3.21 or later) can be used to program existing hex files into the BLE Pioneer kit or BLE dongle. To do this, follow these steps. 1. To program the BLE Pioneer kit, plug the USB cable into the programming USB connector, J13, and connect it to the PC USB port, as shown in Figure 3-7. The kit will enumerate as a composite device. Figure 3-12. Connect BLE Pioneer Kit to PC 2.
Kit Operation Figure 3-14. PSoC Programmenr GUI 4. Click the File Load button at the top left corner of the window. Browse for the desired hex file and click Open. Figure 3-15. Select Hex File 5. Go to File > Program to start programing the kit with the selected file. CY8CKIT-042-BLE Bluetooth® Low Energy (BLE) Pioneer Kit Guide, Doc. # 001-93731 Rev.
Kit Operation Note: If the hex file for a device is selected and programmed on the kit with a different device, then PSoC Programmer will throw an error of device mismatch and terminate programming. Figure 3-16. Program Hex File to Kit 6. When the programming is finished successfully, indicated by a PASS message on the status bar, the kit is ready for use. Close PSoC Programmer. CY8CKIT-042-BLE Bluetooth® Low Energy (BLE) Pioneer Kit Guide, Doc. # 001-93731 Rev.
Kit Operation 3.5 Updating BLE Dongle for CySmart PC Tool The dongle, shown in Figure 3-17, provides a BLE Central mode capability using the CySmart PC tool (see CySmart PC Tool on page 160) on the PC. The CySmart PC tool is used to connect and validate the example projects loaded on the BLE Pioneer Kit (baseboard with one of the modules) through BLE.
Kit Operation The dongle works along with the CySmart PC tool, as shown in Figure 3-18. The CySmart PC tool is installed as part of the BLE Pioneer Kit installation and can be opened from Start > All Programs > Cypress > CySmart > CySmart . The tool operation is explained in CySmart PC Tool on page 160. Figure 3-18.
Kit Operation Figure 3-19. Update Dongle Firmware with Hex from Latest Kit Installer Figure 3-20. Update Dongle Firmware with Hex from Web In this scenario, choose the hex file from the respective location and update the dongle firmware with the following steps. CY8CKIT-042-BLE Bluetooth® Low Energy (BLE) Pioneer Kit Guide, Doc. # 001-93731 Rev.
Kit Operation Figure 3-21. Open Hex File 4. Ensure the other settings match as shown in Figure 3-21. Click the Program button to start programming. The status bar at the bottom of the PSoC Programmer window will show the programming status and the result (Pass/Fail). Figure 3-22. Programming Hex File to Dongle 5. After programming is completed successfully, the dongle firmware is updated and can be used to connect to the CySmart PC tool. 3.
Kit Operation place the UART component in the PSoC 4 BLE or PRoC BLE and assign the UART pins as shown in Table 3-2. Table 3-2. UART Pin Assignment in BLE Devices for USB-UART Bridge Pin BLE Pioneer Kit BLE Dongle UART_RX P1_4 P1_4 UART_TX P1_5 P1_5 Table 3-3 lists the specifications supported by the USB-UART bridge. Table 3-3. Specifications Supported by USB-UART Bridge Parameter 3.
Kit Operation Figure 3-23. Bridge Control Panel To use the USB-I2C functionality, select the KitProg USB-I2C in the BCP. On successful connection, the Connected and Powered tabs turn green, as shown in Figure 3-24. CY8CKIT-042-BLE Bluetooth® Low Energy (BLE) Pioneer Kit Guide, Doc. # 001-93731 Rev.
Kit Operation Figure 3-24. KitProg USB-I2C Connected in Bridge Control Panel USB-I2C is implemented using the USB and I2C components of PSoC 5LP. For the BLE Pioneer Kit, the SCL (P12_0) and SDA (P12_1) lines from the PSoC 5LP are connected to the SCL (P3_5) and SDA (P3_4) lines of the BLE module header. For the dongle, the SCL (P12_0) and SDA (P12_1) lines from the PSoC 5LP are connected to the SCL (P3_5) and SDA (P3_4) lines.
Kit Operation 3.8 Updating the Onboard PSoC 5LP Programmer Firmware The BLE Pioneer kit and BLE dongle contains the PSoC 5LP programmer (KitProg) required for programming, debugging and communication over the COM port. The KitProg normally does not require any update. If an update is required, then PSoC Programmer will display a warning message when the kit or dongle is connected to it, as shown in Figure 3-25. Figure 3-25.
Kit Operation The other pins on the BLE module can be used to build the desired application. Connect the positive terminal of the coin cell to pin J2.2 and negative terminal to pin J2.4 using wires. Figure 3-27. Powering the BLE Module using a Coin Cell Connect an ammeter in series with the battery to measure the power consumption as shown in Figure 3-28. Figure 3-28. Current Measurement of BLE Module when Powered from a Coin Cell CY8CKIT-042-BLE Bluetooth® Low Energy (BLE) Pioneer Kit Guide, Doc.
4. Example Projects This chapter demonstrates the functionality of the PSoC 4 BLE and PRoC BLE devices using the BLE Pioneer kit-based example projects. To access these example projects, download and install the kit setup file from the kit web page. The example projects are available in the firmware folder under the installed directory. The Cypress BLE device comes in two variants: 4.1 ■ PSoC 4 BLE: The PSoC 4 BLE product family is the new wireless member of the PSoC 4 architecture platform.
Example Projects Figure 4-1. Open Example Project from PSoC Creator 4. Select the folder where you want to save the project and click OK. 5. BLE projects use a public device address set in the BLE component GUI to advertise and scan, depending on the role: peripheral or central mode. If there are other kits in close proximity, which have the same public device address, then wrong devices may be connected or connections can fail.
Example Projects Figure 4-2. Change BLE Public Device Address and Name 6. Build the example project by choosing Build > Build , as shown in Figure 4-3. A hex file will be generated. Figure 4-3. Build Project from PSoC Creator 7. To program the kit with this example project, connect the baseboard to the PC by plugging it into the USB mini-B connector (J13) on the baseboard, as described in BLE Pioneer Kit USB Connection on page 26.
Example Projects Figure 4-4. Program Device in PSoC Creator 9. If the device is not yet acquired, PSoC Creator will open the programming window. Select KitProg and click the Port Acquire button, as shown in Figure 4-5. Note: The string following 'KitProg' is the serial ID for the programmer on the kit. Each kit will have a unique serial ID. If various kits are connected to the same system, the serial ID can be used to select the correct kit to program the firmware.
Example Projects Figure 4-6. Connect Device From PSoC Creator and Program Note: As stated previously, the BLE Pioneer kit supports both Cypress BLE devices: PSoC 4 BLE and PRoC BLE. Thus, there are two versions of each of the kit example projects demonstrating the same functionality. Projects named with the prefix PSoC_4_BLE_ work with the PSoC 4 BLE Module placed on the baseboard. Projects named with the prefix PRoC_BLE_ work with the PRoC BLE Module placed on the baseboard.
Example Projects 4.2 CapSense Slider and LED 4.2.1 Project Description This project demonstrates BLE connectivity between the BLE Pioneer kit (acting as a peripheral and server device) and BLE dongle or mobile device running the CySmart application (acting as a central and client device).
Example Projects The project consists of the following files: ■ main.c/.h These files contain the main function, which is the entry point and execution of the firmware application. It also contains function definition for initialization of the system and reading the CapSense slider data from the CapSense component. ■ BLEApplications.c/.h These files contain all the macros and function definitions related to BLE communication and operation.
Example Projects Figure 4-8. TopDesign for PSoC_4_BLE_CapSense_Slider_LED Project Figure 4-9. TopDesign for PRoC_BLE_CapSense_Slider_LED Project CY8CKIT-042-BLE Bluetooth® Low Energy (BLE) Pioneer Kit Guide, Doc. # 001-93731 Rev.
Example Projects 4.2.2 Hardware Connections No specific hardware connections are required for this project because all connections are hardwired on the board. Ensure that the correct BLE Module is placed on the baseboard corresponding to the project being used. PSoC_4_BLE_CapSense_Slider_LED works with the PSoC 4 BLE Module. PRoC_BLE_CapSense_Slider_LED works with the PRoC BLE Module. The pin assignment for this project is in PSoC_4_BLE_CapSense_Slider_LED.cydwr/ PRoC_BLE_CapSense_Slider_LED.
Example Projects 4.2.3 Flow Chart Figure 4-11 shows the flow chart of the code implemented. Figure 4-11. CapSense Slider and LED Project Flow Chart System initialized.
Example Projects 4.2.4 Verify Output The project can be verified by two methods: using the CySmart PC tool and dongle or using the CySmart iOS/Android BLE app. To install and use the CySmart PC tool, see CySmart PC Tool on page 160. To install and use the CySmart iOS/Android app, see CySmart iOS/Android Application on page 152. 4.2.4.1 CySmart PC Tool To verify the CapSense and LED project using the CySmart PC tool, follow these steps: Note: See CySmart PC Tool on page 160 to learn how to use the tool.
Example Projects 8. After the available devices are listed, double-click the BLE Slider and LED device to connect, or click BLE Slider and LED and then click Connect. Figure 4-13. Connect to BLE Slider and LED Peripheral 9. When the connection is made, the CySmart PC tool will display a message for the Update Connection parameters. This is the request from the BLE peripheral to update the existing connection parameters, such as connection interval, latency, and supervision timeout, to a new value.
Example Projects 11. When all the attributes are listed, locate the attribute with a UUID value of 0xCAA2, which is the characteristic under CapSense Slider custom service. It will also have a Client Characteristic Configuration descriptor (UUID 0x2902). The properties of the descriptor appear in the Attribute Details window, as shown in Figure 4-16. Click Read Value to read the existing Client Characteristic Configuration Descriptor (CCCD) value. Figure 4-16.
Example Projects Figure 4-17. Write CCCD to Enable Notifications 13.Swipe your finger on the CapSense slider on the BLE Pioneer kit, as shown in Figure 4-19 and see the notification values in the CapSense Slider value field, as shown in Figure 4-18. Figure 4-18. CapSense Slider Notification Received Figure 4-19. CapSense Slider CY8CKIT-042-BLE Bluetooth® Low Energy (BLE) Pioneer Kit Guide, Doc. # 001-93731 Rev.
Example Projects 14.Modify the Value field of the Client Characteristic Configuration descriptor to '00:00' to disable notifications. Figure 4-20. Disable Notifications 15.Now, locate the UUID value of 0xCBB1, which is the RGB LED Control characteristic. Under the Attribute Details tab on the right, the read and write properties are enabled. Click Read Value to read the existing 4-byte onboard RGB LED color information, as shown in Figure 4-21.
Example Projects 16.Modify the four bytes of data in the Value field and click Write Value. You will see the corresponding change in the color and intensity of the RGB LED on the BLE Pioneer kit, as shown in Figure 4-22. The RGB LED will be on for 3 seconds before switching off to conserve power. Note: If the BLE Pioneer kit is powered from a coin cell and not the USB Vbus, then the color mixing and intensity will vary. This is because the coin cell provides a lower driving voltage for RGB LEDs.
Example Projects 17.To disconnect from the device, click Disconnect, as shown in Figure 4-24. Figure 4-24. Disconnect from the Device 18.To connect to this peripheral again, restart advertising by pressing the user button (SW2) on the BLE Pioneer kit. Advertising is indicated by the blinking red LED. 4.2.4.2 CySmart iOS/Android App To verify the CapSense and LED project using the CySmart mobile application (see CySmart iOS/ Android Application on page 152), follow these steps: 1.
Example Projects To verify the PRoC_BLE_CapSense_Sider_LED project, plug in the PRoC BLE Module on the baseboard. Figure 4-26. BLE Pioneer Kit with PRoC BLE Module 2. Plug the BLE Pioneer kit into the PC to power using the J13 USB connector. 3. Program the kit with the CapSense and LED example projects. See Using Example Projects on page 42 for programming instructions. 4. Press the user button (SW2) on the BLE Pioneer kit to start the advertisement.
Example Projects 7. When connected, the application will list the supported profiles by the peripherals. Scroll and select the CapSense page, as shown in Figure 4-28. Figure 4-28. CapSense Service Page 8. Swipe your finger on the CapSense slider on the BLE Pioneer kit and see a similar response on the CapSense page in the CySmart application (Figure 4-29). Figure 4-29. CapSense Slider CY8CKIT-042-BLE Bluetooth® Low Energy (BLE) Pioneer Kit Guide, Doc. # 001-93731 Rev.
Example Projects 9. Press the back button in the top left corner of the application to return to the service selection page. Scroll and tap on the RGB LED service shown in Figure 4-30. Figure 4-30. RGB LED Service Page 10.On the RGB LED service page, swipe over the color gamut to see a similar color response on the BLE Pioneer kit RGB LED. The slider below the color gamut controls the intensity of the RGB LED color. The RGB LED will be on for 3 seconds before switching off. This is done to conserve power.
Example Projects 11. To disconnect from the BLE Pioneer kit, return to the CySmart app home screen by pressing the back button. 12.To reconnect to the peripheral, press the user button (SW2) on the BLE Pioneer kit again and then scan for devices using CySmart mobile app. 4.3 CapSense Proximity 4.3.
Example Projects The project consists the following files: ■ main.c/.h These files contain the main function, which is the entry point and execution of the firmware application. It contains function definition for initialization of the system and reading the CapSense proximity data from the CapSense component. ■ BLEApplications.c/.h These files contain all the macros and function definitions related to BLE communication and operation.
Example Projects Figure 4-34. Top Design for PRoC_BLE_CapSense_Proximity Project 4.3.2 Hardware Connections ■ Ensure that the correct BLE module is placed on the baseboard corresponding to the project being used. PSoC_4_BLE_CapSense_Proximity works with the PSoC 4 BLE Module. PRoC_BLE_CapSense_Proximity works with the PRoC BLE Module. ■ Connect a five-inch wire (provided as part of this kit) to the proximity connector J14 on the baseboard. Loop the wire as shown in Figure 4-35.
Example Projects Figure 4-36. Proximity Sensor Connection on BLE Pioneer Kit with PRoC BLE Module The pin assignment for this project is in PSoC_4_BLE_CapSense_Proximity.cydwr/ PRoC_BLE_CapSense_Proximity.cydwr in the Workspace Explorer, as shown in Figure 4-37. Table 4-2. Pin Assignments for CapSense Proximity Project Pin Name Port Name CapSense CMOD P4_0 CapSense Proximity Sensor P2_0 User Button P2_7 Status LED P2_6 Figure 4-37.
Example Projects 4.3.3 Flow Chart Figure 4-38 shows the flow chart of code implemented. Figure 4-38. CapSense Proximity Project Flow Chart System initialized.
Example Projects 4.3.4 Verify Output The project can be verified by two methods: using the CySmart PC tool and dongle or using the CySmart iOS/Android BLE app. To install and use the CySmart PC tool, see CySmart PC Tool on page 160. To install and use the CySmart iOS/Android app, see CySmart iOS/Android Application on page 152. 4.3.4.1 CySmart PC Tool To verify the CapSense proximity project using the CySmart PC tool, follow these steps: Note: See CySmart PC Tool on page 160 to know how to use the tool.
Example Projects Figure 4-40. Start Scanning 9. After the available devices are listed, double-click CapSense Proximity to connect or click Stop Scan and then click Connect to connect to the device. Figure 4-41. Connect to CapSense Proximity Peripheral 10.When the connection is made, the CySmart PC tool will display a message for the Update Connection parameter.
Example Projects 11. If the connection is successful, you will see another tab opening besides the Master tab. Click Discover All Attributes to find all the services and attributes supported by the BLE peripheral. Figure 4-43. Discover All Attributes 12.When all the attributes are listed, locate the UUID value of 0xCAA1, which is the characteristic for CapSense Proximity. It will also have a Client Characteristic Configuration descriptor (UUID 0x2902).
Example Projects Figure 4-45. Write CCCD to Enable Notifications 14.Bring your hand closer to the proximity sensor on the BLE Pioneer kit, as shown in Figure 4-47 and observe the value changing in the characteristic value field, as shown in Figure 4-46. Figure 4-46. CapSense Proximity Notification Received Figure 4-47. CapSense Proximity Sensing with PSoC 4 BLE Module CY8CKIT-042-BLE Bluetooth® Low Energy (BLE) Pioneer Kit Guide, Doc. # 001-93731 Rev.
Example Projects 15.Modify the Value field of the Client Characteristic Configuration descriptor to '00:00' to disable notifications. 16.To disconnect from the device, click Disconnect, as shown in Figure 4-48. Figure 4-48. Disconnect from the Device 17.Press user button (SW2) to wake up from sleep and restart the advertisement for the next connection. 4.3.4.
Example Projects To verify the PRoC_BLE_CapSense_Proximity project, plug in the PRoC BLE Module on the baseboard. Figure 4-50. BLE Pioneer Kit with PRoC BLE Module 2. Connect the five-inch wire as a loop to the proximity connector J14 on the baseboard. 3. Plug the BLE Pioneer kit into the PC for power, using the J13 USB connector. 4. Program the kit with the CapSense proximity example project. Follow steps in Using Example Projects on page 42 to program the device. 5.
Example Projects 8. When connected, the app will list the services supported by the peripherals. Scroll and select the CapSense service. 9. When the CapSense service page opens, bring your hand near the sensor wire on the BLE Pioneer kit and see a similar response in the app as a bar graph, as shown in Figure 4-52. Figure 4-52. CapSense Proximity Sensing with PSoC 4 BLE Module 10.To disconnect from the BLE Pioneer kit, return to the device selection screen on the CySmart app. 11.
Example Projects system stops scanning and returns to Deep Sleep mode (LED OFF). Press SW2 again to wake the system and restart scanning. To aid in evaluation, the BLE peripheral project with the particular BD address is provided in the same workspace. This peripheral project supports IAS and has fixed BD address that the central device will recognize and auto-connect to. This peripheral project is programmed on the BLE dongle and powered through the USB port of PC.
Example Projects Figure 4-54. PRoC_BLE_Central_IAS TopDesign Figure 4-55. BLE_Dongle_Peripheral_IAS TopDesign CY8CKIT-042-BLE Bluetooth® Low Energy (BLE) Pioneer Kit Guide, Doc. # 001-93731 Rev.
Example Projects 4.4.2 Hardware Connections No specific hardware connections are required for this project because all connections are hardwired on the board. Ensure that the correct BLE module is placed on the baseboard corresponding to the project being used. PSoC_4_BLE_Central_IAS works with the PSoC 4 BLE Module. PRoC_BLE_Central_IAS works with the PRoC BLE Module. BLE_Dongle_Peripheral_IAS is the common project for both workspaces and programs the BLE dongle with peripheral mode firmware.
Example Projects 4.4.3 Flow Chart Figure 4-58 shows the flow chart for the IAS client mode example project. Figure 4-58. IAS Client Mode Flow Chart Start Initialize BLE Module No Discovered peripheral with IAS Peripheral Address ? Yes No Initiate and complete connect operation .
Example Projects Figure 4-59 shows the flow chart for the IAS peripheral mode example project. Figure 4-59. IAS Peripheral Mode Flow Chart Start Initialize BLE Module and start Advertisement No Connect request from Central device ? Yes Complete connect operation and wait for Alert notifications No Valid Alert level is notified ? Yes Configure LED as per alert level 4.4.4 Verify Output 1. Connect the BLE dongle to one of the USB ports on the PC. Figure 4-60.
Example Projects 2. In the PSoC Creator Workspace Explorer, right-click on the BLE_Dongle_Peripheral_IAS project and select Set As Active Project, as shown in Figure 4-61. Figure 4-61. Set Dongle Peripheral Project as Active 3. Program the dongle with the BLE_Dongle_Peripheral_IAS project described in Using Example Projects on page 42. Note: Do not update the public device address (inside the BLE component) for the BLE_Dongle_Peripheral_IAS example project.
Example Projects Figure 4-62. Set Central IAS Project as Active 6. Program the BLE Pioneer kit with either the PSoC_4_BLE_Central_IAS or the PRoC_BLE_Central_IAS project, depending on the BLE module placed on the BLE Pioneer kit. 7. Press button SW2 on the BLE Pioneer kit to wake the system and start scanning. Scanning is indicated by a blinking LED. 8. Wait for the BLE connection between the dongle and the Pioneer baseboard.
Example Projects Figure 4-63. User Button on BLE Pioneer Kit with PSoC 4 BLE Module Note: To revert the CySmart functionality to the dongle, program the dongle hex file, as described in Updating BLE Dongle for CySmart PC Tool on page 33. 4.5 BLE Dongle and LED Control 4.5.1 Project Description This firmware supports the CySmart debug tool (see CySmart PC Tool on page 160) by acting as the BLE host emulator. This is the default firmware that comes in the BLE dongle shipped with the kit.
Example Projects Figure 4-64. Top Design for BLE_Dongle_CySmart Project 4.5.2 Hardware Connections No specific hardware connections are required for this project because all connections are hardwired on the dongle board. The pin assignment for this project is in BLE_Dongle_CySmart.cydwr in the Workspace Explorer, as shown in Figure 4-65. Figure 4-65. Pin Selection for BLE Dongle Project CY8CKIT-042-BLE Bluetooth® Low Energy (BLE) Pioneer Kit Guide, Doc. # 001-93731 Rev.
Example Projects 4.5.3 Flow Chart Figure 4-66.
Example Projects 4.5.4 Verify Output This project will be used whenever the CySmart PC tool (see CySmart PC Tool on page 160) is invoked for testing other example projects. In addition, the LED control operation can be verified as follows. 1. Power the BLE Pioneer kit through the USB connector J13. 2. Program the BLE Pioneer kit with the CapSense and LED example project described in CapSense Slider and LED on page 47. 3. Connect the BLE dongle to one of the USB ports on the PC. 4.
Example Projects The HCI is enabled in the BLE component under the General Settings. Note that when the HCI mode is selected, all other tabs are hidden and cannot be configured. This is because in HCI mode, there are no upper layer processes. On enabling HCI mode in the components, the components automatically reserves a UART block to allow communication between the tester and BLE stack. The UART exposes the pins that can be assigned in Design Wide Resource > Pins.
Example Projects Figure 4-69. J5 Header to Interface RS232 Translator 4.6.2 Hardware Connection For DTM test mode, it is recommended to use SMA connectors and connect the tester and DUT using a SMA to SMA connector cable. This ensures that there is minimum interference to RF communication between the DUT and tester, and the performance measured is the true RF performance of the device.
Example Projects Table 4-4. UART Pin Assignment for RS232 Voltage Translator UART Pins 4.6.3 Pin Assigned RX P0_0 TX P0_1 RTS P0_2 CTS P0_3 Verify Output 1. Connect the BLE Pioneer kit through the USB connector J13. 2. Program the BLE Pioneer kit with the PSoC_4_BLE_DTM or PRoC_BLE_DTM project, depending on the BLE module used (PSoC 4 BLE or PRoC BLE), as described in Using Example Projects on page 42. Programming should complete successfully. 3.
5. Hardware This chapter describes the contents of the BLE Pioneer kit hardware and its different blocks, such as the power block, USB connection, Arduino-compatible headers, BLE module connectors, and CapSense slider. 5.1 Pioneer Baseboard 5.1.1 PSoC 5LP An onboard PSoC 5LP is used to program and debug the BLE silicon. The PSoC 5LP connects to the USB port of the PC through a USB mini-B connector and to the SWD interface of the BLE device.
Hardware An adjustable LDO is used to output three different voltage levels (1.9 V, 3.3 V, and 5 V) to power the BLE module. These voltages are selected with the J16 jumper, as shown in Figure 5-1. Figure 5-1. Schematics and Board Highlight of LDO and Power Selection Jumper D1 SOD123 VBUS D2 VIN D3 U1 SOD123 EN_CTRL VCC D4 SOD123 3216 + C1 1 uFd 1 CTL 2 OUT VCC 3 NC C GND 4 SOD123 VADJ 5 3216 R1 11K 1% 6 VDD + C2 4.7uF BA00BC0WFP-E2 R3 14.7K 1% 1% 1 R10 10K R4 10K R5 4.
Hardware The board also contains a CR2032 coin cell holder to power the board using a coin cell, as shown in Figure 5-2. Figure 5-2. Schematics and Board Highlight of Coin Cell Holder 5.1.2.1 Protection Circuits The power supply rail has reverse-voltage, overvoltage, short circuits, and excess current protection features, as shown in Figure 5-3. Figure 5-3. Power Supply Block Diagram With Protection Circuits I/O Header 5V Vin 3.
Hardware ■ A MOSFET-based protection circuit is provided for overvoltage and reverse-voltage protection for the 3.3-V rail from J1.5, as shown in Figure 5-4. When a voltage greater than 3.6 V is applied from J1.5, the Q2 PMOS will turn off, which will cut off the power to the BLE module from J1.5. When reverse voltage is applied from J1.5, the Q1 PMOS will turn off, protecting the onboard components from reverse voltage. Figure 5-4. Schematics and Board Highlight of MOSFET Protection Circuit for 3.
Hardware 5.1.2.2 Current Measurement Jumper To demonstrate the low power consumption of PSoC 4/PRoC BLE, a two-pin header is populated in series with the power supply to the PSoC 4 BLE. This can be used to measure current using an ammeter without the need to desolder any components from the board, as shown in Figure 5-5. Figure 5-5.
Hardware The following methods are supported for measuring the current consumption of the BLE device. ■ When the board is powered through the USB port (J13), remove jumper J15 and connect an ammeter, as shown in Figure 5-6. Figure 5-6. Current Measurement when Powered from USB Port CY8CKIT-042-BLE Bluetooth® Low Energy (BLE) Pioneer Kit Guide, Doc. # 001-93731 Rev.
Hardware ■ When the board is powered from an external voltage supply, remove the USB port (J13). Connect the positive terminal of the external voltage supply to the positive terminal of the ammeter and the negative terminal of the ammeter to the upper pin of J15. Connect the negative terminal of the external voltage supply to and GND pin on board. Figure 5-7 shows the required connections. Figure 5-7. Current Measurement when Powered Separately VOLTAGE SOURCE - 5.1.
Hardware 5.1.4 Expansion Connectors 5.1.4.1 Arduino Compatible Headers (J1, J2, J3, J4, and J12-unpopulated) This kit has five Arduino compatible headers: J1, J2, J3, J4, and J12, as shown in Figure 5-8. You can develop applications based on the Arduino shield's hardware. Figure 5-8. Arduino Headers Arduino compatible I/O header (J3/J4) Arduino compatible power header (J1) Arduino compatible I/O header (J2) The J1 header contains I/O pins for reset, I/O reference voltage (IOREF), and power supply line.
Hardware 5.1.4.2 PMod Connector - Digilent Pmod Compatible (J5-unpopulated) This port supports Digilent Pmod peripheral modules (see Figure 5-9). Pmods are small I/O interfaces that connect with the embedded control boards through either 6- or 12-pin connectors. The BLE Pioneer kit supports the 6-pin Pmod type 2 (SPI) interface. For Digilent Pmod cards, go to www.digilentinc.com. This header is not populated on the BLE Pioneer board. You must populate this header before connecting the Pmod daughter cards.
Hardware 5.1.4.3 PSoC 5LP GPIO Header (J8) An 8×2 header is provided on the board to pull out several pins of PSoC 5LP to support advanced features such as a low-speed oscilloscope and a low-speed digital logic analyzer (see Figure 5-10). This header also contains the USB-Serial bridge pins that can be used when these pins are not accessible on the Arduino headers because a shield is connected. Note: You can use PSoC 5LP for your own custom firmware.
Hardware 5.1.5 USB Mini-B Connector The PSoC 5LP connects to the USB port of a PC through a mini-B connector (see Figure 5-11), which can also be used to power the board. A resettable polyfuse is used to protect the computer's USB ports from shorts and overcurrent. If more than 500 mA is drawn from the USB port, the fuse will automatically break the connection until the short or overload is removed. Figure 5-11.
Hardware 5.1.6 CapSense Circuit 5.1.6.1 CapSense Slider The kit has a five-segment linear capacitive touch slider, which is connected to the BLE module pins (see Figure 5-12). The CMOD and CTANK capacitors are required for CapSense functionality and are provided on the BLE modules (see BLE Module Board on page 106). A 2.2-nF capacitor is present on the CMOD pin, P4[0], for CapSense operation. This kit also supports CapSense designs that enable waterproofing.
Hardware Proximity Header The baseboard contains a header (J14) for CapSense proximity wire connection (see Figure 5-13). Figure 5-13. Schematics and Board Highlight of Proximity Header MOSI MISO SCK VCC P0_2 2 P0_0 3 P0_1 4 P0_3 J14 P2_0 R19 ZERO 1x1 RECP 5 6 VDD GND 1 0603 SS Proximity Header CON6 CY8CKIT-042-BLE Bluetooth® Low Energy (BLE) Pioneer Kit Guide, Doc. # 001-93731 Rev.
Hardware 5.1.7 Pioneer Board LEDs The Pioneer board has three LEDs. A green LED (LED2) indicates the status of the programmer. An amber LED (LED1) indicates the status of power supplied to the board. The kit also has a general-purpose tricolor LED (LED3) for user applications. These are connected to P2_6 (Red LED), P3_6 (Green LED) and P3_7 (Blue LED). Figure 5-14 and Figure 5-15 show the schematics of these LEDs. Figure 5-14.
Hardware 5.1.8 Push Buttons The board contains a reset push button and a user push button, as shown in Figure 5-16. The reset button is connected to the XRES pin of BLE and is used to reset the BLE device. The user button is connected to P2[7] of the BLE device. Both the push buttons connect to ground on activation (active low). Figure 5-16. Schematics and Board Highlight of Reset Button and User Push Button SW1 /XRES /XRES 0402 1 SW2 2 C25 0.
Hardware 5.1.9 Cypress Ferroelectric RAM (F-RAM) The baseboard contains an F-RAM device (FM24V10) (see Figure 5-17) that can be accessed through I2C lines P5[0] and P5[1] of the PSoC 4 BLE/PRoC BLE device. The F-RAM is 1-Mbit (128 KB) with an I2C speed up to 1 Mbps. The I2C slave address of the F-RAM device is seven bits wide, and the LSB two bits are configurable through physical pins and are hardwired to 00 on the board. By default, the address of the F-RAM device used on the board is 0x50.
Hardware 5.1.10 Serial Interconnection Between PSoC 5LP and BLE Module The PSoC 5LP onboard programmer is also a USB-Serial interface, It supports USB-UART and USB-I2C bridges (see Figure 5-18). The pull-ups resistors on I2C bus are enabled when the protocol is selected from user interface (like bridge control panel). The USB-Serial pins of the PSoC 5LP are also available on the Arduino header; therefore, the PSoC 5LP can be used to control Arduino shields with the SPI/I2C/UART interface.
Hardware 5.1.11 Bluetooth Module Headers The PSoC 4 BLE and PRoC BLE Modules are connected to the Pioneer board using the two (24-pin and 20-pin) Bluetooth module headers, as shown in Figure 5-19. Figure 5-19.