
User guide


12 CY8CKIT-002 MiniProg3 User Guide, Doc. # 001-59350 Rev. *E
Installing MiniProg3
2.3 MiniProg3 Installation
The MiniProg3 programmer and debugger are supported by PSoC Programmer, PSoC Designer,
and PSoC Creator. Secondary software, such as Bridge Control Panel and Clock Programmer, use
the programmer COM hardware layer to support MiniProg3 functionality.
1. Download and install PSoC Programmer. Follow the instructions to install the software.
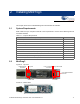
2. Connect the MiniProg3 to your computer’s USB port using the USB cable. When properly
connected, the four LEDs on the MiniProg3 flicker.
The first two MiniProg3 drivers are automatically installed.
Note Remove the warning sticker before using MiniProg3.
3. Run PSoC Programmer: Select Start > All Programs > Cypress > PSoC Programmer.
The second MiniProg3 driver is automatically installed.
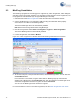
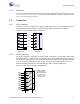
4. In PSoC Programmer, select View > Modern.
Figure 2-3. PSoC Programmer in Modern View Mode: MiniProg3 Selected and Connected
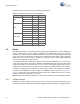
5. To connect to the port, in the port selection window, click the MiniProg3 device. You can also click
Connect/Disconnect.
If the connection is successful, the green status LEDs on MiniProg3 light up and a blue dot
appears next to MiniProg3 in the Port Selection box. Also, the indicator in the lower-right corner
of the PSoC Programmer window turns green and shows Connected.
You can now use MiniProg3 and the functions it supports.
For more information on how to use PSoC Programmer, see the PSoC Programmer User Guide.