
Operating instructions
1-3 (E)
DFP-R3000
1-3. Note on RD-35 Board Replacement
The DFP-R3000 serial number and following hours meter
setting data are stored in the NVSRAM STK22C48(IC14)
on the RD-35 board.
The setting data is reset when the RD-35 board or the
NVSRAM is replaced.
Therefore, set the serial number and the following hours
meter again when the RD-35 board or NVSRAM has been
replaced.
Hours meter item
Code Description
0 Accumulated power ON time
1 Accumulated film running time
2 Accumulated S side LED lighting time
3 Accumulated P side LED lighting time
Serial number and hours meter setting
Set or reset the serial number and hours meter with
following procedure using personal computer and terminal
software.
Required equipment and tools
Personal computer : IBM PC/AT compatible
Terminal software : Communication format (Baud rate ;
9600 baud, Data length ; 8 bits,
None parity, Stop bit ; Fixed to one
bit)
RS-232C cable (for DFP-D2000)
Preparation
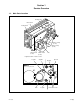
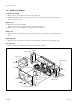
(1) Remove the right side plate.
(2) Connect the D-sub 9pin connector on the RD-35 board
and serial port on personal computer using RS-232C
cable (for DFP-D2000).
(3) Start up the terminal software of personal computer.
1. Serial number setting
Input the following commands at the screen of the
terminal software started and set the serial number.
Set the serial number indicated on the label of DFP-
R3000.
Be sure to set 6 digits for the serial number.
(X : serial number)
(^o^) /nXXXXXX
Ex.) When a serial number 10123 : (^0^) /n10123
2. Hours meter setting
Checking of hours meter
(1) Input the following commands at the screen of the
terminal software.
(^o^) /h
(2) Each hours meter will be displayed on the screen by
eight-digit hexadecimal as shown below.
(X : any hexadecimal digit)
Power ON Time = XXXXXXXX
(display of accumulated power
ON time)
FILM RUN Time = XXXXXXXX
(display of accumulated film
running time)
LED S ON Time = XXXXXXXX
(display of accumulated S side
LED lighting time)
LED P ON Time = XXXXXXXX
(display of accumulated P side
LED lighting time)
Hours meter setting
Input the following commands at the screen of the terminal
software started and set the hours meter.
Input eight digits (hexadecimal) for the time to be set at X.
(^o^) /h0, XXXXXXXX
(setting of accumulated power ON time)
(^o^) /h1, XXXXXXXX
(setting of accumulated film running time)
(^o^) /h2, XXXXXXXX
(setting of accumulated S side LED lighting time)
(^o^) /h3, XXXXXXXX
(setting of accumulated P side LED lighting time)
Hours meter resetting
Input the following commands at the screen of the terminal
software started and reset the hours meter.
Each hours meter can be reset independently.
(^o^) /h0, 00000000
(resetting of accumulated power ON time)
(^o^) /h1, 00000000
(resetting of accumulated film running time)
(^o^) /h2, 00000000
(resetting of accumulated S side LED lighting time)
(^o^) /h3, 00000000
(resetting of accumulated P side LED lighting time)
1-3. Note on RD-35 Board Replacement