
Operating instructions


3-24 (E)
DFP-R3000
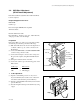
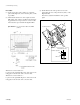
1. S side optics adjustment
n
By touching against the lens and the protection glass of the
CCD adjustment table, do not make them dirty.
Step 1. Preparation
(1) Load the alignment film into the DFP-R3000 and
projector, and then run the alignment film.
(2) Input the command C1 (press the “C” key and “1”
key) from the PC keyboard at the screen of the termi-
nal software started and then press the Enter key.
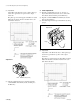
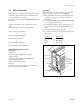
Step 2. CCD magnification and focus rough adjustment
(1) Input the command m0 from the PC and then press the
Enter key.
(2) Loosen the two hexagon cap screws as the bottom of
the optics block about a half turn.
(3) Set the sweep times of the oscilloscope so that the
pulse width (high level) of the oscilloscope CH2
output waveform is 6 DIV (scales).
(4) Rotate and adjust the fifth and sixth CCD adjustment
screws from the mechanical deck chassis using a hex
wrench driver so that amplitude A of the output
waveform of the oscilloscope CH1 becomes maxi-
mum.
(5) Check that the film data width of the oscilloscope CH1
meets the following specification.
Specification : Film data width = 6 ±0.1 scales
. When the film data width is narrower than the above
specification, turn the adjustment screw at the sixth from
the mechanical chassis counterclockwise and perform
the procedure (4) and (5) above.
. When the film data width is wider than the above
specification, turn the adjustment screw at the sixth from
the mechanical chassis clockwise and perform the
procedure (4) and (5) above.
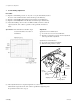
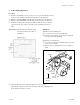
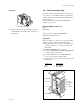
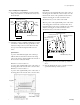
3-5. Optics Adjustment
Optics block
Bottom side
Hex head (S side)
Adjustment screw
(S side)
Adjustment screw
(S side)
SE-437 board
(S side)
Optics block