
Operating instructions


3-33 (E)
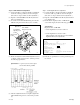
DFP-R3000
3-7. Error Rate Checking
Check the error rate using the film for checking error rate.
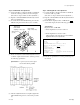
Check the error rate checking with DFP-R3000 installed to
the projector and connected to DEP-D3000.
Required Equipment and Tools
DFP-D3000
Projector
Personal computer ; PC/AT compatible
(Operating system ; Microsoft Windows95)
Film for error rate checking
Installation reels (A) (part No. 9-936-836-01)
Installation reels (SR) (part No. 9-936-837-01)
SDDS Setup software
Connection cable (Supplied with DFP-D3000)
RS-232C Null modem cable
Procedure
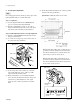
Step 1. Preparation
(1) Connect the DFP-R3000 to the DFP-D3000 READER
connector using connection cable.
(2) Connect the RS-232C connector of the DFP-D3000
and a serial port of PC (personal computer) using RS-
232C Null modem cable.
(3) Load the installation reels (A) or (SR) into the DFP-
R3000 and projector.
Step 2. Checking the error rate
(1) Start up Windows95 in PC.
(2) Insert SDDS Setup software disk into floppy disk drive
on PC.
(3) Open “3.5 inch FD” from “My Computer” of Win-
dows95 and start up “Dfp.exe” of SDDS Setup
software disk.
(4) Run the installation reels.
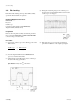
(5) Select the “Liner Error Test” command located under
the “Test” menu of “DFP-D3000 System Setup”
screen.
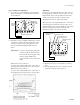
DFP-D3000 System Setup screen
(6) Select the error rate measurement track (P Track, S
Track or ACM) on “DFP-D3000 Liner Error Data”
dialog box.
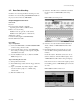
(7) Click Start Poll button, and measure the error rate
when the film is running. (Run the film about five
minutes.)
Check that only the “Excellent” (Green) and “Good”
(Yellow) indicators of the Error Meter display of the
“DEP-D3000 Linear Error Data” dialog box light up.
If the “Fair” and “Poor” indicators also light up, adjust
the installing position of DEP-R3000 again to meet the
error rate.
DFP-D3000 Linear Error Data screen
3-7. Error Rate Checking