IP Phone 1120 User Guide
Copyright © 2007 Cypress Communications, Inc. All rights reserved. The information in this document is subject to change without notice. The statements, configurations, technical data, and recommendations in this document are believed to be accurate and reliable, but are presented without express or implied warranty. Users must take full responsibility for their applications of any products specified in this document. The information in this document is proprietary to Cypress Communications, Inc.
Contents Overview ........................................................................................................ 7 Key Features ...........................................................................................................7 Physical Features....................................................................................................8 Display.....................................................................................................................8 Indicators..........
Contents Busy Lamp Field (BLF) .........................................................................................17 Call Forward..........................................................................................................17 Call Hold................................................................................................................18 Conferencing (3-way or 30-way) ........................................................................... 18 Directed Call Park ..............
Contents Making a Call on an MDN MCA or MDN SCA Key............................................26 Answering an MDN MCA or MDN SCA Call......................................................26 Transferring a MDN SCA Call to Another MDN SCA Group Member ...............26 Conferencing with a MDN SCA Line and Privacy Release ...............................27 Mute ......................................................................................................................
Contents Modifying User settings......................................................................................... 36 Navigating the User menu ................................................................................. 36 Viewing your user name .................................................................................... 36 Viewing your login type ..................................................................................... 37 Enabling or disabling the auto login feature .......
Key Features Overview Overview The IP Phone 1120 is a professional-level desktop phone that provides a full range of features with a large backlit display and fixed and programmable keys. The IP Phone 1120 brings voice and data to the desktop by connecting directly to a Local Area Network (LAN) through an Ethernet connection. You can use the handset and keypad of the IP Phone 1120 as you would use a standard telephone.
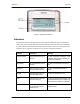
Overview Physical Features Physical Features Figure 1: Physical features Display The display on the IP Phone 1120 terminal has blue LED backlighting, which you can turn on and off. The backlight turns off automatically after a period of inactivity. Nortel IP Phone 1120 display has three distinct areas: • The upper area shows line and feature key status.
Indicators Overview Figure 2: Display area features Indicators The IP Phone terminal uses light-emitting diodes (LEDs) of different colors to indicate the current state of the terminal. The following table describes each color and its associated state. A steady indicator means that the extension or feature beside it is active. A flashing indicator means the line is on hold or the feature is in the process of being programmed.
Connecting the IP Phone to the LAN Prerequisites Connecting the IP Phone to the LAN Follow this procedure to connect the terminal to the Local Area Network (LAN) and to a power source. Prerequisites IP Phones can be powered by an AC adapter or over a LAN. Contact your installation technician to identify the correct power option. Warning: Risk of equipment damage Do not plug the IP Phone 1120 into a regular telephone jack. This causes severe damage to the terminal.
Connecting the IP Phone to the LAN Connecting the IP Phone to the LAN IP Phone connectors and other back panel features Figure 3: IP Phone connectors Copyright © 2007 Cypress Communications, Inc. All Rights Reserved.
Getting Started Logging on Getting Started Logging on Before you can use your IP Phone 1120, you must log on to obtain the features provided to you on the Cypress Communications network. You do not need to log on to your IP Phone 1120 every day. Your phone remains logged in unless you log out or your IP Phone loses power. You may be prompted to upgrade the IP Phone 1120 firmware before you log on. If this occurs, you must perform the upgrade before you can log on.
Using the dialpad to enter text Getting Started Using the dialpad to enter text Steps to Take 1. To enter text, find the number key associated with the letter you want to enter, and perform one of these actions: • To enter the first letter, press the key once. • To enter the second letter, press the key twice. • To enter the third letter, press the key three times. The letter appears on the display. 2. To enter special characters perform theses actions.
Making, Answering, and Ending a Call Making a call using off-hook dialing Making, Answering, and Ending a Call Making a call using off-hook dialing Follow this procedure to make a call using off-hook dialing. 1. Lift the handset from the cradle. The primary line is active and you hear a dial tone. 2. Use the dialpad to enter the number. 3. When the call is answered, begin speaking. Making a call using handsfree dialing Follow this procedure to make a call using handsfree dialing.
Editing a predialed number Making, Answering, and Ending a Call Editing a predialed number Follow this procedure to edit a number held in the predialed state. Prerequisites A number must be predialed. 1. Perform one of these steps: • To delete numbers that appear to the left of the cursor, press Bkspc. • To delete numbers that appear to the right of the cursor, press Delete. 2. Use the dialpad to enter the new number.
Using Phone Features Overview Using Phone Features Follow these procedures to use the features provided with your IP Phone 1120. Some of the features described may not be available to all users. Please see your system administrator if you require more information. Overview The IP Phone 1120 is operated using the fixed keys located on either side of the number dial pad , and feature/line keys that appear on display screen.
Busy Lamp Field (BLF) Using Phone Features If you use an Auto Dial key while you are on a call, your current call is placed on hold and your autodial call uses your secondary line. Storing a number at an Automatic Dial key Steps to Take 1. While the phone is on-hook, press the Auto Dial key. 2. Enter the desired number. 3. Press the Auto Dial key again. Using an Automatic Dial key Steps to Take 1. Press the line key. If you are already on a call, press your secondary line key.
Using Phone Features Call Hold 2. Use the dialpad to enter the extension to which you want to forward your incoming calls. 3. Press the Forward key again. An icon appears in the display next to the Forward key label. Calls will now be forwarded to the number that you entered. 4. To turn off call forward, press the Forward key. The feature is deactivated and the icon disappears from the display. Call Hold The Hold feature allows you to suspend a call without ending it.
Directed Call Pickup Using Phone Features Parking a call against a phone number Steps to Take 1. While on a call, press the Dir Park key. 2. Dial a number within your organization. The call is parked at that number. Retrieving a call parked against a phone number Steps to Take 1. Press the line key. 2. Press the Dir Park key. 3. Dial the number at which the call was parked.
Using Phone Features Do Not Disturb / Make Set Busy Deleting an entry from the directory Follow this procedure to delete an entry from the directory. See "Physical Features" on page 8 for the location of the Directory key. Steps to Take 1. Press the directory key to access the directory menu. The directory opens. 2. From the directory list, select the name you want to delete. 3. Press Ok. The Directory menu opens. 4. Press the down navigation key until the Delete option appears. 5. Press Ok.
Group Call Pickup Using Phone Features 2. Use the dialpad to enter the number to which to transfer the call. If your IP Phone includes a BLF key for the number that you wish to transfer to, you can press the BLF key instead of dialing. 3. When the number rings or is answered, press the Fast Xfer key again. The call is transferred. 4. If the call is not answered, press the line key to resume and terminate the call.
Using Phone Features Group Intercom 2. Press the Grp Intrcm key. 3. Dial the desired intercom number. If you are on a call, the call is placed on hold. Answering a Group Intercom call When you receive a Group Intercom call, your phone rings or a tone sounds if you are already on a call. Your Grp Intrcm key display flashes. 1. Lift the handset. 2. Press the Grp Intrcm key to answer the call. If you are on a call, your current call is placed on hold. Paging a member of your intercom group 1.
Inbox (Inbound Call Record) Using Phone Features Making a Conference call with your intercom group Follow these steps to create a conference call with up to 30 members of your intercom group. Steps to Take 1. Lift the handset. 2. Press the Grp Intrcm key. 3. Press #. This calls each member of your intercom group, ringing their phone and flashing the Grp Intrcm key. As each person answers the call to enter the conference, you hear a short ring tone.
Using Phone Features Inbox (Inbound Call Record) 2. Select an item from the list and press Ok. 3. Perform one of these actions: • Select Dial to call the number. • Select Display to view caller information. • Select Store to store the number in the directory. Viewing Inbox call information Follow this procedure to view the information about a call in the Inbox. 1. Press the Msg/Inbox key. The Inbox screen appears, showing a list of the 10 most recent incoming calls. 2. Select a number from the list.
Inspect Using Phone Features 6. Perform one of these steps. • To edit the number, see "Editing a predialed number" on page 15. • To make the call, see "Making a call using predial" on page 14. Resetting the Inbox Follow this procedure to empty the contents of the Inbox. 1. From the main menu, select and open the History menu. 2. From the History menu, select Reset Inbox. A confirmation screen appears. 3. Press Yes. The calls in the Inbox are deleted. You return to the previous menu.
Using Phone Features Multiple Appearance Directory Number (MDN) Multiple Appearance Directory Number (MDN) Multiple Appearance Directory Number (MDN) is a feature that allows one phone number to appear on more than one IP Phone. In each MDN group, one number is designated as the primary, and one or more other users are designated as secondary group members.
Mute Using Phone Features Conferencing with a MDN SCA Line and Privacy Release When you answer a call using an MDN SCA key, you can allow another join the call by using the Privacy Release key. • While in an MDN SCA call, press the PRL (Privacy Release) key. Another MDN SCA group member can now press their MDN SCA key to join the call. Mute You can apply Mute on your phone during a call to prevent the other party or parties from hearing you.
Using Phone Features Outbox (Outbound Call Record) Viewing Outbox call information Follow this procedure to view the information about a call in the Outbox. Steps to Take 1. Press the Shift/Outbox key. The Outbox screen appears, showing a list of the 10 most recent outgoing calls. 2. Select a number from the list. 3. Press the Ok key. The Dial screen appears. 4. Press the down navigation key. 5. Select Display. The Display screen appears. 6. Press the down navigation key to view the information.
Speed Dial Using Phone Features Speed Dial If you have a list of phone numbers that you dial frequently, you can use the Speed Dial feature to store each telephone number. You can then dial any of these persons quickly by using their Speed Dial code instead of the full telephone number. Speed dialed numbers can be internal or external. Speed Dial codes can be between 20 and 39. Storing a Speed Dial number 1. Press the SpeedDial key. 2. Enter a Speed Dial call position from 20 to 39. 3.
Changing Your IP Phone Settings Using the Settings menu Changing Your IP Phone Settings Using the Settings menu Follow these procedures to navigate and select items from the main menu. Menu items can be selected with a shortcut key. The shortcut key is the number on the dialpad that corresponds to the number of the menu item. Only items numbered 0 through 9 can be opened by a shortcut key. Use the navigation keys to scroll through menus and screens. Follow this procedure to open the main menu. 1.
Modifying Audio settings Changing Your IP Phone Settings Modifying Audio settings You can change the following audio settings for your IP Phone: • Default volumes, or resetting volumes to preset default levels • Ring tone Changing the default volume Follow this procedure to change the default volume of the handset, headset, handsfree speaker, ringer, or buzzer. Steps to Take 1. From the main menu, select and open Audio. The Audio menu opens. 2. Navigate through the menu and select Default Volumes.
Changing Your IP Phone Settings Modifying Feature key settings Selecting a ring tone Steps to Take 1. From the main menu, select and open Audio. The Audio menu opens. 2. Scroll through the menu and select Play Ring Patterns. The list of ring tones opens. 3. Scroll through the ring tones list to find the tone that you want. Press the Ok key to select a tone. 4. To hear a ring tone before you select it, select a ring tone from the list, and then: • Press the Ok key for the Play option to hear the tone.
Adjusting the contrast level of the display Changing Your IP Phone Settings Restoring default settings for a feature key Steps to Take 1. From the main menu, select and open the Feature menu. 2. Select the feature that you want to relabel by navigating to the item in the list, and then pressing the Enter key or the Ok key. 3. Select the Reset option, and then press the Ok key. A message appears asking you to confirm that you want to apply the default settings to the feature key. 4. Press Yes.
Changing Your IP Phone Settings Modifying Time settings Modifying Time settings Navigating the Time menu Steps to Take 1. From the main menu, select and open Time. The Time menu opens. 2. Perform one of these actions: • Select and open Hours from GMT. See "Selecting the time zone" on page 34. • Select and open Daylight Saving. See "Enabling Daylight Saving Time" on page 34. • Select and open Time Format. See "Setting the time format" on page 35. • Select and open Date Format.
Modifying Time settings Changing Your IP Phone Settings Disabling Daylight Saving Time Steps to Take 1. From the main menu, open the Time menu. 2. From the Time menu, select and open Daylight Saving. The Daylight Saving screen appears. The word On appears with a check mark beside it, if the feature is enabled. 3. Select Off. Daylight Saving Time is disabled. The word Off appears in the display, with a check mark beside it. You return to the previous screen.
Changing Your IP Phone Settings Modifying User settings 4. Scroll through the Date Format options to select the format you want. A check mark appears beside the format currently in use. 5. To enable a format, select it and press the Ok key. A check mark appears beside the option, to indicate that it is enabled. The date is displayed in the selected format. You return to the previous screen. Resetting the default time Steps to Take 1. From the main menu, open the Time menu. 2.
Modifying User settings Changing Your IP Phone Settings Viewing your login type You can operate your IP Phone 1120 in one of two ways, as determined by the login type: • Unique — the phone cannot join a session with an m6350 Soft client. • Joint — the phone can operate in a joint session with an m6350 Soft client. Steps to Take 1. From the main menu, open the User menu. 2. From the User menu, select and open Login Type. The login type (Unique or Joint) appears in the lower left of the display.
Changing Your IP Phone Settings Performing a firmware upgrade 4. Use the dialpad to enter the new password, and then press the Ok key. 5. Use the dialpad to enter the new password again, and then press the Ok key. The message ‘Password changed’ appears. 6. Press the Ok key. Performing a firmware upgrade If a firmware upgrade for the IP Phone is available, the system prompts you to upgrade when you log on.
Performing a firmware upgrade Access Code Summary Access Code Summary Contact your system administrator for a list of features available on your IP Phone, and the corresponding Access Codes. Use this table to keep track of the feature Access Codes. Feature Access Code Feature Copyright © 2007 Cypress Communications, Inc. All Rights Reserved.