
Specifications


80 CY8CKIT-042 PSoC 4 Pioneer Kit Guide, Doc. # 001-86371 Rev. *D
Advanced Topics
if(0u != (I2C_I2CSlaveStatus() & I2C_I2C_SSTAT_WR_CMPLT))
{
/* Read the number of bytes transferred */
byteCnt = I2C_I2CSlaveGetWriteBufSize();
/* Clear the write status bits*/
I2C_I2CSlaveClearWriteStatus();
/* Move the data written by the master to the read buffer so that the
master can read back the data */
for(indexCntr = 0; indexCntr < byteCnt; indexCntr++)
{
rdBuf [indexCntr] = wrBuf[indexCntr]; /* Loop back the data to the read
buffer */
}
/* Clear the write buffer pointer so that the next write operation will
start from index 0 */
I2C_I2CSlaveClearWriteBuf();
/* Clear the read buffer pointer so that the next read operations starts
from index 0 */
I2C_I2CSlaveClearReadBuf();
}
/* If the master has read the data , reset the read buffer pointer to 0
and clear the read status */
if(0u != (I2C_I2CSlaveStatus() & I2C_I2C_SSTAT_RD_CMPLT))
{
/* Clear the read buffer pointer so that the next read operations starts
from index 0 */
I2C_I2CSlaveClearReadBuf();
/* Clear the read status bits */
I2C_I2CSlaveClearReadStatus();
}
}
}
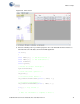
6. Build the project by clicking Build > Build Project or [Shift]+[F6]. After the project is built without
errors and warnings, program ([Ctrl]+[F5]) this code onto the PSoC 4 through the PSoC 5LP pro-
grammer or MiniProg3.
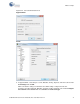
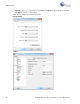
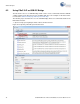
7. Open the BCP from Start > All Programs > Cypress > Bridge Control Panel <version num-
ber>.
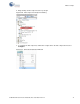
8. Connect to KitProg/ under Connected I2C/SPI/RX8 Ports.