
Specifications


CY8CKIT-042 PSoC 4 Pioneer Kit Guide, Doc. # 001-86371 Rev. *D 93
Advanced Topics
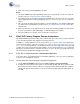
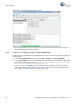
6. Click on the device and click Connect to program.
Notes:
1. The 10-pin SWD debug and programming header (J7) is not populated. See the 'No Load Com-
ponents' section of A.6 Bill of Materials (BOM) for details.
2. The PSoC 5LP pins are brought to the PSoC 5LP GPIO header (J8). These pins are selected to
support high-performance analog and digital projects. See A.2 Pin Assignment Table for pin infor-
mation.
3. Take care when allocating the PSoC 5LP pins for custom applications. For example, P2[0]–P2[4]
are dedicated for programming the PSoC 4. Refer to A.1 CY8CKIT-042 Schematics before allo-
cating the pins.
4. When a normal project is programmed onto the PSoC 5LP, the initial capability of the PSoC 5LP
to act as a programmer, USB-UART bridge, or USB-I2C bridge in not available.
5. The status LED does not function unless used by the custom project.
6.4 PSoC 5LP Factory Program Restore Instructions
The CY8CKIT-042 PSoC 4 Pioneer Kit features a PSoC 5LP device that comes factory-programmed
as the onboard programmer and debugger for the PSoC 4 device.
In addition to creating applications for the PSoC 4 device, you can also create custom applications
for the PSoC 5LP device on this kit. For details, see section 6.3 Developing Applications for PSoC
5LP on page 84. Reprogramming or bootloading the PSoC 5LP device with a new flash image will
overwrite the factory program and forfeit the ability to use the PSoC 5LP device as a programmer/
debugger for the PSoC 4 device. Follow the instructions to restore the factory program on the PSoC
5LP and enable the programmer/debugger functionality.
6.4.1 PSoC 5LP is Programmed with a Bootloadable Application
If the PSoC 5LP is programmed with a bootloadable application, restore the factory program by
using one of the following two methods.
6.4.1.1 Restore PSoC 5LP Factory Program Using PSoC Programmer
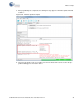
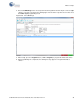
1. Launch PSoC Programmer 3.18 or later from Start > Cypress > PSoC Programmer.
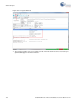
2. Configure the Pioneer Kit in Service Mode. To do this, while holding down the reset button (SW1
Reset), plug in the PSoC 4 Pioneer Kit to the computer using the included USB cable (USB A to
mini-B). This puts the PSoC 5LP into service mode, which is indicated by the blinking green sta-
tus LED.