CLUX-11CD HDMI Audio Extractor Operation Manual
DISCLAIMERS The information in this manual has been carefully checked and is believed to be accurate. Cypress Technology assumes no responsibility for any infringements of patents or other rights of third parties which may result from its use. Cypress Technology assumes no responsibility for any inaccuracies that may be contained in this document. Cypress also makes no commitment to update or to keep current the information contained in this document.
SAFETY PRECAUTIONS Please read all instructions before attempting to unpack, install or operate this equipment and before connecting the power supply. Please keep the following in mind as you unpack and install this equipment: • Always follow basic safety precautions to reduce the risk of fire, electrical shock and injury to persons. • To prevent fire or shock hazard, do not expose the unit to rain, moisture or install this product near water. • Never spill liquid of any kind on or into this product.
CONTENTS 1. Introduction �������������������������������������������� 1 2. Applications ������������������������������������������� 1 3. Package Contents �������������������������������� 1 4. System Requirements ���������������������������� 1 5. Features �������������������������������������������������� 2 6. Operation Controls and Functions ������� 3 6.1 Top Panel ������������������������������������������3 6.2 Right Panel ����������������������������������������4 6.
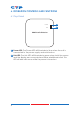
1. INTRODUCTION The HDMI Audio Extractor allows you to extract audio signals from your HDMI source. When connecting to a TV or display you don’t always get the best audio, or in the case of a PC monitor, no audio at all. So with this Audio Extractor you can take your original HDMI audio signal and convert it to digital optical or analog Stereo (L/R) audio. This means that you can output your audio signal to external speakers or extend your audio signal pathway. 2.
5. FEATURES • Compliant with HDMI, HDCP 1.2 and DVI 1.
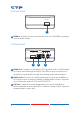
6. OPERATION CONTROLS AND FUNCTIONS 6.1 Top Panel Power 1 Link 2 HDMI Audio Extractor 1 Power LED: The Power LED will illuminate in blue when the unit is connected to the power supply and switched on. 2 Link LED: The Link LED will illuminate in green when both the source and the display are connected and have established a link. This LED will also blink once while the power is turned on.
6.2 Right Panel Bitstream TV 2CH LPCM 1 Power 2 1 TV/Bitstream/2CH LPCM: This switch allows users to select the source's audio EDID. TV Mode: Switch to TV mode for the HDMI source to output audio per the EDID of connected TV or AV receiver, supports up to LPCM 7.1 channels. Bitstream Mode: Switch to Bitstream mode for the HDMI source to output Bitstream audio per the built-in EDID, supports up to compressed audio 5.1 channels.
6.4 Front Panel HDMI In 1 1 HDMI In: Connect to a source device such as a DVD/Blu-ray player with an HDMI cable. 6.5 Rear Panel HDMI Out Optical 1 2 L R 3 1 HDMI Out: Connect to the display (TV/monitor) with an HDMI cable for video and audio signal output. No HDMI output connection is required to send audio through the analog and optical outputs. 2 Optical Out: Connect to audio equipment such as an amplifier or Hi-Fi system with an optical cable for digital audio output.
7.
8. SPECIFICATIONS Input Port 1×HDMI HDMI Audio Sampling Rate Up to 192 kHz Optical Audio Sampling Rate Up to 48 kHz Output Ports 1×HDMI, 1×Optical,1×L/R HDMI Audio Format LPCM 2/5.1/7.1CH, Dolby 5.1, DTS 5.1, DD+, D-TrueHD & DTS-HD Optical Audio Format LPCM 2CH, Dolby 5.1 & DTS 5.1 L/R Audio Format Analog Stereo 2CH Power Supply 5 V/1 A linear power adaptor (US/EU Standards, CE/FCC/UL Certified) Or 5 V/1.
9.
CYPRESS TECHNOLOGY CO., LTD Home page: http://www.cypress.com.