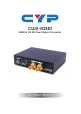
CLUX-H2SDI HDMI to 3G SDI Dual-Output Converter Operation Manual
DISCLAIMERS The information in this manual has been carefully checked and is believed to be accurate. Cypress Technology assumes no responsibility for any infringements of patents or other rights of third parties which may result from its use. Cypress Technology assumes no responsibility for any inaccuracies that may be contained in this document. Cypress also makes no commitment to update or to keep current the information contained in this document.
SAFETY PRECAUTIONS Please read all instructions before attempting to unpack, install or operate this equipment and before connecting the power supply. Please keep the following in mind as you unpack and install this equipment: • Always follow basic safety precautions to reduce the risk of fire, electrical shock and injury to persons. • To prevent fire or shock hazard, do not expose the unit to rain, moisture or install this product near water. • Never spill liquid of any kind on or into this product.
CONTENTS 1. Introduction �������������������������������������������� 1 2. Applications ������������������������������������������� 1 3. Package Contents �������������������������������� 1 4. System Requirements ���������������������������� 1 5. Features �������������������������������������������������� 2 6. Operation Controls and Functions ������� 3 6.1 Front Panel ���������������������������������������3 6.2 Rear Panel �����������������������������������������4 6.
1. INTRODUCTION The HDMI to SDI Converter allows HDMI signals to be shown on two SDI displays while ensuring high bit rates of 2.970 Gbit/s to give you high resolution signal without any loss. For professionals this means that it is now easier to convert your high def HDMI signal with audio to SDI for long distance transmission and display your work on two SDI displays. Also, a 2 CH L/R audio input allows DVI signal with 2CH audio to be converted to SDI in order to be shown on SDI displays.
5. FEATURES • Shows HDMI source on two SDI displays simultaneously • SDI interface operates at bitrates of 2.970 Gbit/s, 2.970/1.001 Gbit/s, 1.485 Gbit/s, 1.485/1.001 Gbit/s and 270 Mb/s • Converts HDMI signal to SDI: 1. 480i/576i to SD-SDI (SMPTE 259M-C, at bitrates of 270 Mbit/s) 2. 720p/1080i to HD-SDI (SMPTE 292M, at bitrates of 1.485 Gbit/s or 1.485/1.001 Gbit/s) 3. 1080p to 3G-SDI (SMPTE 424M/425M-AB, at bitrates of 2.970 Gbit/s and 2.970/1.001 Gbit/s) • Supports HDMI input timings: 480i@59.
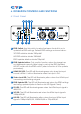
6. OPERATION CONTROLS AND FUNCTIONS 6.1 Front Panel 4 5 7 8 EDID Update 3G HD 3G SDI SD HD EDID 3G EDID 2 Out 1 CLUX-H2SDI HDMI to 3G SDI HDMI/DVI Video Lock 1 3 6 Out 2 9 1 EDID Switch: Use this switch to select between the built-in or to update the EDID settings.
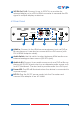
3G SDI Out 1 & 2: Connect to up to 2 SDI TVs or monitors for mirrored display or to a SDI to HDMI converter to cascade the SDI signal to multiple displays or devices 6.2 Rear Panel Audio In HDMI In Power DC 5V Audio SW HDMI 1 R/L 2 R L 3 4 5 1 HDMI In: Connect to the HDMI source equipment such as DVD or Blu-ray player or it can also be connected to a DVI source (with DVI to HDMI Adaptor cable).
6.3 EDID Update Procedure Please follow this procedure if there is no image displayed or it is displayed incorrectly. A. Please ensure that the display output settings of the source input device (such as a Blu-ray player or HD Camcorder) is set to “Automatic”. If the source image is displayed correctly no further action is necessary but if not to step B. DVD Player HDMI Converter SDI SDI Monitor B.
D. Finally, connect the HDMI source to the HDMI input of the Converter and connect the output to a SDI monitor which should now be correctly displaying the image.
6.4 LED Signal Chart System Operation LED Signal Status ● ● ● Input timing is 3G, HDMI mode ● ● Input timing is HD, HDMI mode ● ● Input timing is SD, HDMI mode ● ● ● ● Input timing no support , HDMI mode ● ● ● ● Input timing is 3G, DVI mode ● ● ● Input timing is HD, DVI mode ● ● ● Input timing is SD, DVI mode ● ● ● ● ● Input timing no support , DVI mode Input timing is 3G, HDMI mode No.
Note 1. Key: "" LED On "●" LED Off "" LED Flashing 2. Not all of HDMI timings can be converted to SDI, therefore selecting the default EDID settings provides the HDMI source with output timing reference. 3. EDID switch mode/Default EDID setting: 3G 1080p@60 HD 1080i@60 Update 720p@60 4. Due to the fact that the HDMI default timing is mainly set to 480p, there is a possibility that the image will not be displayed correctly as that timing is not supported by SDI .
EDID Update LED Confirmation Status Switch key /DVI HDMI Lock Video Update EDID SD Single LED HD EDID 3G EDID 1 Update Pressed On ● ● 3G Native, HDMI mode, Read OK 2 Update Pressed On ● ● HD Native, HDMI mode, Read OK 3 Update Pressed On ● ● SD Native, HDMI mode, Read OK 4 Update Pressed On ● ● ● No support timing, HDMI mode, Read OK 5 Update Pressed On ● ● ● 3G Native, DVI mode, Read OK (Note4) 6 Update P
7.
8. SPECIFICATIONS SDI Transmission Rates 2.970 Gbps, 2.970/1.001Gbps, 1.485 Gbps, 1.485/1.001Gbps & 270 Mbps Video Bandwidth 225 MHz/6.75Gbps Input 1×HDMI, 1×Stereo Audio (R/L) Output 2×BNC (SD/HD/3G-SDI) HDMI Timing Support 480i@59.94, 576i, 720p@50/59.94/60 1080i@50/59.94/60 1080p@23.98/24/25/29.97/30/50/59.94/60 SD-SDI: SMPTE 259M-C, 270 Mbit/s HD-SDI: SDI Timing Support SMPTE 292M, 1.485 & 1.485/1.001 Gbit/s 3G-SDI: SMPTE 424M/425M-AB, 2.970 & 2.970/1.
9. ACRONYMS ACRONYM COMPLETE TERM 3G Bandwidth 2.
CYPRESS TECHNOLOGY CO., LTD Home page: http://www.cypress.com.