CLUX-UCEC HDMI CEC Controller Operation Manual
DISCLAIMERS The information in this manual has been carefully checked and is believed to be accurate. Cypress Technology assumes no responsibility for any infringements of patents or other rights of third parties which may result from its use. Cypress Technology assumes no responsibility for any inaccuracies that may be contained in this document. Cypress also makes no commitment to update or to keep current the information contained in this document.
SAFETY PRECAUTIONS Please read all instructions before attempting to unpack, install or operate this equipment and before connecting the power supply. Please keep the following in mind as you unpack and install this equipment: • Always follow basic safety precautions to reduce the risk of fire, electrical shock and injury to persons. • To prevent fire or shock hazard, do not expose the unit to rain, moisture or install this product near water. • Never spill liquid of any kind on or into this product.
CONTENTS 1. Introduction �������������������������������������������� 1 2. Applications ������������������������������������������� 1 3. Package Contents �������������������������������� 1 4. System Requirements ���������������������������� 1 5. Features �������������������������������������������������� 1 6. Operation Controls and Functions ������� 2 6.1 Front Panel �����������������������������������������2 6.2 Rear Panel �����������������������������������������2 7.
1. INTRODUCTION The HDMI CEC Controller is a convenient USB device allowing users to control various HDMI devices through their PC. Both sources and displays can be controlled, either with a PC or remote control. This device connects to the PC using a mini USB port, allowing plug and play simplicity and providing power for the device itself, so you don’t have to deal with any cumbersome power cables. 2. APPLICATIONS • CEC system remote control over USB for HDMI devices 3.
6. OPERATION CONTROLS AND FUNCTIONS 6.1 Front Panel HDMI I/O CLUX-UCEC 1 1 HDMI I/O: Connect to the HDMI/DVI output of your source (i.e., DVD player or set-top box) or the input ports of an HDMI/DVi equipped display using a HDMI or HDMI to DVI adaptor cable. Note: When connecting to an input source, the other HDMI I/O must be connected to a display device. You cannot control two sources or two displays simultaneously. 6.
7. SOFTWARE INSTALLATION 7.1 Installing the RS-232 Driver Insert the provided driver CD into your CD-ROM drive, then execute the FIDIBUS file. Follow the on screen instructions to complete the installation. Note: It is not necessary to install this application if users already have existing RS-232 software installed on their computer. 7.2 Connecting the Hardware Once the RS-232 driver is installed connect the device to a PC/Laptop with a mini-USB to USB-A type cable.
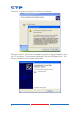
A found new hardware wizard will appear on your PC screen. Choose “No, not this time” and Click “Next” to continue. Select "Search for the best Driver in these locations" and then Click “Browse” and navigate to the “USB TO RS232 SOFTWAVE” folder on the CD-Rom. Click “Next” to continue.
Click the “Continue Anyway” button to continue. Click the “Finish” button to complete this part of the installation. Now the PC will show “Found New Hardware” for the USB Serial Port. This means the device has been detected.
The PC will run the Found New Hardware Wizard again, please repeat the same steps to complete the installation. Choose “No, not this time” and click the “Next” button to continue. Choose “Install from a list or specific location (Advanced)" and click the “Next” button to continue.
Select "Search for the best Driver in these locations" and then Click “Browse” and navigate to the “USB TO RS232 SOFTWAVE” folder on the CD-Rom. Click “Next” to continue. Click the “Finish” button and a confirmation message that confirms the completion of the installation will be displayed in the system as shown below.
Step 2: Click 'START Menu' button and select Settings/Control panel/ Performance and maintenance/System/System Properties/Hardware/ Device Manager/Ports (COM & LPT)/USB Serial Port (COM) Note: The COM Port number as this will be required when using the RS232 application. 7.3 Using the RS-232 Application Step 1: Please insert the included CD and double click the 'CLUX_UCEC_ AP.exe.' to install.
When the application launches (see the image below) the user can select the following features. 1 2 5 3 4 6 1 RS232 ComPort and Baud Rate Setting: Click 'Connect' to confirm the transmission setting and connect to the CLUX-UCEC 2 3 4 5 6 CEC Commands and Data Setting CEC Basic Command Buttons EDID Read, Write, Save File and Load File Buttons RS232 ComPort Communication Log Window RS232 ComPort Communication Log Window Control Buttons Step 2-1: Select the COM Port (Refer to Step 2 in Section 7.
Step 2-2: To send the desired CEC command the Transmit button must be pressed in order for the command to be to executed. For example, if we are simulating a DVD player sending the “Active Source 1000” command to a TV based on CEC protocol, there are a few bytes in “Active Source 1000” command. 6 1 2 3 4 5 1 Data Length: How many bytes need to be sent. The length includes the CEC Header, CEC OPCode and CEC Data. In this example is 5 Bytes.
2 Data Type: CEC commands. 3 CEC Header: Bit 7~Bit4 is the Source's Logical address. Bit3~Bit0 is the Sink's Logical address. In this example the DVD player needs to send a command to the TV but it is not known if the TV is powered on or not, so we send the broadcast command to all devices by entering “4F”. 4 OPCode: CEC protocol commands are detailed in Section 9. In this example for the “Active Source” command enter “82”.
Step 2-4: Click on the EDID Read button to read EDID settings of the curently connected device and press the SAVE button to save it it to the desired location.
If the communications log window shows "EDID Read fail", check the connection to the device and make sure it is well connected and powered up, then press the button again to re-read the EDID again. When the EDID has been read successfully, the communications log window will show "Read complete". Click on the Save File button to save the EDID in the user’s desire.
Click on the Load File button to download the desired EDID file and click on the write button to select the EDID. If the communications log window shows "EDID Write Fail", check the connection to the device and make sure it is well connected and powered up and also check the EDID file is correct then click on the "Write" button to try again. The RS232 COM port communication log window shows a record of all CEC commands.
9.
VALUE OPERATION CODE 0x64 0x80 0x81 0x82 0x83 0x84 0x85 0x86 0x87 0x89 0x8A 0x8B 0x8C 0x8D
10.
11.
12. SPECIFICATIONS Frequency Bandwidth 2.25 Gbps (Single-link) Input Port 1×HDMI Type A (Female) Output Port 1×HDMI Type A (Female) HDMI Audio Support PCM 2/5.1/7.1CH, Dolby 5.1CH, DTS 5.
13.
CYPRESS TECHNOLOGY CO., LTD Home page: http://www.cypress.com.