
Specifications


5
3) 3.5mm Mini-jacks: Connect to source's L/R output with 3.5mm
mini-jack for audio signal conversion.
Note: For HDMI signals you can select in the OSD Menu whether
you require audio from the HDMI (AUTO) or from the analog audio
inputs (EXT)
4) YCbCr/YPbPr + L/R: Connect to source equipment such as a
DVD player for both video and audio signal conversion.
5) CV + L/R: Connect to a composite video source such as a
video/DVD player for both video and audio signal conversion.
6
CONTROL: This port is the link for Telnet or Web GUI controls,
connect to an active Ethernet link with an RJ45 terminated cable
7
POWER: Switch this power toggle to turn on and activate the
device or turn off to shut it down.
8
DC 5V: Connect the power adaptor included in the package to
the device and plug it into an AC wall outlet for power supply.
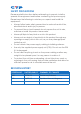
6.3 Remote Control
1
POWER: Press this button to switch the
device on or to set it to standby mode.
2
HDMI1/2/3, PC1/2/3, CV and COMP:
Direct source selection keys. Press one
of these keys to switch to the required
source.
3
MENU: Press this button to enter the OSD
menu.
4
EXIT: Press this button to exit the menu or
the current selection in the OSD menu.
5
OK & ▲▼◄►: Press OK to conrm the
selection or press the arrow buttons to
navigate the OSD menu. When the OSD
menu is not active, use the LEFT/RIGHT
(◄►) to control the volume level.
6
AUTO ADJUST: Press this button when the image being outputted
does not correctly t the display's screen. The device will auto
adjust the image to ll the screen.
7
RESET: Press this button to reset the device back to the default
settings.
CR-122
POWER
EXIT MENU
OK
RESET
AUTO
ADJUST
PC1PC2 PC3
CV COMP
HDMI2HDMI1 HDMI3
1
3
6
5
4
7
2