
Specifications


4
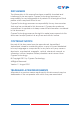
6.2 Rear Panel
POWER
DC 5V
CONTROL
HDMI 2HDMI 1
PC/HD
RS232
COAX AUDIO
SERVICE
OUTPUT
3 CP2 CP1 CP3 IMDH2 IMDH1 IMDH
Cr/Pr
Cb/Pb
RL
Y
RLCV
AUDIO
INPUT
IR IN
5 84
1 2 3 6 7
1
IR IN: Connect the supplied IR extender to receive the IR signal
from the included IR remote. Ensure that the remote is within the
direct line-of-sight of the IR extender.
2
SERVICE: Reserved for manufacturer use only.
3
RS-232: Connect to a PC/Laptop or RS-232 control system to use
RS-232 commands to control the device (See Section 6.5 for details
on RS-232 commands).
4
OUTPUT
1) HDMI 1/2: Connect to an HDMI display or AV Receiver for video
and/or audio output.
2) PC/HD: Connect to a monitor/display for video output. For
HD (Component) output, use the supplied D-Sub 9pin to 3 RCA
adaptor cable for HD resolutions from 480p~1080p.
Note: When the selected HDMI input source signal has HDCP
content the VGA/Component output will not display any image.
3) COAX: Connect to an amplier or active speakers for audio
output in digital format.
Note: When the input audio source signal is in bitstream format
and the AUDIO SOURCE setting is set to AUTO in the OSD menu,
the coaxial output will bypass the input audio signal including
compatible surround sound formats.
4) AUDIO: Connect to an amplier or active speakers for audio
output in stereo format.
5
INPUT
1) HDMI 1/2/3: Connect to HDMI sources such as Blu-ray/DVD
player for both video and audio signal conversion.
2) PC 1/2/3: Connect to a PC/Laptop source for video signal input
with a D-Sub 15pin cable.