CWHDI-TX & RX Wireless HDMI Transmitter and Receiver Box Operation Manual CWHDI-TX & RX
TABLE OF CONTENTS 1. Introduction................................................................................ 1 2. Features...................................................................................... 1 3. Package Contents................................................................... 1 4. Operation Controls and Functions.......................................... 2 4.1 Transmitter side................................................................. 2 4.1.1 Front Panel....................
1. Introduction This wireless HDMI transmitter and receiver box uses baseband technology with a Wireless High Definition Interface (WHDI) to deliver uncompressed HD video and audio up to 15~30 meters away, while maintaining superb, wired-equivalent quality and reliability without any lag. Both the transmitter and receiver are available with embedded antennas. 2. Features ● ● ● ● ● ● ● ● ● ● ● ● ● Wireless transmission of uncompressed HD audio/video at wired-equivalent quality.
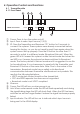
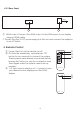
. Operation Controls and Functions 4.1 Transmitter side 4.1.1 Front Panel 4 5 6 Power Link CWHDI-TX Transmitter Power ④ ⑤ ⑥ ⑦ HDMI1 HDMI2 HDMI3 Input 1 ① ② ③ 7 ID 2 3 Power: Press to turn the system on/off. Input: Press to select input source (1/2/3). ID: Press the Transmitter and Receivers “ID” button for 2 seconds to connect the systems. These systems were already connected before leaving the factory, so you do not need to reset them again unless the system cannot link up properly.
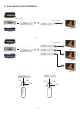
4.1.2 Rear Panel DC 5V HDMI3 HDMI1 HDMI2 1 2 ① HDMI 1/2/3 Inputs: Connect each of the input ports to the HDMI output of your source equipment such as DVD/Blu Ray players or set-top-boxes. ② Power: Plug the 5V DC power supply into this unit and connect the adaptor to an AC outlet. 4.2 Receiver side 4.2.1 Front Panel 3 IR CWHDI-RX Receiver 4 5 Power Link Power ID 1 2 ① Power: Press to turn the system on/off.
4.2.2 Rear Panel DC 5V HDMI OUT 1 2 ① HDMI output: Connect the HDMI output to the HDMI input of your display using an HDMI cable. ② Power: Plug the 5V DC power supply into this unit and connect the adaptor to an AC outlet. 5. Remote Control ①. Power: Press to turn the device on/off. ②. ID: Press the transmitters and receivers “ID” button for two seconds to connect the system.
6.
7. Specifications Radio Power Video resolutions (partial list) Frequencies Supported Modulation Bandwidth Wireless Range Antenna System Features Digital Video Interface Digital Audio Interface System Latency Security Input ports Output port Power Supply Dimensions (mm) Weight(g) Chassis Material Silkscreen Color Operating Temperature Power Consumption Transmit power is configurable up to 63mW (+18dBm) 480i/p, 576i/p, 720p, 1080i, VGA@60/72, SVGA@60/72, XGA@60/70 and 1080p(24fps/30fps) 4.9 ~ 5.
8. Troubleshooting Situation Power LED is not illuminate when power ON. Check Point 1. Check if the right adaptor is used. 5V 2.6A’s adaptor. 2. Check all power connectors are plugged in correctly. 3. Push the power buttons to turn on the devices. 1. After powering on Tx & Rx the Link’s LED is flashing speedily / slowly without image. 2. 3. 1. The Link’s LED is illuminating consistently without image display or unexpected image 2. display. 3. 4. Input’s LED not illuminate. 1.
8
9
CYPRESS TECHNOLOGY CO., LTD. Home page: http://www.cypress.com.