
Operating instructions


Cyrus Streamline series User Instructions
5
Connecting digital audio sources
The digital audio inputs are compatible with a number of different digital
audio sources. These include-
Digital Audio output from a CD player•
Digital Radio•
Blu-ray/DVD players (for replay of 2 channel PCM programs only)•
Digital Satellite receivers •
Games Console•
Using a suitable Toslink optical or a digital phono interconnect, connect
each digital audio source to one of the inputs 1-5. Make a note of the
input number used for each source as the inputs can be re-named at the
set-up stage.
Connecting to the USB port
The USB port is compatible with iPods, iPhones, iPads and other personal
audio players, also memory sticks, hard drives and personal audio players.
It is not intended for connection to the USB port of a computer.
NOTE: If you are connecting a USB flash drive or hard drive, make sure
that the drive is formatted as FAT16 or FAT32, as other formats such as
NTFS will not be navigable from the Streamline.
As the USB port is located on the back panel of the unit, you may want
to leave a docking cable for your personal audio player permanently
connected and accessible from the front of the unit.
Preparations for Installation
Before installing your Cyrus Streamline check that the following items are
included in the accessory box.
Warranty card (with instruction manual)•
Power cable•
n-remote remote handset•
Wi-Fi aerial•
1m Ethernet cable•
4 Loudspeaker plugs (Streamline, in certain markets only)•
2 x cables for MC-BUS connection•
After removing these items, please retain the packaging.
Install the unit in a well ventilated location away from sources of high
temperature, dust or humidity. Never stand the unit under another unit or
on any surface likely to obstruct its cooling or ventilation.
Connecting to the AC Mains Supply
Connect the socket on the AC Power cable to the Power inlet on the rear
panel of the unit. Now connect the cable to a suitable AC power point.
IMPORTANT NOTE – READ BEFORE MAKING ANY CONNECTIONS
To avoid possible damage to your unit, it is essential to disconnect
all system components from the mains supply before connecting or
disconnecting any interconnects.
Connecting to a computer network
There are two network connection options, ethernet cable connection or
802.11g wireless. If the Streamline detects an ethernet cabled connection,
this will be used in preference to a wireless connection.
Where possible, ethernet cable connection to the Streamline is strongly
recommended as this enables a far higher data bandwidth than wireless
connection.
Wired Ethernet connection
The Streamline is supplied with a 1m length Ethernet cable. If this cable
is not suitable for your installation, pre-assembled Ethernet cables of the
correct length are readily available. Measure the distance that the cable will
run between the Streamline and a spare connection on the router/switch, or
if the building is pre-wired with ethernet cable, to the nearest ethernet socket
on the wall. Obtain an ethernet cable of at least this length.
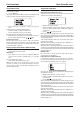
Fit the ferrite clamp to the cable as shown below.•
If your personal audio player has an integrated USB connector, a plug
to socket USB extension cable will extend the docking connector to an
accessible place.
Connecting to loudspeakers (Streamline only)
Fit plugs to the loudspeaker cables, making sure to line up + and - at
each end. Most cables have polarity indicators and may also be marked
for directionality. The + and - terminals must be connected to the
corresponding + and - terminals of the loudspeakers.
Ensure that the connections are secure, then connect the left and right
loudspeakers to the rear panel sockets.
The cable tie is used to retain the clamp close to the plug connected to
the Streamline.
With the clamp fitted, connect this end to the ethernet socket on the •
Streamline.
The plug will latch into place.
Connect the other end to the modem/router or wall socket.•
Ethernet wired connection is very robust and will run over distances of
50m or more without requiring a repeater.
802.11g wireless aerial
If you are connecting the Streamline to the network via 802.11g wireless,
you will need to fit the wireless aerial to the Streamline.
You can either -
Screw the aerial directly onto the Wi-Fi aerial network connector on the
back panel or -
Screw the aerial to the magnetic base. The base can then be located in a
position, remote from the Streamline where signal strength may be greater.
The aerial should be aligned vertically for best results.
Ethernet plug
(Streamline end)
Ferrite
clamp
Cable
tie
To Ethernet
connection