TABLE OF CONTENTS INTRODUCTION Editor : Idris Zainal Abidin Atifah Suad Anwar Advisor and Supporter : Phang Chin Yee Ober Choo Sui Hong Suhana Azmi Tested by: Ahmad Asyraf Syahfuddin Introduction to Components - Maker UNO - Maker UNO Board - Light Emitting Diode - Resistor - USB Micro B Cable - Push Button - 7 Segment Display - Light Dependent Resistor - Temperature Sensor - Piezo Buzzer - Potentiometer - Jumper WIre - Breadboard 5 6 7 7 8 8 9 9 10 10 11 11 12 Setting Up - Download Arduino IDE - Install
LESSONS LED Blinking RGB LED Create Melody with Piezo 7 Segment Display Push Button as Digital Intput Serial Display on Computer Potentiometer as Analog Input Light Dependant Resistor Temperature Sensor 20 22 24 26 28 30 32 34 36 PROJECTS Interactive Traffic Light Smart Fire Alarm System Light Theremin 39 42 45
INTRODUCTION
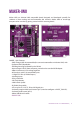
MAKER-UNO Maker UNO, an Arduino UNO compatible board designed and developed specially for students to learn coding and microcontroller. We named it Maker UNO to encourage everyone to be a maker by getting started with this amazing board.. MAKER - UNO Features: - SMD ATmega328P microcontroller(the same microcontroller on Arduino UNO) with Optiboot (UNO) Bootloader. - USB Programming facilitated by the CH340. - Input voltage: USB 5V, from computer, power bank or standard USB adapter. - 500mA (maximum) 3.
MAKER-UNO BOARD Piezo Buzzer Slide Switch Slide switch to connect between pin 8 to piezo buzzer. To use piezo buzzer, slide the switch on and program the buzzer. To use pin 8 for other purpose, slide the switch off. Piezo Buzzer Piezo buzzer is connected to pin 8 through slide switch. Power Pin GND - Ground Pins 5V - Regulated 5V output 3V3 - Regulated 3.
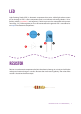
LED Light Emitting Diode (LED) is electronic component that emits visible light when current passes through it. LED is a basic component used as an indicator in learning robotics. It has polarity which is positive(+) and negative(-). Positive pin must be connected to the power source (eg : 5V), while negative pin must be connected to the ground. LED is considered as an output for electronic components.
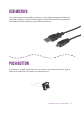
USB MICRO B This is USB 2.0 type A to micro USB 5-pin cable. It is a new, smaller connector for USB devices. Micro USB connectors are about half the height of mini USB. Micro USB is found on newer hand held devices like cell phones and portable media devices. PUSH BUTTON Push button is a simple switch mechanism that close a circuit when pressed. It’s good to detect on and off signals. Push button is an electronic input.
7 segment display This is a 7 segment display. It’s created using seven LEDs. Each of the seven LEDs is called a segment because when illuminated the segment forms part of a numerical digit (both Decimal and Hex) to be displayed. LIGHT Dependent resistor A photoresistor or light dependent resistor (LDR) is a resistor whose resistance decreases with increasing incident light intensity. It can also be referred to as a photoconductor.
TEmperature sensor Temperature sensor change it’s voltage depending on the temperature of the component. If the temperature of the component is high, then the voltage output is high and if the temperature of the component is low, then the voltage output is low. Piezo BUZZER This is an on-board piezo buzzer. It is an electrical component that give out audio signal.
POTENTIOMETER Potentiometer is a variable resistor with three pins. The variable resistor is easier to be adjusted by turning the knob clockwise or anti-clockwise. jumper wire This jumper wire is used to connect component to each other on the breadborad and to the Maker UNO.
Breadboard The breadborad is a board that can build an electronic circuit on it. It has a rows and columns of holes that connected to each other. Figure 1 : A small size breadboard.
DOWNLOADING ARDUINO IDE Maker UNO requires Arduino software to run. You can download the software from Arduino website (http://arduino.cc/en/Main/Software) and it is free to use. Arduino IDE is compatible with Windows, Mac OS X and also Linux. You just need to choose the appropriate operating system installation package for your computer. *Note: If you are a Windows user, it is recommended that you choose Windows (installer).
Choose the installer that compatible with your laptop OS and download the Arduino IDE. You will have arduino-1.8.x-windows.exe software after finish downloading for Windows OS user while for Mac OS user, you will get a zip file of arduino-1.8.x-macosx zip file as shown below : *Note: For latest version of Arduino IDE, go to https://www.arduino.cc/en/Main/Software Double-click on the icon to install Arduino IDE. Complete the download, proceed with the installation as usual.
Label Description Label Description A Menu Bar E Code Area B Button Bar F Status Bar C Serial Monitor G IDE Output D Sketch Name H Board Name and COM Number SETTING UP | 15
Verify Compiles and approves your code. It will detect errors in syntax (e.g. missing semi colon or parentheses). Upload Sends your code to the Maker UNO. When you click it, you should see the lights on your board blink rapidly. New Sketch This button opens up a new code window tab. Open This button will let you open an existing sketch. Save This saves the currently active sketch. Serial Monitor Open Serial Monitor.
installing MAKER uno driver Download Maker UNO driver at Maker Uno product page (under Attachment tab). Please choose appropriate driver depends on your OS. Complete the download, proceed with the installation as usual. After installation is complete, your Maker UNO port should appears at Device Manager under Ports (COM & LPT) - e.g. USB-SERIAL CH340 (COM3). Please remember the port number.
Select Board : Select Serial Port : SETTING UP | 18
LESSON
LESSON 1 LED BLINKING INTRODUCTION LED is a light emitting diode. It will light up when a proper voltage is applied in correct direction. LED will blink when delay is applied between ON and OFF.
ARDUINO CODE void setup() { pinMode(3, OUTPUT); } The void setup() runs once when the Maker UNO is powered on. The code in the void setup() usually use to configure the pin as INPUT or OUTPUT using pinMode(); void loop() { digitalWrite(3, HIGH); delay(1000); digitalWrite(3, LOW); delay(1000); } The digitalWrite(3, HIGH); digital pin number 3 is set to HIGH which is to turn ON the LED while the digitalWrite(3, LOW); digital pin number 3 is set to LOW which is to turn OFF the LED.
LESSON 2 RED GREEN BLUE LED INTRODUCTION Red Green Blue (RGB) LED is a red, green, blue LED. It is a combination of 3 colors in a single LED.
ARDUINO CODE void setup() { pinMode(9, OUTPUT); pinMode(10, OUTPUT); pinMode(11, OUTPUT); } void loop() { // Blue light analogWrite(9, 0); analogWrite(10, 255); analogWrite(11, 255); delay(1000); // Green light analogWrite(9, 255); analogWrite(10, 0); analogWrite(11, 255); delay(1000); // Red light analogWrite(9, 255); analogWrite(10, 255); analogWrite(11, 0); delay(1000); } The analogWrite(9, 0); set the OUTPUT of the pin number 9’s brightness to 0. The value can be from 0 to 255.
LESSON 3 CREATE MELODY WITH PIEZO BUZZER INTRODUCTION Piezo buzzer can produce different notes by controlling the voltage frequency. Maker UNO has a built-in piezo buzzer on digital pin 8.
ARDUINO CODE #include "pitches.h" int melody[] = { NOTE_C4, NOTE_G3, NOTE_G3, NOTE_A3, NOTE_G3, 0, NOTE_B3, NOTE_C4 }; int noteDurations[] = { 4, 8, 8, 4, 4, 4, 4, 4 }; void setup() { for (int thisNote = 0; thisNote < 8; thisNote++) { int noteDuration = 1000 / noteDurations[thisNote]; tone(8, melody[thisNote], noteDuration); int pauseBetweenNotes = noteDuration * 1.30; delay(pauseBetweenNotes); noTone(8); } void loop() { RESULT Piezo buzzer generates a melody.
LESSON 4 7 SEGMENT DISPLAY INTRODUCTION 7 segment display is an arrangement of LEDs that able to display decimal numbers.
ARDUINO CODE int sevenSegment[5][8] = { {HIGH, HIGH, HIGH, HIGH, HIGH, HIGH, LOW, LOW}, // 0 {LOW, HIGH, HIGH, LOW, LOW, LOW, LOW, LOW}, // 1 {HIGH, HIGH, LOW, HIGH, HIGH, LOW, HIGH, LOW}, // 2 {HIGH, HIGH, HIGH, HIGH, LOW, LOW, HIGH, LOW}, // 3 {LOW, HIGH, HIGH, LOW, LOW, HIGH, HIGH, LOW}, // 4 }; int pin, number; void setup() { } for(pin = 2; pin < 10; pin++) pinMode(pin, OUTPUT); void loop() { } for(number = 0; number < 5; number++) { for(pin = 0; pin < 8; pin++) digitalWrite(pin+2, sevenSegment[num
LESSON 5 PUSH BUTTON AS DIGITAL INPUT INTRODUCTION Push button can act as a digital input device. Maker UNO is able to sense 2 states for digital input, i.e.
ARDUINO CODE *Open Button Button). example (File - Examples - 02.Digital - const int buttonPin = 3; const int ledPin = 13; int buttonState = 0; void setup() { pinMode(ledPin, OUTPUT); pinMode(buttonPin, INPUT); } void loop() { buttonState = digitalRead(buttonPin); } if(buttonState == LOW) // Push button is pressed digitalWrite(ledPin, HIGH); else digitalWrite(ledPin, LOW); RESULT If push button is pressed, LED on Maker UNO will turn on and if push button is released, LED will turn off.
LESSON 6 SERIAL DISPLAY ON COMPUTER INTRODUCTION Serial display can display numbers and characters (based on ASCII data) on the Arduino Serial Monitor.
ARDUINO CODE int Button = 2; void setup() { pinMode(2, INPUT_PULLUP); Serial.begin(9600); } The Serial.begin() open a serial communication between the MAKER-UNO and the computer. 9600 is the baud rate of the comunication. The serial monitor must use the same baud rate to view the information. void loop() The Serial.print() sends { information from if (digitalRead(Button) == LOW) MAKER-UNO to the { connected computer. The Serial.
LESSON 7 POTENTIOMETER AS ANALOG INPUT INTRODUCTION Potentiometer can be an analog input device. Maker UNO is able to read 1024 (10-bits) from 0 - 1023 as analog input.
ARDUINO CODE int sensorPin = A0; int ledPin = 13; int sensorValue = 0; void setup() { pinMode(ledPin, OUTPUT); } void loop() { sensorValue = analogRead(sensorPin); digitalWrite(ledPin, HIGH); delay(sensorValue); digitalWrite(ledPin, LOW); delay(sensorValue); } RESULT When the potentiometer’s value changes, it will affect the LED pin 13 blinking speed.
LESSON 8 LIGHT DEPENDENT RESISTOR AS ANALOG INPUT INTRODUCTION LDR (Light Dependent Resistor) is a sensor that can generate a different resistance value based on the amount of light intensity it receives HARDWARE CONNECTION SCHEMATIC DIAGRAM 5V 3V3 MAKER UNO 10KΩ LDR A0 A1 A2 A3 A4 A5 GND VIN 13 12 ~11 ~10 ~9 8 7 ~6 ~5 4 ~3 2 TX 1 RX 0 LESSON 8 | 34
ARDUINO CODE int sensorPin = A0; int ledPin = 13; int sensorValue = 0; void setup() { pinMode(ledPin, OUTPUT); } void loop() { sensorValue = analogRead(sensorPin); if(sensorValue > 900) digitalWrite(ledPin, HIGH); else digitalWrite(ledPin, LOW); } RESULT When it is dark, the LED on pin 13 will light up.
LESSON 9 TEMPERATURE SENSOR INTRODUCTION Temperature sensor can be used to measure surrounding temperature. It will produce a voltage proportional to temperature (°C). The voltage output is based on temperature of the component.
ARDUINO CODE int sensorPin = A0; int sensorValue = 0; void setup() { Serial.begin(9600); } void loop() { sensorValue = analogRead(sensorPin); Serial.print("ADC :"); Serial.print(sensorValue); Serial.print(" Temperature : "); } Serial.print(sensorValue*0.488); // Convert ADC to Celcius Serial.print(186); // ASCII degree symbol Serial.println("C"); delay(100); RESULT ADC and temperature value displays on Arduino Serial Monitor (need to open Arduino Serial Monitor).
PROJECT
PROJECT 1 INTERACTIVE TRAFFIC LIGHT INTRODUCTION Interactive Traffic Light is a combination of standard traffic light for vehicles and traffic light for pedestrian. This project applies knowledge outcome from: Lesson 1: LED Blinking Lesson 6: Push Button as Digital Input INGREDIENTS a. Maker UNO - 1x b. Breadbord - 1x c. Red LED - 2x d. Green LED - 2x e. Yellow LED - 1x f. Push button - 1x g. Resistor 220Ω - 5x h. Resistor 10kΩ - 1x i.
HARDWARE CONNECTION SCHEMATIC DIAGRAM 10kΩ 220Ω 5V 3V3 VIN 220Ω 220Ω MAKER UNO A0 A1 A2 A3 A4 A5 GND 13 12 ~11 ~10 ~9 8 7 ~6 ~5 4 ~3 2 TX 1 RX 0 220Ω 220Ω PROJECT 1 | 40
ARDUINO CODE const const const const const const int int int int int int greenLedVehicle = 5; yellowLedVehicle = 6; redLedVehicle = 7; greenLedPedestrian = 3; redLedPedestrian = 4; pushButton = 2; void setup() { pinMode(greenLedVehicle, OUTPUT); pinMode(yellowLedVehicle, OUTPUT); pinMode(redLedVehicle, OUTPUT); pinMode(greenLedPedestrian, OUTPUT); pinMode(redLedPedestrian, OUTPUT); pinMode(pushButton, INPUT); } digitalWrite(greenLedVehicle, HIGH); digitalWrite(redLedPedestrian, HIGH); void loop() { }
PROJECT 2 SMART FIRE ALARM SYSTEM INTRODUCTION Smart Fire Alarm System is a fire alarm system project that will alert the surrounding if the temperature is above than normal temperature. If the temperature exceeds a certain value, the buzzer will sound and LED will blink. This project applies knowledge outcome from: Lesson 1: LED Blinking Lesson 3: Create Melody with Piezo Lesson 9: Temperature Sensor INGREDIENTS a. Maker UNO - 1x b. Breadbord - 1x c. Red LED - 1x d. Resistor 220Ω - 1x e.
HARDWARE CONNECTION SCHEMATIC DIAGRAM 5V 3V3 LM35 MAKER UNO A0 A1 A2 A3 A4 A5 GND VIN 13 12 ~11 ~10 ~9 8 7 ~6 ~5 4 ~3 2 TX 1 RX 0 LED 220Ω PROJECT 2 | 43
ARDUINO CODE #include "pitches.h" const int ledPin = 2; const int piezoPin = 8; const int sensorPin = A0; int celsius = 0; void setup() { pinMode(ledPin, OUTPUT); pinMode(piezoPin, OUTPUT); pinMode(sensorPin, INPUT); } void loop() { celsius = analogRead(sensorPin) * 0.
PROJECT 3 LIGHT THEREMIN INTRODUCTION A theremin is an instrument that makes sounds based on the movements of a musician’s hands around the instrument. This project will use LDR as an input where the amount of light intensity will determine the melody notes. This project applies knowledge outcome from: Lesson 3: Create Melody with Piezo Lesson 8: Light Dependent Resistor INGREDIENTS a. Maker UNO - 1x b. Breadbord - 1x c. Resistor 10kΩ - 1x d. LDR - 1x e.
HARDWARE CONNECTION SCHEMATIC DIAGRAM 5V 3V3 MAKER UNO 10KΩ LDR A0 A1 A2 A3 A4 A5 GND VIN 13 12 ~11 ~10 ~9 8 7 ~6 ~5 4 ~3 2 TX 1 RX 0 PROJECT 3 | 46
ARDUINO CODE #include "pitches.
Prepared by: Cytron Technologies Sdn Bhd www.cytron.io No. 1, Lorong Industri Impian 1, Taman Industri Impian, 14000 Bukit Mertajam, Penang, Malaysia. Tel:+604 - 548 0668 Fax: +604 - 548 0669 Email: support@cytron.io sales@cytron.