ENGLISH 40” WIDE TFT LCD TV Owner’s Manual Model: LT-40FEP/FLP Downloaded from www.Manualslib.
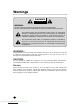
Warnings WARNING RISK OF ELECTRIC SHOCK DO NOT OPEN WARNING : To reduce the risk of electric shock do not remove cover (or back). No user serviceable parts inside. Refer servicing to qualified service personnel. The lightning flash with arrowhead symbol, within an equilateral triangle, is intended to alert the user to the presence of uninsulated “dangerous voltage” within the product’s enclosure that may be of sufficient magnitude to constitute a risk of electric shock to persons.
Location Position your TV so that no bright light or sunlight will shine directly on the screen. Do not expose the TV to vibration, moisture, dust or heat. Also ensure that the TV is placed in a position that allows a free flow of air. Do not cover the ventilation openings on the back cover. You can place it on a table-top. Cleaning Unplug the TV before cleaning the face of the LCD Screen. Dust the TV by wiping the screen and cabinet with a soft, clean cloth.
Downloaded from www.Manualslib.
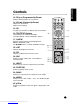
Before operating the set, please read this manual carefully. Warnings Contents Supplied Accessories Controls Controller of panel Remote controller Basic Operation On and off Programme selection Volume adjustment Q.
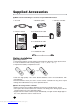
Supplied Accessories L Make sure the following accessories are provided with Product. 1. AC cord 2. Batteries (2EA) DEUTSCH FRANÇAIS ENGLISH 5. PC ANALOG IN cable ITALIANO 40" Wide LCD Color TV 4. Owner’s manual 3. Remote controller Model : LT-40FEP/FLP 6. PC DIGITAL IN cable Owner’s Manual 7. PC AUDIO IN cable Battery installation uInserting batteries 1. Remove the battery cover by pulling it upward in the direction shown by the arrow. 2.
1. ON/OFF Switches TV set on or off. 2. MENU Displays a menu. 3. + PR - (Programme Up/Down) Selects a programme or a menu item. 4. + VOL - (Volume Up/Down) Adjusts the volume./ Adjusts menu settings. 5. TV/AV Selects TV, SCART1, SCART2, S-VIDEO, PC-ANALOG or PC-DIGITAL mode./ Clears the menu from the screen. 6. Power Indicator Illuminates in red when the TV is in standby mode./ Illuminates in green when the TV is switched on. Illuminates in blinked when the power save mode(only PC mode). 7.
Controls All the functions can be controlled with the remote controller. Some functions can also be adjusted with the buttons on the side panel of the set. Remote controller Before you use the remote controller, please install the batteries. 1. POWER Turns the TV on from standby or off to standby mode. 2. MUTE Turns the sound on and off. 3. NUMBER buttons Selects programme numbers. 4. PSM (Picture Status Memory) Recalls your preferred picture setting 5.
ENGLISH Controls 13. PRxy (Programme Up/Down) Selects next programme or a menu item. 14. VOLÏq (Volume Up/Down) Adjusts the sound level. Adjusts menu settings. 15. OK Accepts your selection or displays the current mode. 16. TELETEXT Buttons These buttons are used for TELETEXT. For further details, see the ‘TELETEXT’ section. 17. Q.VIEW Returns to the previously viewed programme. Note: In TELETEXT mode, The Q.VIEW button is used for TELETEXT function. 18. LIST Displays the programm list menu. 19.
Basic Operation Turning the TV On and Off Press the ON/OFF button on the side panel of the TV to go into standby mode. 1. If the TV is in standby mode, press the POWER button on the remote controller or the TV itself to turn the TV on. 2. Press the POWER button again on the remote controller or the TV itself to turn the TV off. Note : If the TV is on and the POWER button is pressed to turn the TV off, the TV goes into standby mode.
ENGLISH On Screen Menus and Display 1. Press the MENU button to display main menu. 2. Press the PR xy button to select menus-Picture, Sound, Special, Setup. Ïq button. 3. Adjust each menu with the VOLÏ Equalizer 4. Press the MENU button to return to preceding menu. Flat Music 5. Press the TV/AV button to finish adjusting menu. Main menu Movie Speech User Picture Picture q Contrast 90 Sound q Brightness 75 Special q Colour 75 Setup q Sharpness 50 Tint 0.1 0.5 1.5 5.
Setting up TV Programme Once you have preset the programme, you will be able to xy or NUMBER buttons to scan the use the PRx programme you programmed. Programme can be tuned using Auto or Manual programme menu. Auto programme System Storage from BG 1 Start Auto Programme All programme that can be received are stored by this method. It is recommended that you use Auto programme during installation of this set. 1. Press the MENU button. 2. Select the Setup menu. 3. Select the Auto programme menu.
Manual Programme Manual Programme lets you manually tune and arrange the programme in whatever order you desire. Also you can assign a programme name with 5 characters to each programme number. 1. Press the MENU button. 2. Select the Setup menu. 3. Select Manual programme menu. xy button to select System. 4. Press the PRx Ïq button. 5. Select a TV system with the VOLÏ BG : (West Europe/Asia/M.
Setting up TV Programme Programme edit This function enables you to delete, copy, move or skip or skip the stored programme. Also you can move some programme to other programme numbers or insert a blank programme data into the selected programme number. 1. Press the MENU button. 2. Select the Setup menu. xy button select Programme edit. 3. Press the PRx xy and Select the programme name to edit with the PRx Ïq . VOLÏ Deleting a programme xy 1. Select a programme to be deleted with the PRx Ïq button.
You can adjust picture Contrast, Brightness, Colour, Sharpness and Tint to the levels you prefer. Manual Picture Control 1. Press the MENU button. 2. Select the Picture. xy buttons to select a picture item. 3. Press the PRx Ïq buttons to adjust the picture 4. Press the VOLÏ condition as you want. 5. Press the TV/AV button to store for the picture User.
Sound Control You can select your preferred sound setting; Flat, Music, Movie or Speech and you can also adjust the sound frequency of equalizer, balance. If you switch AVL to on, the set automatically keeps on an equal volume level even if you change programme. 1. Press the MENU button. 2. Select the Sound menu. xy button to select the desired 3. Press the PRx sound item; Equalizer, Balance, AVL Surround or headphone Volume. Ïq button to make desired 4. Press the VOLÏ adjustment.
ENGLISH Other functions TV, SCART1, SCART2 and S-VIDEO modes (You can’t set PC mode in this menu. Use the TV/AV button) External equipment inputs:S-VIDEO mode are used for video devices like VCRs, DVDs, etc.), SCARTmode is used for SCART type devices. Note : If a VCR is connected to the antenna jack, use TV mode. See External Equipment Connection section. 1. Press the MENU button. 2. Select the Special menu. xy button to select Input. 3. Press the PRx Ïq button to select TV, SCART1, 4.
Other functions Sleep timer You don’t have to remember to switch the set off before you go to sleep. The sleep timer automatically switches the set to standby after the preset time elapses. Press the SLEEP button to select the number of minutes. The display will appear on the screen, followed by 0, 10, 20, 30, 60, 90, 120, 180 and 240. The timer begins to count down from the number of minutes selected. Note: a. To view the remaining sleep time, press the SLEEP button once. b.
Calling the programme list You can check the programmes stored in the memory by displaying the programme LIST. Displaying programme list 1. Press the LIST button to display the Programme list menu. The programme list appears on the screen. One programme list contains ten programmes as right. Note : a. You may find some blue programmes. They have been set up to be skipped by auto programming or in the programme edit mode. b.
TELETEXT TEXT On/Off Press the TEXT/MIX button to switch to TELETEXT. The initial page or last selected page appears on the screen. The first page number indicates your selection, while the second shows the current page displayed. 1. Press TEXT button once, displays the Teletext pages. 2. Press MIX button once more, displays the Teletext pages superimposed on the TV picture. 3. Press the TEXT button to switch off Teletext once more, Text mode is off, and TV mode appears.
ENGLISH TELETEXT Special TELETEXT functions MENU Functions TEXT Changes TELETEXT mode SIZE Selects double height text. Press this button to enlarge the top half of the page. Press this button again to enlarge the bottom half of the page. Press this button again to return to the normal display. HOLD Stops the automatic page change, which will occur if a TELETEXT page consists of 2 or more sub pages. The number of sub pages and the sub page displayed is, usually, shown on the screen below the time.
External Equipment Connection You can connect additional equipment, such as VCRs, camcorders etc. to your set. Examples are shown below. Antenna connection 1. Connect RF out on the VCR to the Antenna input on the rear of the TV. 2. Connect the antenna cable to the antenna in jack on the VCR. 3. Use the TV/AV button to select TV mode. 4. Press the PLAY button on the VCR. SCART2 SCART1 ANT. VCR SCART 2 1. Connect the AV out jacks on the AV device to the SCART on the TV. 2.
ENGLISH External Equipment Connection S-VIDEO input If using an S-VIDEO source, the picture quality will be improved over a video source. 1. Connect the S-VIDEO output of a VCR to the S-VIDEO input on the TV. 2. Connect the audio cables from the S-VIDEO VCR to the L (MONO) R inputs on the TV. 3. Select S-VIDEO mode by pressing the TV/AV button repeatedly. 4. Press the PLAY button on the VCR. The VCR playback picture appears on the screen. L S-VIDEO R SCART2 SCART1 ANT.
Connecting PC as monitor Picture adjustment You can adjust picture Contrast, Brightness, Horizontal/Vertical position, Clock, Phase, Auto and Reset as you prefer. 1. Press the TV/AV or TV/PC button to select the PC mode. 2. Press the MENU button. xy button to select the desired 3. Press the PRx picture item. Ïq button to make appropriate 4. Press the VOLÏ adjustments. Contrast Brightness Contrast x 0 Ï 100 q y 1024 X 768 AUTO ▲▼ 48.4KHz 60.
PC/DTV INPUT 1. Connect the PC IN cable (D sub jack) from the monitor output socket of the PC to the PC/DTV input socket of the set. 2. Connect the PC AUDIO IN cable from the PC to the PC AUDIO IN of the set. 3. Press the TV/AV or TV/PC button to select PC ANALOG IN mode. 4. Switch on the PC, and the PC screen appears on the set. The set can be operated as the PC monitor. SCART2 SCART1 ANT. PC AUDIO IN PC DIGITAL IN DVI (Digital Visual Interface) INPUT PC ANALOG IN 1.
Product Spec. Model LT-40FEP/FLP Horizontal size 1085 mm Thickness 110 mm Weight 28.
ENGLISH Troubleshooting Problem Check item No picture on screen and no sound from speakers. • Make sure the remote control is not in the standby mode (The POWER/Standby indicator is red.) • Turn on the MAIN POWER button on the top of the display. No picture/No picture from AV terminal. • Check the brightness setting of the display. • Lamp may have malfunction. • Make sure a cable with no VIDEO input signal is connected to the S-VIDEO INPUT terminal.
LIMITED WARRANTY 28 Downloaded from www.Manualslib.
Downloaded from www.Manualslib.
MEMO Downloaded from www.Manualslib.
Downloaded from www.Manualslib.
Downloaded from www.Manualslib.