
Installation Guide

plain
Before
After
How to apply
sticky back plastic
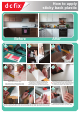
Tools for the job
Remove doors and handles
Measure the door and cut to size allowing enough
extra to wrap around the edges.
(The handy grid on the backing paper makes
measuring and cutting in straight lines easier)
For neat corners, cut diagonally into the corner with scissors. Fold one flap around the corner, then the other. You will
be left with a small triangular excess which can be trimmed away with your scalpel, then wrap the rest of the excess
film over the edge to the inside of the door, this can be trimmed later if you prefer. Repeat for all 4 corners & sides
Peel away a small section of backing paper
and stick the film into place. Gradually peel
away the rest of the backing paper little by little,
smoothing out to the sides as you go. If you
make a mistake simply peel back and start again
Hang doors back into place, re-attach the
handles, stand back and admire your handy work!
Air bubbles can be pushed out to the side or for
small bubbles, prick with a pin to release the air.
Tip ! If your cupboard doors aren’t flat (eg shaker style),
use a hairdryer on a low setting to warm the film so
it moulds into the shape of the cupboard door
Clean thoroughly to remove any grease and dust
8
7
4
3
2
1
6
5