Table of Contents Table of Contents Product Overview.............................................................. 4 Package Contents......................................................................... 4 System Requirements ................................................................. 5 Introduction ................................................................................... 6 Features.................................................................................... 7 Hardware Overview...
Table of Contents System ....................................................................................59 Language Pack.....................................................................60 Firmware ................................................................................60 Time.........................................................................................62 Watchdog ..............................................................................63 Status .............................
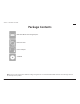
Section 1 - Product Overview Product Overview Package Contents DAP-1560 Media Streaming Adapter Ethernet Cable Power Adapter CD-ROM Note: Using a power supply with a different voltage rating than the one included with the DAP-1560 will cause damage and void the warranty for this product.
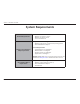
Section 1 - Product Overview System Requirements Network Requirements t "O &UIFSOFU CBTFE /FUXPSL t *&&& O H XJSFMFTT DMJFOUT t *&&& B XJSFMFTT DMJFOUT t &UIFSOFU Computer with the following: t 8JOEPXT¥ .BDJOUPTI PS -JOVY CBTFE PQFSBUJOH TZTUFN t "O JOTUBMMFE &UIFSOFU BEBQUFS Web-based Configuration Utility Requirements Browser Requirements: t *OUFSOFU &YQMPSFS¥ BOE IJHIFS t .
Section 1 - Product Overview Introduction The D-Link Media Streaming Adapter (DAP-1560) enable you to easily upgrade any router to support streaming of High-Definition (HD) multimedia content over a wireless connection. This device lets you create a ‘bridge’ between two different physical media types. This versatile kit transforms your wired device into a wireless one without the added hassle of installing Ethernet cables.
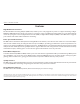
Section 1 - Product Overview Features High-Definition Performance The D-Link Media Streaming Adapter (DAP-1560) enables you to easily upgrade any router to support streaming of HighDefinition (HD) multimedia content over a wireless connection. Connect any Ethernet-enabled devices in your entertainment DFOUFS MJLF ZPVS HBNF DPOTPMFT %JHJUBM 7JEFP 3FDPSEFS %73 PS %JHJUBM .FEJB "EBQUFST %." UP UIF %"1 UP VQHSBEF your network and enable dual-band wireless streaming.
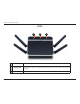
Section 1 - Product Overview Hardware Overview Connections 1 1 WPS 2 LAN Port 3 Mode Selecter 4 Power Receptor 5 Reset Button D-Link DAP-1560 User Manual 2 3 4 5 Press the WPS button to automatically connect to a WPS-enabled wireless client. $POOFDU &UIFSOFU EFWJDFT TVDI BT DPNQVUFST TXJUDIFT BOE IVCT Slide to the left for Access Point (AP) Mode or to the right for Bridge mode. Receptor for the supplied power adapter.
Section 1 - Product Overview LEDs 1 1 Power LED 2 Wireless LED 3 WPS LED D-Link DAP-1560 User Manual 2 3 A solid green light indicates a proper connection to the power supply. A blinking green light indicates the wireless function is working. The light will blink fast during data transmission. The light will be off during device reboot or if the wireless radio is disabled. A blinking light indicates that the DAP-1560 is performing the WPS function.
Section 2 - Installation Installation This section will walk you through the installation process. Placement of the DAP-1560 is very important. Do not place the %"1 JO BO FODMPTFE BSFB TVDI BT B DMPTFU DBCJOFU PS JO UIF BUUJD PS HBSBHF Wireless Modes Depending on how you want to use your DAP-1560 will determine which mode you use. This section will help you figure out which setting works with your setup. AP Mode *G ZPV BMSFBEZ IBWF B XJSFE PS XJSFMFTT SPVUFS BOE XBOU UP BEE B .
Section 2 - Installation Bridge Mode *G ZPV XBOU UP XJSFMFTTMZ DPOOFDU NVMUJQMF &UIFSOFU FOBCMFE EFWJDFT TVDI BT HBNF DPOTPMFT NFEJB QMBZFST PS OFUXPSL attached storage devices you will need to move the switch on the back panel of the DAP-1560 to Bridge. Refer to page 44 for configuration instructions.
Section 2 - Installation Create a Full MediaBand (5GHz wireless) Network If you have two DAP-1560 devices and want to create a wireless network with full MediaBand technology you will need to connect one DAP-1560 to your router and move the switch on the back panel to AP. The second DAP-1560 will need to be QMBDFE OFYU UP ZPVS &UIFSOFU FOBCMFE EFWJDFT BOE ZPV XJMM OFFE UP NPWF UIF TXJUDI PO UIF CBDL QBOFM UP Bridge.
Section 2 - Installation Wireless Installation Considerations The D-Link wireless access point lets you access your network using a wireless connection from virtually anywhere within the PQFSBUJOH SBOHF PG ZPVS XJSFMFTT OFUXPSL ,FFQ JO NJOE IPXFWFS UIBU UIF OVNCFS UIJDLOFTT BOE MPDBUJPO PG XBMMT DFJMJOHT PS PUIFS PCKFDUT UIBU UIF XJSFMFTT TJHOBMT NVTU QBTT UISPVHI NBZ MJNJU UIF SBOHF 5ZQJDBM SBOHFT WBSZ EFQFOEJOH PO UIF UZQFT PG NBUFSJBMT BOE CBDLHSPVOE 3' SBEJP GSFRVFODZ OPJTF JO ZPVS IPNF PS
Section 3 - Configuration Configuration (AP Mode) This section will show you how to configure your new D-Link wireless access point using the web-based configuration utility. Web-based Configuration Utility 0O UIF CBDL PG UIF %"1 TMJEF UIF NPEF TFMFDUPS to the left (AP Mode). 5P BDDFTT UIF DPOGJHVSBUJPO VUJMJUZ PQFO B XFC CSPXTFS TVDI BT *OUFSOFU &YQMPSFS BOE FOUFS dlinkap or 192.168.0.50 in the address field. 3. Enter admin and then enter your password.
Section 3 - Configuration Setup Wizard Click Launch Wireless Setup Wizard to quickly configure your access point. If you want to enter your settings without running the XJ[BSE DMJDL WIRELESS SETUP on the left side and skip to page 25.
Section 3 - Configuration Wireless Setup Wizard This Wizard is designed to assist you in connecting your wireless device to your access point. It will guide you through step-by-step instructions on how to get your wireless device connected. Enter the Device Name of the AP and click Next to continue. It is recommended to change the Device Name if there is more than one D-Link device within the subnet. *G ZPV XBOU UP DIBOHF UIF BENJO BDDPVOU QBTTXPSE enter a new password and click Next.
Section 3 - Configuration Click Save to save your network settings. The following screen opens to indicate that you have successfully saved your new settings.
Section 3 - Configuration Select Manual as the configuration method to set up your network manually. Click Next to continue. Enter a network name and select Automatically assign a network key. 5P NBOVBMMZ BTTJHO B OFUXPSL LFZ TLJQ UP QBHF Click Next to continue.
Section 3 - Configuration *G ZPV DIPPTF 81" 14, FODSZQUJPO UIF GPMMPXJOH TDSFFO will show you your Network Key to enter on your wireless clients. Click Save to finish the Setup Wizard. *G ZPV DIPPTF 8&1 FODSZQUJPO UIF GPMMPXJOH TDSFFO XJMM show you your Network Key to enter on your wireless clients. Click Save to finish the Setup Wizard.
Section 3 - Configuration Select Manually assign a network key to create your own key. Click Next to continue. 'PS 81" FODSZQUJPO FOUFS B /FUXPSL ,FZ CFUXFFO BOE DIBSBDUFST MPOH PS FOUFS FYBDUMZ DIBSBDUFST using 0-9 and A-F. Click Next to continue.
Section 3 - Configuration *G ZPV TFMFDU 81" FODSZQUJPO UIF GPMMPXJOH TDSFFO XJMM show you your network key to enter on your wireless clients. Click Save to finish the Setup Wizard. For WEP FODSZQUJPO FOUFS B /FUXPSL ,FZ FYBDUMZ PS DIBSBDUFST MPOH PS FYBDUMZ PS DIBSBDUFST VTJOH 0-9 and A-F. Click Next to continue.
Section 3 - Configuration If you select WEP FODSZQUJPO UIF GPMMPXJOH TDSFFO XJMM show you your network key to enter on your wireless clients. Click Save to finish the Setup Wizard.
Section 3 - Configuration Add Wireless Device With WPS This Wizard is designed to assist you in your wireless network setup. It will guide you through step-by-step instructions on how to set up your wireless network and how to make it secure. Select PIN to use your PIN number from your wireless device to connect to your network. For PBC DPOöHVSBUJPO TLJQ UP UIF OFYU QBHF Click Connect to continue.
Section 3 - Configuration Select PBC to use the Push Button Configuration in order to connect to your network. Click Connect to continue. Press down the Push Button on the wireless device that you are adding to your network to complete the setup within 2 minutes (120 seconds).
Section 3 - Configuration Manual Configuration Wireless Settings Enable Wireless: $IFDL UIF CPY UP FOBCMF UIF XJSFMFTT GVODUJPO *G ZPV EP OPU XBOU UP VTF XJSFMFTT VODIFDL UIF CPY UP EJTBCMF BMM UIF XJSFMFTT functions. Wireless Mode: The current wireless mode is set to Access Point JU XJMM DSFBUF B wireless infrastructure network.
Section 3 - Configuration Transmission Rate: Select the transmit rate. It is strongly recommended to select Best (automatic) for best performance. Enable Hidden Wireless: $IFDL UIJT CPY JG ZPV EP OPU XBOU UIF 44*% PG ZPVS XJSFMFTT OFUXPSL UP CF CSPBEDBTUFE CZ UIF %"1 *G FOBCMFE UIF 44*% of the DAP-1560 will not be seen by Site Survey utilities so your wireless clients will have to know the SSID of your DAP-1560 in order to connect to it.
Section 3 - Configuration Network Settings DHCP DHCP stands for Dynamic Host Control Protocol. The DHCP Server (usually your router) will automatically assign an IP address UP UIF %"1 8IFO ZPV UVSO ZPVS %"1 PO JU XJMM BVUPNBUJDBMMZ SFDFJWF UIF QSPQFS 5$1 *1 TFUUJOHT QSPWJEFE CZ UIF DHCP Server. My LAN Use the drop-down menu to select Dynamic IP Connection is: (DHCP) to automatically obtain an IP address on UIF -"/ QSJWBUF OFUXPSL Device Name: Enter the Device Name of the AP.
Section 3 - Configuration Static IP LAN Connection Use the drop-down menu to select Static IP. Type: Access Point IP Enter the IP address of the access point. The Address: default IP address is 192.168.0.50. If you change UIF *1 BEESFTT PODF ZPV DMJDL Apply ZPV XJMM need to enter the new IP address in your browser to get back into the configuration utility. Subnet Mask: Enter the Subnet Mask of your network.
Section 3 - Configuration Advanced MAC Address Filter The MAC address filter section can be used to filter network access by machines based on the unique MAC addresses of their network adapter(s). It is most useful to prevent unauthorized wireless devices from connecting to your network. A MAC address is a unique ID assigned by the manufacturer of the network adapter. MAC Address When Turn MAC Filtering OFF JT TFMFDUFE ."$ Filter: addresses are not used to control network access.
Section 3 - Configuration Advanced Wireless Transmit Power: Sets the transmit power of the antennas (Low Medium PS High). Beacon Period: Beacons are packets sent by an Access Point to synchronize a wireless network. Specify a value. 100 is the default setting and is recommended. DTIM Interval: %FMJWFSZ 5SBóD *OEJDBUJPO .FTTBHF JT UIF EFGBVMU setting. A DTIM is a countdown informing clients of the OFYU XJOEPX GPS MJTUFOJOH UP CSPBEDBTU BOE NVMUJDBTU messages.
Section 3 - Configuration Guest Zone The Guest Zone feature will allow you to create temporary zones that can be used by guests to access the Internet. These zones will be separate from your main wireless network. Enable Guest Check to enable the Guest Zone feature. Select Zone: the schedule of time when the Guest Zone will CF BDUJWF 5IF TDIFEVMF NBZ CF TFU UP "MXBZT which will allow the particular service to always be enabled. You can create your own times in the Tools > Schedules section.
Section 3 - Configuration Maintenance Admin 5IJT QBHF XJMM BMMPX ZPV UP DIBOHF UIF "ENJOJTUSBUPS QBTTXPSE 5IF BENJOJTUSBUPS QBTTXPSE IBT SFBE XSJUF BDDFTT Password: Enter a new password for the Administrator Login Name. The administrator can make changes to the settings.
Section 3 - Configuration System Save Settings to Use this option to save the current access point Local Hard Drive: configuration settings to a file on the hard disk PG UIF DPNQVUFS ZPV BSF VTJOH 'JSTU DMJDL UIF Save CVUUPO :PV XJMM UIFO TFF B öMF EJBMPH XIFSF you can select a location and file name for the settings.
Section 3 - Configuration Firmware You can upgrade the firmware of the access point here. Make sure the firmware you want to use is on the local hard drive of the computer. Click on Browse to locate the firmware file to be used for the update.
Section 3 - Configuration *G ZPV MPBE B MBOHVBHF QBDL BOE XPVME MJLF UP HP CBDL UP &OHMJTI DMJDL Maintenance > System and click on Clear OFYU UP Clear Language Pack.
Section 3 - Configuration Time 5IF 5JNF $POöHVSBUJPO PQUJPO BMMPXT ZPV UP DPOöHVSF VQEBUF BOE NBJOUBJO UIF DPSSFDU UJNF PO UIF JOUFSOBM TZTUFN DMPDL From this section you can set the time zone that you are in. Daylight Saving can also be configured to automatically adjust the time when needed. Time Zone: Select the Time Zone from the drop-down menu.
Section 3 - Configuration Schedules Name: Enter a name for your new schedule. Days: 4FMFDU B EBZ B SBOHF PG EBZT PS All Week to include every day. Time: Check All Day - 24hrs or enter a start and end time for your schedule. Save: Click Save to save your schedule. You must click Save Settings at the top for your schedules to go into effect. Schedule Rules The list of schedules will be listed here. Click the List: Edit icon to make changes or click the Delete icon to remove the schedule.
Section 3 - Configuration Watchdog 5IF 8BUDIEPH GFBUVSF QJOHT B TQFDJöD *1 BEESFTT *G UIF *1 BEESFTT TUPQT SFTQPOEJOH UP QJOHT ZPVS BDDFTT QPJOU XJMM CF SFCPPUFE :PV DBO BMTP TFMFDU BO PQUJPO UP IBWF UIF TFOE BO FNBJM BMFSU JG UIF TQFDJöFE *1 BEESFTT TUPQT SFTQPOEJOH UP QJOHT Enable: Check to enable Watchdog. Update Time Enter the interval to ping the entered address. Interval: Watchdog Enter the IP address of a device that can respond Response IP: back to the access point.
Section 3 - Configuration Status Device Info This page displays the current information for the DAP-1560. It will display the LAN and wireless LAN information. General: Displays the access point’s time and firmware version. LAN: Displays the MAC address and the private (local) IP settings for the access point. Wireless LAN: Displays the wireless MAC address and your wireless settings such as SSID and Channel.
Section 3 - Configuration Logs The access point automatically logs (records) events of possible interest in its internal memory. If there isn’t enough internal memory GPS BMM FWFOUT MPHT PG PMEFS FWFOUT BSF EFMFUFE CVU MPHT PG UIF MBUFTU FWFOUT BSF SFUBJOFE 5IF -PHT PQUJPO BMMPXT ZPV UP WJFX UIF access point logs. You can define what types of events you want to view and the level of the events to view.
Section 3 - Configuration Statistics The Statistics page displays all of the LAN (Ethernet port) and Wireless packets transmit and receive statistics. Sent: The total number of packets sent from the access point. Received: The total number of packets received by the access point. TX Packets Displays the number of packets that were dropped Dropped: XIJMF TFOEJOH EVF UP FSSPST DPMMJTJPOT PS BDDFTT point resource limitations.
Section 3 - Configuration Wireless The wireless section allows you to view the wireless clients that are connected to your wireless access point. Connection TIme: Displays the amount of time the wireless client has been connected to the access point. MAC Address: Displays the MAC address of the wireless client.
Section 3 - Configuration Help D-Link DAP-1560 User Manual 43
Section 3 - Configuration Configuration (Bridge Mode) This section will show you how to configure your new D-Link wireless access point using the web-based configuration utility. Web-based Configuration Utility 0O UIF CBDL PG UIF %"1 TMJEF UIF NPEF TFMFDUPS to the right (Bridge Mode). 5P BDDFTT UIF DPOGJHVSBUJPO VUJMJUZ PQFO B XFC CSPXTFS TVDI BT *OUFSOFU &YQMPSFS BOE FOUFS dlinkap or 192.168.0.50 in the address field. 3. Enter admin and then enter your password.
Section 3 - Configuration Setup Wizard This wizard is designed to assist you in configuring the wireless settings for your bridge. It will guide you through step-by-step instructions on how to setup your wireless network. Click Launch Wireless Setup Wizard Enter the Device Name of the AP and click Next to continue. It is recommended to change the Device Name if there is more than one D-Link device within the subnet.
Section 3 - Configuration *G ZPV XBOU UP DIBOHF UIF BENJO BDDPVOU QBTTXPSE enter a new password and click Next. Select Auto configuration if you want to use Wi-Fi Protected Setup. *G ZPV XBOU UP TFU VQ ZPVS OFUXPSL NBOVBMMZ TLJQ UP QBHF 48. Click Next to continue.
Section 3 - Configuration Select PIN to connect your wireless device with WPS. For PBC DPOöHVSBUJPO TLJQ UP UIF OFYU QBHF Enter the PIN number used into you access point and click Connect. Start WPS on the wireless device you are adding to you wireless network to complete the setup.
Section 3 - Configuration Select PBC to use the Push Button Configuration to connect to your network. Click Connect to continue. Press down the WPS Button on the wireless device you are adding to your network to complete the setup. Select Manual configuration to set up your network manually. Click Next to continue.
Section 3 - Configuration Enter the Wireless Network Name of the AP or click the Site Survey button to find the AP. Click Next to continue.
Section 3 - Configuration If you clicked on Site Survey UIF GPMMPXJOH TDSFFO XJMM be displayed. Find your access point from the list and click Connect to complete the Setup Wizard. Choose which Security Mode you want to use and click Next to continue.
Section 3 - Configuration If you choose WEP FOUFS UIF XJSFMFTT TFDVSJUZ QBTTXPSE and click Next to complete the Setup Wizard. If you choose WPA FOUFS UIF WPA Personal Passphrase and click Next to complete the Setup Wizard. *G ZPV DIPPTF 81" FOUFS UIF 81" 1FSTPOBM 1BTTQISBTF and click Next to complete the Setup Wizard.
Section 3 - Configuration The following screen opens to indicate that you have successfully saved your new settings.
Section 3 - Configuration Wireless Wireless Mode: Wireless Client will be displayed. Site Survey: Click to display available wireless networks within range of the DAP-1560. Select the network you want to connect to and enter any security settings required. Wireless Type: Select Infrastructure if connecting to a wireless router or access point (most common) or Ad-Hoc if connecting directly to another wireless client in Ad-Hoc mode.
Section 3 - Configuration Security Mode: Refer to page 68 for more information regarding wireless security. Enable: Enable the Wi-Fi Protected Setup feature. Wireless MAC Cloning Enabling this option allows the user to manually assign the source MAC address to packets forwarded by the DAP-1560. If OPU NBOVBMMZ BTTJHOFE UIF QBDLFU T TPVSDF ."$ BEESFTT öFME XJMM CF BVUPNBUJDBMMZ TFMFDUFE BT UIF %"1 T .
Section 3 - Configuration Network Settings Static This section will allow you to change the local network settings of the bridge and to configure the Static settings. LAN Connection Use the drop-down menu to select Static IP if you Type: XBOU UP NBOVBMMZ BTTJHO UIF *1 BEESFTT TVCOFU NBTL BOE HBUFXBZ BEESFTTFT 4FMFDU Dynamic IP (DHCP) to automatically receive an IP address from your DHCP server or router. Access Point IP Enter the IP address you want to assign the bridge.
Section 3 - Configuration DHCP LAN Connection Select DHCP to automatically obtain an IP address Type: PO UIF -"/ QSJWBUF OFUXPSL Device Name: Enter the Device Name of the AP and click Next to continue. It is recommended to change the Device Name if there is more than one D-Link device within the subnet.
Section 3 - Configuration Advanced Advanced Wireless Transmit Power: Set the transmit power of the antennas. RTS Threshold: This value should remain at its default setting of *G JODPOTJTUFOU EBUB øPX JT B QSPCMFN POMZ B minor modification should be made. Fragmentation 5IF GSBHNFOUBUJPO UISFTIPME XIJDI JT TQFDJöFE Threshold: JO CZUFT EFUFSNJOFT XIFUIFS QBDLFUT XJMM CF GSBHNFOUFE 1BDLFUT FYDFFEJOH UIF CZUF setting will be fragmented before transmission.
Section 3 - Configuration Maintenance Admin 5IJT QBHF XJMM BMMPX ZPV UP DIBOHF UIF "ENJOJTUSBUPS QBTTXPSE "ENJO IBT SFBE XSJUF BDDFTT Password: Enter a new password for the Administrator Login Name. The administrator can make changes to the settings.
Section 3 - Configuration System Save Settings To Use this option to save the current access point Local Hard Drive: configuration settings to a file on the hard disk PG UIF DPNQVUFS ZPV BSF VTJOH 'JSTU DMJDL UIF Save CVUUPO :PV XJMM UIFO TFF B öMF EJBMPH XIFSF you can select a location and file name for the settings.
Section 3 - Configuration Firmware You can upgrade the firmware of the access point here. Make sure the firmware you want to use is on the local hard drive of the computer. Click on Browse to locate the firmware file to be used for the update. Please check the D-Link support site GPS öSNXBSF VQEBUFT BU IUUQ TVQQPSU EMJOL DPN :PV DBO EPXOMPBE öSNXBSF VQHSBEFT UP ZPVS IBSE ESJWF GSPN UIF % -JOL support site.
Section 3 - Configuration *G ZPV MPBE B MBOHVBHF QBDL BOE XPVME MJLF UP HP CBDL UP &OHMJTI DMJDL Maintenance > System and click on Clear OFYU UP Clear Language Pack.
Section 3 - Configuration Time 5IF 5JNF $POöHVSBUJPO PQUJPO BMMPXT ZPV UP DPOöHVSF VQEBUF BOE NBJOUBJO UIF DPSSFDU UJNF PO UIF JOUFSOBM TZTUFN DMPDL From this section you can set the time zone that you are in. Daylight Saving can also be configured to automatically adjust the time when needed. Time Zone: Select the Time Zone from the drop-down menu.
Section 3 - Configuration Watchdog 5IF 8BUDIEPH GFBUVSF QJOHT B TQFDJöD *1 BEESFTT *G UIF *1 BEESFTT TUPQT SFTQPOEJOH UP QJOHT ZPVS BDDFTT QPJOU XJMM CF SFCPPUFE :PV DBO BMTP TFMFDU BO PQUJPO UP IBWF UIF TFOE BO FNBJM BMFSU JG UIF TQFDJöFE *1 BEESFTT TUPQT SFTQPOEJOH UP QJOHT Enable: Check to enable Watchdog. Update Time Enter the interval to ping the entered address. Interval: Watchdog Enter the IP address of a device that can respond Response IP: back to the access point.
Section 3 - Configuration Status Device Info This page displays the current information for the DAP-1560. It will display the LAN and wireless LAN information. General: Displays the DAP-1560’s time and firmware version. LAN: Displays the MAC address and the private (local) IP settings for the access point. Wireless LAN: Displays the wireless MAC address and your wireless settings such as SSID and Channel.
Section 3 - Configuration Logs The access point automatically logs (records) events of possible interest in its internal memory. If there isn’t enough internal NFNPSZ GPS BMM FWFOUT MPHT PG PMEFS FWFOUT BSF EFMFUFE CVU MPHT PG UIF MBUFTU FWFOUT BSF SFUBJOFE 5IF -PHT PQUJPO BMMPXT ZPV to view the access point logs. You can define what types of events you want to view and the level of the events to view.
Section 3 - Configuration Statistics The Statistics page displays all of the LAN and Wireless packets transmit and receive statistics. Sent: The total number of packets sent from the bridge. Received: The total number of packets received by the bridge. TX Packets Displays the number of packets that were dropped Dropped: XIJMF TFOEJOH EVF UP FSSPST DPMMJTJPOT PS BDDFTT QPJOU resource limitations.
Section 3 - Configuration Help D-Link DAP-1560 User Manual 67
Section 4 - Security Wireless Security This section will show you the different levels of security you can use to protect your data from intruders. The DAP-1560 offers the following types of security: t 81" 8J 'J 1SPUFDUFE "DDFTT t 81" 8J 'J 1SPUFDUFE "DDFTT t 8&1 8JSFE &RVJWBMFOU 1SJWBDZ t 81" 14, 1SF 4IBSFE ,FZ t 81" 14, 1SF 4IBSFE ,FZ What is WEP? WEP stands for Wired Equivalent Privacy. It is based on the IEEE 802.11 standard and uses the RC4 encryption algorithm.
Section 4 - Security What is WPA? 81" PS 8J 'J 1SPUFDUFE "DDFTT JT B 8J 'J TUBOEBSE UIBU XBT EFTJHOFE UP JNQSPWF UIF TFDVSJUZ GFBUVSFT PG 8&1 8JSFE &RVJWBMFOU Privacy). The 2 major improvements over WEP: t *NQSPWFE EBUB FODSZQUJPO UISPVHI UIF 5FNQPSBM ,FZ *OUFHSJUZ 1SPUPDPM 5,*1 5,*1 TDSBNCMFT UIF LFZT VTJOH B IBTIJOH BMHPSJUIN BOE CZ BEEJOH BO JOUFHSJUZ DIFDLJOH GFBUVSF FOTVSFT UIBU UIF LFZT IBWFO U CFFO UBNQFSFE with. WPA2 is based on 802.
Section 4 - Security Configure WEP in AP Mode It is recommended to enable encryption on your wireless access point before your wireless network adapters. Please establish wireless connectivity before enabling encryption. Your wireless signal may degrade when enabling encryption due to the added overhead. 1. Log into the web-based configuration by opening a web browser and entering the IP address of the access point (192.168.0.50). Click on Setup and then click Wireless Settings on the left side.
Section 4 - Security Configure WPA-Personal (AP Mode) It is recommended to enable encryption on your wireless access point before your wireless network adapters. Please establish wireless connectivity before enabling encryption. Your wireless signal may degrade when enabling encryption due to the added overhead. 1. Log into the web-based configuration by opening a web browser and entering the IP address of the access point (192.168.0.50). Click on Setup and then click Wireless Settings on the left side.
Section 4 - Security Configure WPA-Enterprise (AP Mode) It is recommended to enable encryption on your wireless access point before your wireless network adapters. Please establish wireless connectivity before enabling encryption. Your wireless signal may degrade when enabling encryption due to the added overhead. 1. Log into the web-based configuration by opening a web browser and entering the IP address of the access point (192.168.0.50). Click on Setup and then click Wireless Settings on the left side.
Section 4 - Security Configure WEP (Bridge Mode) It is recommended to enable encryption on your wireless access point before your wireless network adapters. Please establish wireless connectivity before enabling encryption. Your wireless signal may degrade when enabling encryption due to the added overhead. 1. Log into the web-based configuration by opening a web browser and entering the IP address of the bridge (192.168.0.50). Click on Setup and then click Wireless Settings. 2.
Section 4 - Security Configure WPA-Personal (Bridge Mode) It is recommended to enable encryption on your wireless access point before your wireless network adapters. Please establish wireless connectivity before enabling encryption. Your wireless signal may degrade when enabling encryption due to the added overhead. 1. Log into the web-based configuration by opening a web browser and entering the IP address of the bridge (192.168.0.50). Click on Setup and then click Wireless Settings on the left side.
Section 4 - Security Connect to a Wireless Network Using Windows® 7 *U JT SFDPNNFOEFE UP FOBCMF XJSFMFTT TFDVSJUZ 81" 81" PO ZPVS XJSFMFTT SPVUFS PS BDDFTT QPJOU CFGPSF DPOöHVSJOH ZPVS XJSFMFTT BEBQUFS *G ZPV BSF KPJOJOH BO FYJTUJOH OFUXPSL ZPV XJMM OFFE UP LOPX UIF TFDVSJUZ LFZ PS QBTTQISBTF CFJOH VTFE 1. Click on the wireless icon in your system tray (lower-right corner). Wireless Icon 2. The utility will display any available wireless networks in your area.
Section 4 - Security 3. Highlight the wireless network (SSID) you would like to connect to and click the Connect button. *G ZPV HFU B HPPE TJHOBM CVU DBOOPU BDDFTT UIF *OUFSOFU DIFDL ZPVS 5$1 *1 TFUUJOHT GPS ZPVS XJSFMFTT BEBQUFS 3FGFS UP UIF /FUXPSLJOH Basics section in this manual for more information. 4. The following window appears while your computer tries to connect to the router.
Section 4 - Security 5. Enter the same security key or passphrase that is on your router and click Connect. You can also connect by pushing the WPS button on the router. It may take 20-30 seconds to connect to the wireless network. If the DPOOFDUJPO GBJMT QMFBTF WFSJGZ UIBU UIF TFDVSJUZ TFUUJOHT BSF DPSSFDU 5IF LFZ PS QBTTQISBTF NVTU CF FYBDUMZ UIF TBNF BT PO UIF XJSFMFTT router.
Section 4 - Security Configure WPS The WPS feature of the DAP-1560 can be configured using Windows® 7. Carry out the following steps to use Windows® 7 to configure the WPS feature of the DAP-1560: 1. Click the Start button and select Computer from the Start menu. 2. Click the Network option.
Section 4 - Security 3. Double-click the DAP-1560. 4. Input the WPS PIN number (displayed in the WPS window on the Router’s LCD screen or in the Setup > Wireless Setup menu in the Router’s Web UI) and click Next.
Section 4 - Security 5. Type a name to identify the network. 5P DPOöHVSF BEWBODFE TFUUJOHT DMJDL UIF JDPO Click Next to continue.
Section 4 - Security 7. The following window appears while the Router is being configured. Wait for the configuration to complete. 8. The following window informs you that WPS on the DAP-1560 has been setup successfully. Make a note of the security key as you may need to provide this security key if adding an older wireless device to the network in the future. 9. Click Close to complete WPS setup.